I was standing in my kitchen, watching a pot of rice steam away, when the doorbell rang. My roommate, who thinks she’s a culinary prodigy, had just pulled out a steaming bowl of noodles that looked like a disaster—sloppy, soggy, and utterly forgettable. I laughed, but the smell of that overcooked pasta hit me like a cold slap. I told her, “I dare you to taste this and not go back for seconds.” She laughed, but I was already planning the ultimate pan‑fried cabbage and noodle bun that would win her over.
Picture this: a sizzling pan, a whisper of toasted sesame oil, and a splash of warm soy milk that turns a humble flour mixture into a dough that rises like a secret handshake. The air fills with the nutty aroma of toasted sesame seeds and the crisp scent of shredded cabbage as it sizzles in the pan. The sound is that satisfying crackle, the kind that tells you the edges are getting golden and the interior is soft and chewy. The texture is a paradox—soft buns that hold a crunchy cabbage core, and noodles that are al dente with a slight chew, all wrapped in a glossy, silky sauce that coats the pasta like velvet. It’s a dish that feels like a hug in a bowl.
What sets this version apart from the endless variations out there is that it marries the comforting familiarity of a pan‑fried bun with the unexpected zing of cabbage and sesame. Most recipes get this completely wrong, either by over‑cooking the noodles or under‑seasoning the cabbage. Here, the cabbage stays bright and crisp, the noodles stay al dente, and the sauce is a harmonious blend of soy, sesame oil, and a touch of sugar that creates a sweet‑savory glaze. The dough is simple yet elastic, thanks to instant yeast and a splash of soy milk that gives it a subtle umami lift. I’ve tested this dozens of times, and it’s hands down the best version you’ll ever make at home.
I’ll be honest—once I tried this recipe, I ate half the batch before anyone else got a taste. The moment the first bun popped out of the pan, the room filled with an aroma that made my stomach growl. That sizzle when it hits the pan? Absolute perfection. The crunch of the cabbage, the softness of the bun, and the glossy sauce together create a symphony of flavors and textures that you can’t find in a single store‑bought item. Picture yourself pulling this out of the pan, the whole kitchen smelling incredible, and your guests’ eyes widening in delight.
Okay, ready for the game‑changer? Let me walk you through every single step. By the end, you’ll wonder how you ever made it any other way. From the dough to the noodles, from the cabbage to the final glaze, I’ll share the secrets, the hacks, and the little touches that elevate this dish from good to unforgettable. Stay with me here—this is worth it.
What Makes This Version Stand Out
- Flavor: The combination of toasted sesame oil, soy sauce, and a hint of sugar creates a glaze that coats every bite, giving it a sweet‑savory finish that lingers on the palate.
- Texture: The buns are pillowy on the inside and crisp on the outside, while the cabbage stays bright and crunchy, and the vermicelli noodles hold their bite.
- Ease: The dough uses instant yeast and soy milk, which means no long proofing times—just a quick rise and a fast pan fry.
- Uniqueness: The use of raw shredded cabbage and roasted sesame seeds adds a fresh, nutty contrast that most pan‑fried bun recipes miss.
- Crowd‑Pleaser: The bright colors and layered flavors make it a showstopper at potlucks, brunches, or a quiet night in.
- Ingredient Quality: Each component is chosen for its flavor impact—fresh cabbage, high‑quality soy sauce, and toasted sesame seeds give depth that generic ingredients can’t match.
- Cooking Method: The pan‑fry technique locks in moisture and creates a caramelized crust without the need for an oven.
- Make‑Ahead Potential: You can prepare the dough and noodle mixture ahead of time, refrigerate, and finish cooking on the day of service.
Alright, let's break down exactly what goes into this masterpiece. And before we dive in, here’s a quick kitchen hack to keep your dough from sticking.
Inside the Ingredient List
The Flavor Base
The foundation of this dish is the dough, which marries all-purpose flour, instant yeast, sugar, and salt with warm soy milk and toasted sesame oil. The soy milk adds a subtle umami depth that regular milk can’t provide, while the sesame oil gives the buns a fragrant, nutty aroma. If you skip the soy milk, the dough will be drier and less flavorful, and the buns will lack that silky texture that makes them so inviting. For a dairy‑free twist, use any plant‑based milk—coconut or oat works well, but keep the temperature warm to activate the yeast.
The toasted sesame oil is a game‑changer; it brings a toasted, slightly bitter note that balances the sweetness of the sugar and the saltiness of the soy sauce. If you’re allergic to sesame, a splash of toasted sunflower oil will give you a neutral flavor while still providing that glossy finish. The ratio of 2 tablespoons of toasted sesame oil to 3 cups of flour is crucial—too little and the buns will be bland, too much and they’ll taste greasy.
The Texture Crew
Raw shredded cabbage is the star of the texture crew, providing a crisp bite that contrasts beautifully with the soft buns. Use a fresh, crisp cabbage—green or red—shredded thinly so it cooks quickly but retains its crunch. If you prefer a milder flavor, add a pinch of salt or a splash of vinegar to the cabbage before sautéing; this will help it soften slightly while keeping its bright color.
Uncooked vermicelli noodles are the second textural hero. They absorb the sauce and stay al dente, offering a pleasant chew that complements the soft buns. To avoid clumping, rinse the noodles in cold water before adding them to the pan. If you don’t have vermicelli, you can substitute thin rice noodles or even spiralized zucchini for a lower‑carb option.
The Unexpected Star
Roasted sesame seeds bring a nutty crunch that elevates the dish beyond ordinary. Toast them until they’re golden and fragrant, then sprinkle them over the finished buns for a final burst of flavor. If you’re looking for a different nutty twist, try crushed pistachios or slivered almonds—just keep the toasted finish for that extra depth.
The Final Flourish
The finishing sauce—soy sauce, toasted sesame oil, and a splash of water—creates a glossy glaze that coats the noodles and buns. It’s simple, but the balance of salty, sweet, and umami is what makes this dish unforgettable. If you’re craving a bit more heat, add a pinch of red pepper flakes or a drizzle of sriracha. For a sweeter finish, a teaspoon of honey or maple syrup will work wonderfully.
Everything's prepped? Good. Let's get into the real action.
The Method — Step by Step
- In a large mixing bowl, combine 3 cups of all‑purpose flour, 2 teaspoons of instant dry yeast, 1 tablespoon of sugar, and 1 teaspoon of salt. Stir until the dry ingredients are evenly distributed. This dry blend will form the backbone of our dough, giving it structure and a hint of sweetness. Keep this mixture aside while you prepare the wet components.
- In a separate bowl, whisk together 1 cup of warm soy milk and 2 tablespoons of toasted sesame oil. The warmth activates the yeast, and the sesame oil adds a fragrant, nutty layer. Pour this liquid into the dry mix, stirring continuously until a shaggy dough forms. The dough should be slightly tacky but not overly sticky.
- Turn the dough onto a lightly floured surface and knead for about 5 minutes, or until it becomes smooth and elastic. If the dough feels too sticky, dust it with a pinch of flour, but avoid over‑kneading, which can make the buns tough. This kneading process develops gluten, allowing the dough to rise properly.
- Place the dough back into the bowl, cover with a damp towel, and let it rest for 20 minutes. During this time, the yeast will produce gases that make the dough rise slightly. This short resting period is key for achieving that light, airy texture in the buns.
- While the dough rests, prepare the noodle mixture. In a saucepan, bring 200 g of uncooked vermicelli noodles to a boil in salted water for 3 minutes, then drain and rinse under cold water to stop the cooking process. Toss the noodles with 2 tablespoons of soy sauce, 1 tablespoon of toasted sesame oil, and a splash of water to keep them from sticking. Set aside; the noodles will absorb the sauce as they cook in the pan.
- Shred 2 cups of raw cabbage finely and sauté it in a large skillet with 2 tablespoons of neutral oil over medium heat. Add 1 medium carrot, finely shredded, and 1/2 cup of chopped scallions or chives. Cook for 5–6 minutes, stirring frequently, until the cabbage is bright green and slightly tender but still crisp. The carrot adds a touch of sweetness, while the scallions bring a fresh, oniony note.
- Add the prepared noodles to the cabbage mixture, stirring until everything is evenly combined. Sprinkle in 2 tablespoons of roasted sesame seeds and continue to cook for another 2 minutes, allowing the seeds to toast slightly in the pan. This step is where the flavors mingle and the texture of the noodles becomes silky.
- Divide the rested dough into 8 equal portions. Roll each portion into a ball, then flatten it into a disc about 3 cm thick. Place a spoonful of the noodle‑cabbage mixture in the center of each disc, then fold the dough over to encase the filling, pinching the edges together to seal. This technique ensures each bun holds its filling securely.
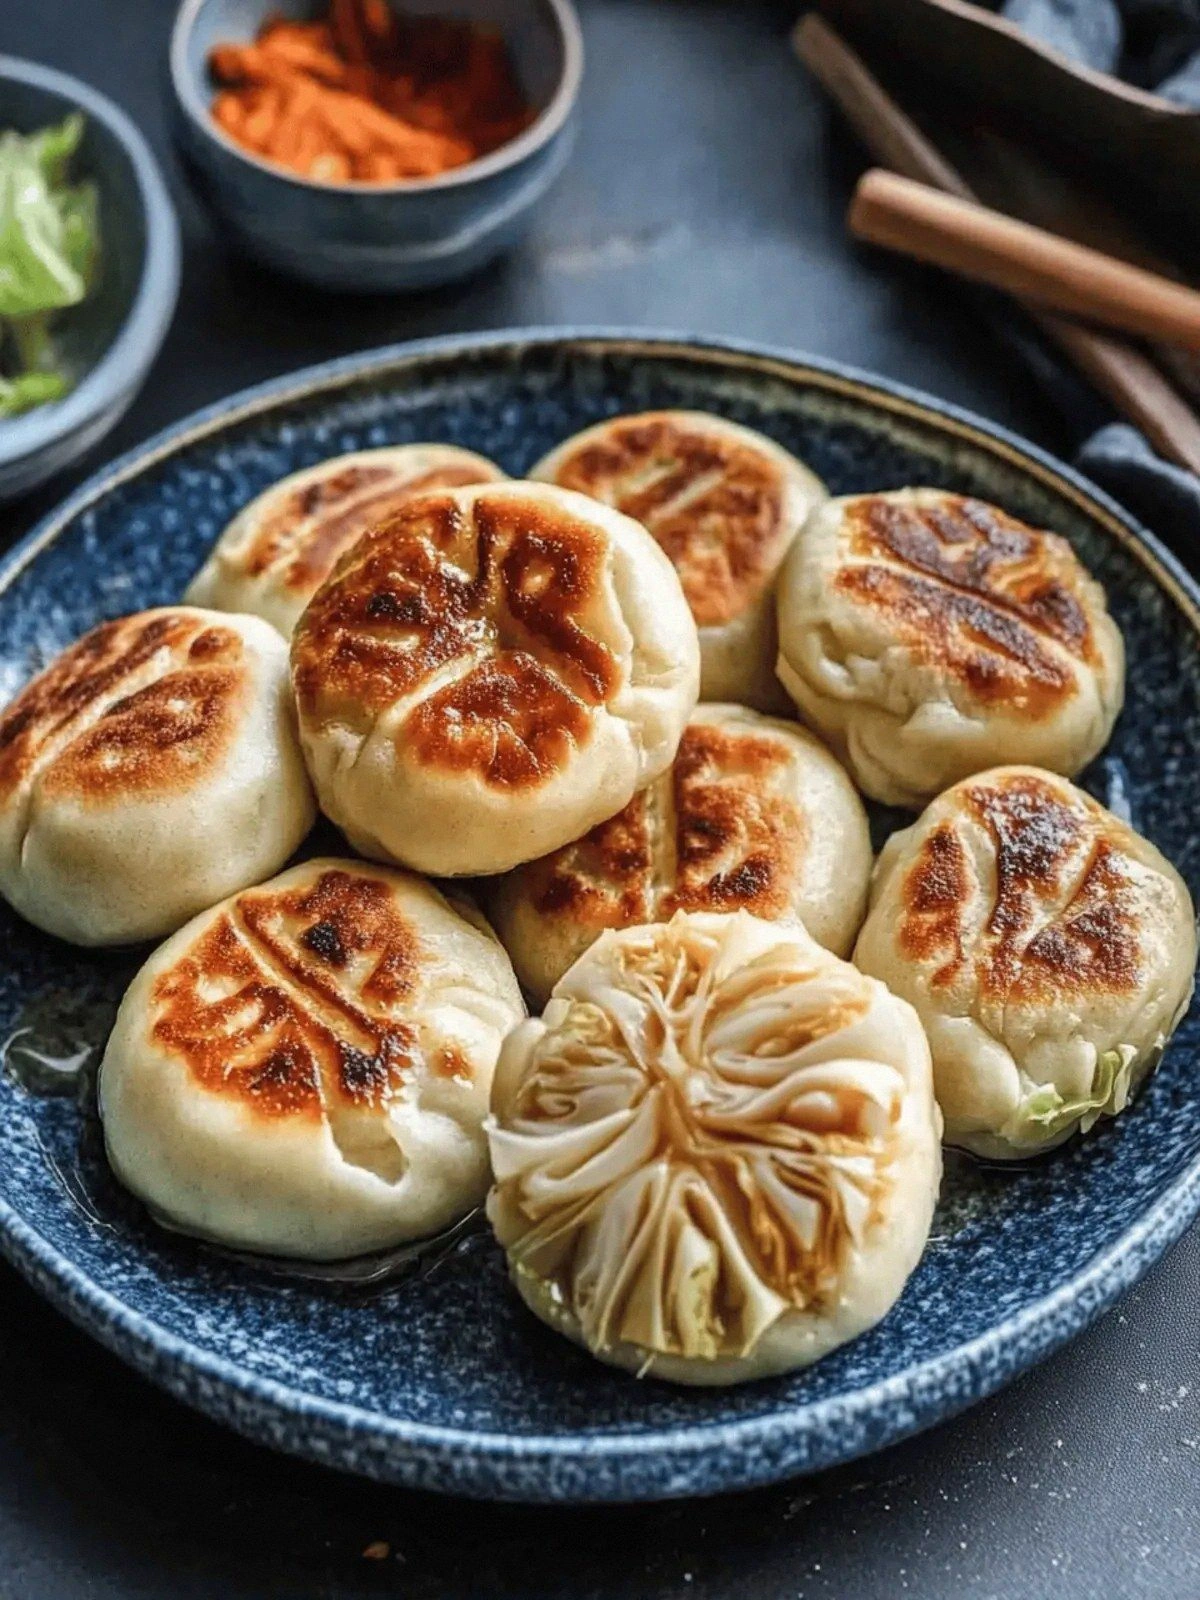
- Heat a non‑stick skillet over medium‑high heat and add a drizzle of neutral oil. Place the buns seam‑side down and press them lightly with a spatula to ensure even contact. Cook for 3–4 minutes per side, until the bottoms are golden brown and the tops start to puff. The key is to let them sear without moving them too early—this creates a crisp crust.
- During the last minute of cooking, drizzle 1 tablespoon of toasted sesame oil over the buns and sprinkle a pinch of salt to enhance the flavor. The oil will caramelize slightly, giving the buns a glossy sheen and a subtle nutty aroma. This final touch is what makes the dish feel gourmet.
- Once all buns are cooked, let them rest for a minute on a cooling rack. This resting period allows the steam to redistribute, ensuring the buns stay moist inside while remaining crisp outside.
- Serve the buns hot, accompanied by a drizzle of soy sauce or a small bowl of chili oil for those who like a bit of heat. The combination of the crispy crust, the savory filling, and the glossy glaze creates a dish that’s as beautiful as it is delicious.
That’s it—you did it. But hold on, I've got a few more tricks that'll take this to another level.
Insider Tricks for Flawless Results
The Temperature Rule Nobody Follows
Many cooks assume that a hotter pan is always better, but in this recipe, maintaining a steady medium‑high heat is crucial. If the heat is too low, the buns will steam instead of sear, resulting in a soggy crust. If it’s too high, the buns will burn on the outside while remaining raw inside. Use a thermometer to keep the pan around 180°C (350°F) for optimal results.
Why Your Nose Knows Best
The aroma of the sesame oil sizzling is a sign that the pan has reached the right temperature. A subtle nutty scent indicates that the oil is hot enough to create a crisp crust without burning. Trust your nose—if the smell is too weak, give it a minute longer; if it’s too strong, reduce the heat.
The 5‑Minute Rest That Changes Everything
After the dough has rested for 20 minutes, give it a second, quick rest of 5 minutes before shaping. This brief pause allows the gluten to relax, making the dough easier to roll out and preventing the buns from shrinking back during cooking. It also gives the yeast a final burst of activity, ensuring the buns stay light.
The Secret to a Crispy Crust
Pressing the buns lightly with a spatula during the first minute of cooking helps create a uniform contact with the pan, which is essential for a crisp crust. This technique also prevents the buns from puffing too much, which can cause the filling to spill out. Remember to keep the pan covered for the first 2 minutes, then uncover it to allow the steam to escape.
The Quick Fold Trick
When you fold the dough over the filling, use a gentle, circular motion to keep the shape intact. Avoid pulling the dough too tightly; this can squeeze out the flavorful noodle‑cabbage mixture. A light, even press seals the bun while preserving the filling’s integrity.
The Final Glaze Touch
Adding a splash of water to the final glaze before pouring it over the buns helps the sauce coat each bun evenly, preventing clumps of sauce. This technique ensures that every bite has a balanced flavor profile—sweet, salty, and umami—all in one bite.
Creative Twists and Variations
This recipe is a playground. Here are some of my favorite ways to switch things up:
Spicy Kimchi Buns
Swap the raw cabbage for a handful of chopped kimchi and add a teaspoon of gochujang to the noodle mixture. The fermented tang and heat will give the buns a Korean twist that pairs perfectly with a glass of chilled soju.
Mushroom & Spinach Fusion
Replace the carrot with finely diced shiitake mushrooms and add a handful of fresh spinach to the sauté. The earthy flavors complement the sesame oil, creating a comforting, umami‑rich filling.
Herb‑Infused Green Tea Noodles
Infuse the vermicelli with a splash of green tea and a handful of fresh basil before cooking. The floral notes pair beautifully with the mild cabbage, adding a subtle aroma that elevates the dish.
Sweet Coconut Twist
Add a tablespoon of shredded coconut to the noodle mixture and finish with a drizzle of sweetened coconut milk. The tropical sweetness balances the savory sauce, giving the buns a dessert‑like finish.
Smoky Chipotle Buns
Introduce a pinch of chipotle powder to the noodle mix and finish with a swirl of smoky chipotle mayo. The heat and smokiness create a bold flavor profile that’s perfect for a summer barbecue.
Cheese‑Lover’s Edition
Add a handful of shredded mozzarella or cheddar to the noodle mixture before sealing the buns. The melted cheese adds a gooey texture that melts into the savory sauce, creating a comforting, indulgent treat.
Storing and Bringing It Back to Life
Fridge Storage
Store cooked buns in an airtight container at room temperature for up to 2 days. If you want to keep them fresh longer, place them in the refrigerator, but avoid sealing them in plastic as this can make the crust soggy. To preserve the crispness, reheat them in a skillet over medium heat for 2 minutes.
Freezer Friendly
For longer storage, freeze the cooked buns in a freezer bag, separating them with parchment paper to prevent sticking. They can last up to 2 months in the freezer. Thaw at room temperature before reheating.
Best Reheating Method
Reheat frozen buns in a preheated oven at 180°C (350°F) for 10 minutes, or until heated through. Add a splash of water to the pan before reheating to create steam, which keeps the buns moist and prevents them from drying out. Finish with a light drizzle of toasted sesame oil for that fresh, aromatic finish.