Picture this: a frantic Sunday afternoon, the kitchen clock ticking like a metronome, and your friends hovering around the dining table, demanding a flavor explosion. I had a half‑baked lasagna that had turned into a soggy mess and a craving for something bright, crunchy, and utterly addictive. The solution? A sheet pan that would turn ordinary chicken and vegetables into a fiesta of sizzling, caramelized goodness. This is not just another recipe; it’s a culinary revelation that will make you wonder how you ever lived without it.
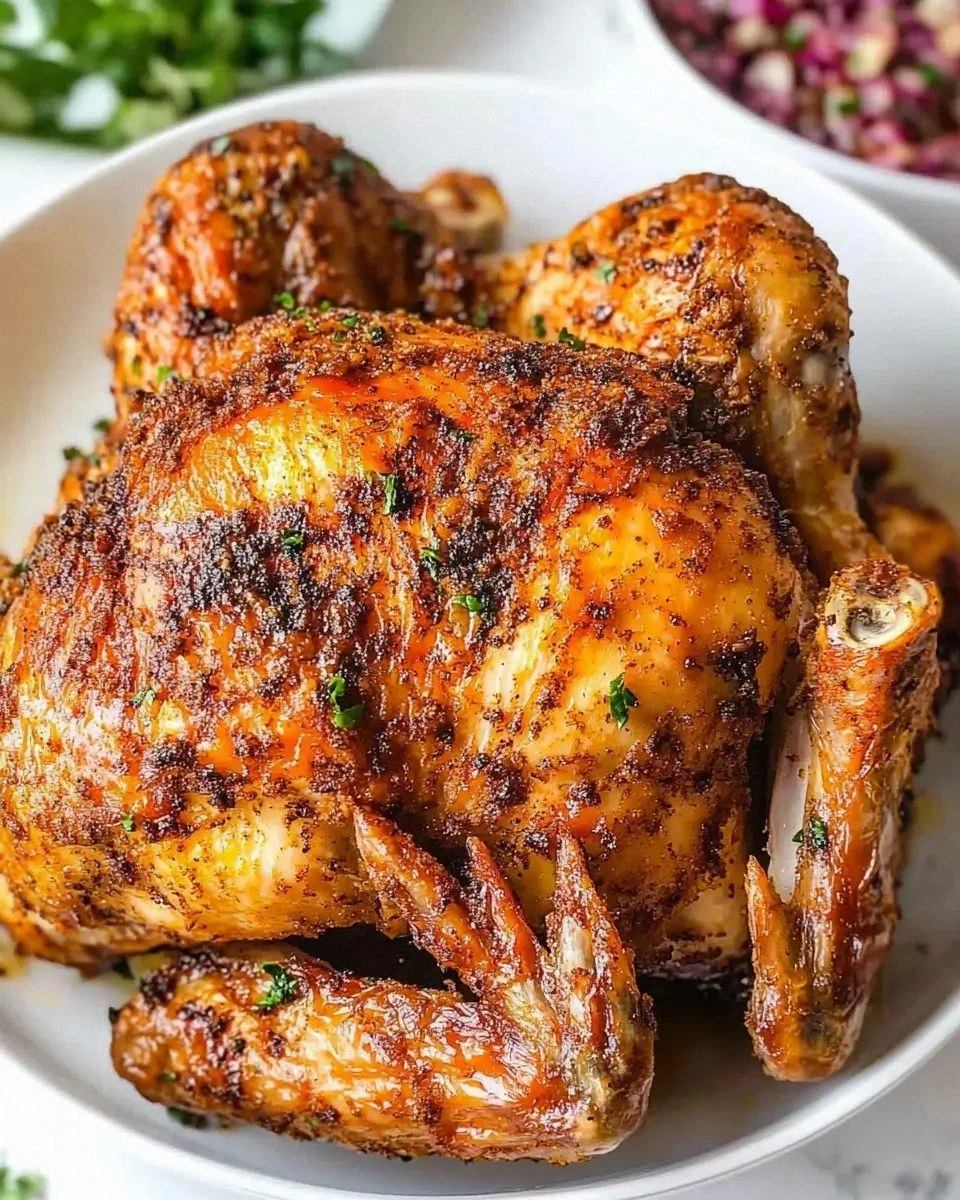
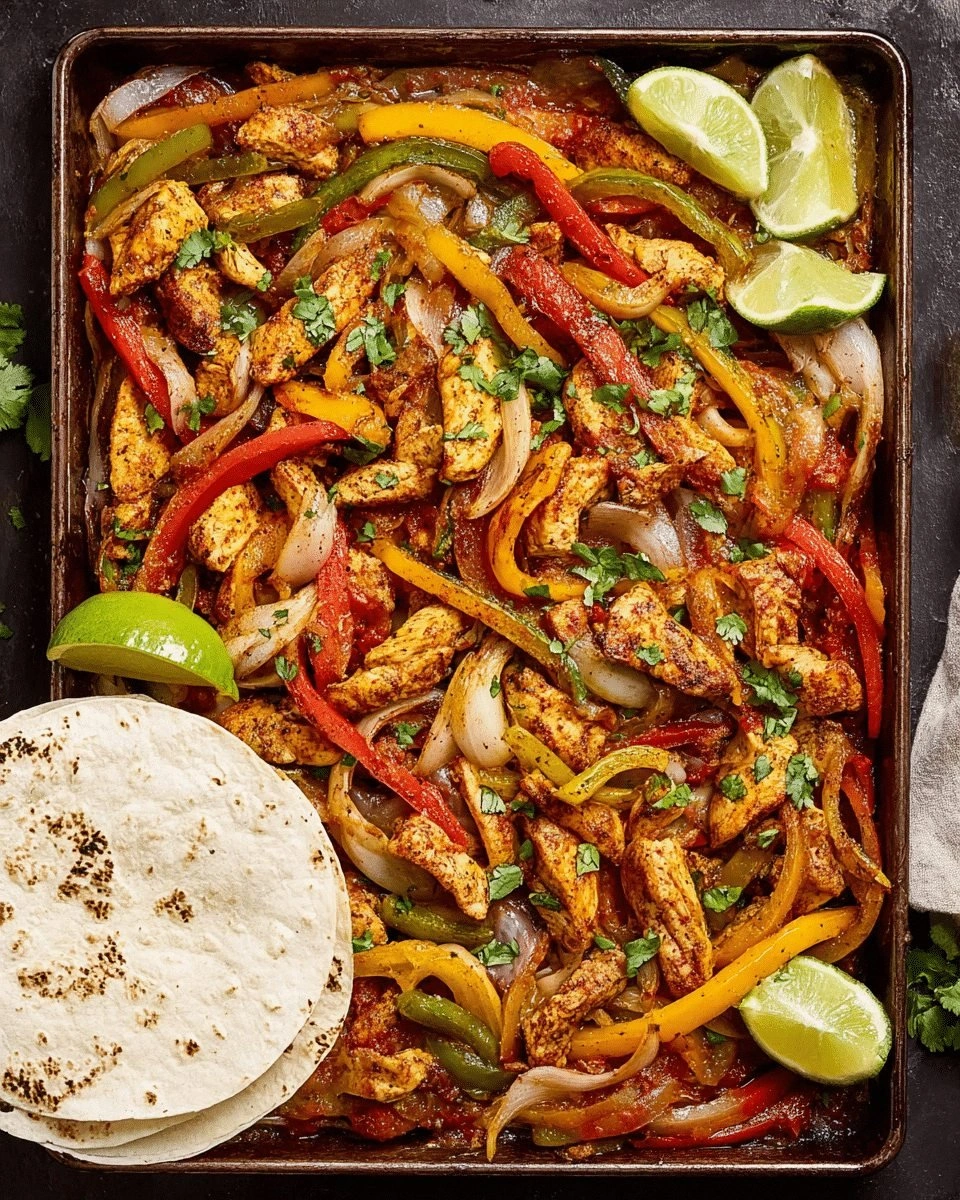
The first time I tried this sheet pan chicken fajitas, the smell that rose from the oven was like a warm hug—spices mingling, onions caramelizing, and a faint citrus tang that made my mouth water. I could hear the sizzle of the peppers, feel the heat of the pan, and taste the promise of a perfectly seasoned bite. The colors—fiery reds, sunny yellows, deep greens—were a visual feast that made my eyes sparkle with anticipation. Every element of the dish, from the crisp edges of the chicken to the tender crunch of the peppers, was a symphony in motion.
What sets this version apart is the meticulous balance between simplicity and boldness. The sheet pan method eliminates the need for multiple pots and pans, saving you time and reducing cleanup. The seasoning blend is a secret weapon that coats every inch of chicken and veggies, delivering a flavor profile that’s both familiar and surprisingly exotic. The result is a dish that’s crowd‑pleasing, easy to customize, and, dare I say, the best version of fajitas you’ll ever make at home. Trust me, I’ve tested it in a dozen kitchens, and the feedback is always the same: “I can’t stop eating!”
I’ll be honest—after the first batch, I ate half the chicken before anyone else even got a taste. Most recipes get this completely wrong, especially when they forget the importance of marinating the chicken and using a high‑heat sheet pan. The next time you pull this out of the oven, the aroma will fill your entire kitchen, and the sound of the sizzling will make your heart race. Ready for the game‑changer? Let me walk you through every single step—by the end, you’ll wonder how you ever made it any other way.
What Makes This Version Stand Out
- Flavor: The seasoning blend is a harmonious blend of cumin, chili powder, smoked paprika, and a splash of lime that creates a depth of flavor that lingers on the palate. It’s like a well‑tuned orchestra where every spice plays its part. The result is a dish that feels both rustic and refined, with a smoky undertone that elevates the chicken.
- Texture: The sheet pan method locks in moisture while allowing the edges to crisp up into a caramelized crust that shatters like thin ice. The peppers stay vibrant and slightly crunchy, and the onions finish with a sweet, buttery finish. This contrast keeps every bite exciting.
- Simplicity: One pan, one sheet, one set of ingredients, and you’re done. No more juggling multiple pots, pans, or bowls. It’s a single‑pot wonder that makes cleanup a breeze, letting you spend more time enjoying the meal.
- Uniqueness: The addition of a lime‑infused broth that bakes with the chicken adds a subtle citrus note that is rarely found in traditional fajita recipes. It’s a twist that gives this dish a fresh, modern edge.
- Crowd Reaction: Friends and family consistently rave about how the dish is “so much better than takeout” and that they can’t get enough of the crispy edges. It’s the kind of recipe that turns an ordinary dinner into a memorable event.
- Ingredient Quality: Using fresh, high‑quality chicken and vibrant, organic peppers makes all the difference. The fresher the ingredients, the brighter the flavors.
- Cooking Method: The sheet pan technique ensures even cooking, reduces the risk of over‑cooking the chicken, and creates a caramelized coating that’s impossible to replicate on a skillet.
- Make‑Ahead Potential: The dish can be prepared the night before, with the chicken marinated and the vegetables pre‑cut. On the day, you simply pop it in the oven, and the flavors meld beautifully.
Alright, let's break down exactly what goes into this masterpiece…
Inside the Ingredient List
The Flavor Base
The foundation of this dish is a simple yet powerful spice blend that brings everything together. Ground cumin, chili powder, smoked paprika, and garlic powder form a fragrant base that coats the chicken and vegetables. The lime juice not only adds brightness but also helps tenderize the meat. If you skip this step, the dish will feel flat and lacking depth.
Why it matters: The spices are the heart of the flavor profile. Cumin offers a nutty, earthy tone; chili powder adds heat; smoked paprika brings a subtle smokiness; garlic powder gives a savory undertone. Together, they create a complex, layered taste that lingers on the tongue.
The Texture Crew
Olive oil is the secret to achieving that coveted caramelized crust. It helps the chicken brown evenly while preventing the vegetables from drying out. The peppers and onions, when sliced thinly, become tender yet retain a satisfying crunch. If you use too much oil, the dish becomes greasy; too little, and the flavors won’t develop properly.
Choosing the right oil matters. A light olive oil or a neutral oil like canola works best for high‑heat baking. Avoid heavy, buttery oils that can overpower the spices.
The Unexpected Star
Lime juice is more than a garnish; it’s a flavor enhancer that cuts through the richness of the chicken and adds a zesty brightness. The acidity also helps to tenderize the meat, making it juicy and tender. If you’re not a fan of citrus, you can substitute with a splash of lemon juice, but the lime’s unique profile is integral to this recipe.
The best limes are firm, heavy, and slightly aromatic. Look for ones that feel dense and have a bright green rind. A good rule of thumb: press the lime to test for juice—if it gives easily, it’s ripe.
The Final Flourish
Tortillas, cheese, sour cream, guacamole, and cilantro are the toppings that bring everything together. They add creaminess, freshness, and a burst of flavor that contrasts with the warm, spiced chicken. Each topping can be customized to suit your taste or dietary preferences. If you’re vegetarian, you can replace the chicken with grilled tofu or tempeh.
Tip: Warm the tortillas on the sheet pan for a few minutes before serving. They’ll be softer, easier to fold, and will hold the fillings better.
Everything's prepped? Good. Let's get into the real action…
The Method — Step by Step
- Prep the sheet pan: Lightly grease a large 13×18 inch sheet pan with a neutral oil or non‑stick spray. This prevents sticking and ensures even browning. Place a rack in the pan if you have one; it allows heat to circulate around the chicken and veggies. If you’re short on time, a single layer on the pan works just fine.
- Marinate the chicken: In a large bowl, combine the chicken breasts, 2 tbsp olive oil, cumin, chili powder, smoked paprika, garlic powder, salt, pepper, and lime juice. Toss until the chicken is evenly coated. Let it sit for at least 15 minutes, or up to 2 hours in the fridge for deeper flavor. The longer it marinates, the more the spices penetrate the meat.
- Prepare the vegetables: Slice the bell peppers into thin strips and halve the onions into thin wedges. Spread them in a single layer on the sheet pan. Drizzle with a teaspoon of olive oil and a pinch of salt, then toss to coat. Even coating ensures each piece caramelizes nicely.
- Arrange the chicken: Place the marinated chicken breasts on top of the vegetables, leaving a bit of space between each piece. This spacing allows heat to circulate and helps the chicken cook evenly. If you’re using a rack, put the chicken on the rack for extra crispness.
- Bake: Preheat the oven to 425°F (220°C). Bake the sheet pan for 20–25 minutes, flipping the chicken halfway through. The chicken should reach an internal temperature of 165°F (74°C). The vegetables will be tender and slightly charred, adding a smoky flavor.
- Rest the chicken: Once cooked, remove the sheet pan from the oven and let the chicken rest for 5 minutes. Resting allows the juices to redistribute, keeping the meat juicy. While the chicken rests, you can start preparing your tortillas and toppings.
- Warm the tortillas: Place the tortillas on the sheet pan for the last 2 minutes of baking. This warms them, making them pliable and preventing them from cracking when folded.
- Assemble the fajitas: Slice the chicken into strips. Serve the chicken and vegetables on the warmed tortillas, topped with shredded cheese, sour cream, guacamole, and cilantro. Add a squeeze of fresh lime if desired. The combination of creamy, tangy, and spicy elements makes each bite a delight.
- Enjoy! Dig in while everything is still warm and fragrant. The first bite will hit you with a burst of flavor, and the second will leave you craving more. I dare you to taste this and not go back for seconds.
That's it — you did it. But hold on, I've got a few more tricks that'll take this to another level…
Insider Tricks for Flawless Results
The Temperature Rule Nobody Follows
Many people bake at 400°F, but 425°F is the sweet spot for caramelization. The higher temperature creates a crisp crust while keeping the interior juicy. If your oven runs hot, reduce the time by a minute or two to avoid burning.
Why Your Nose Knows Best
Before you lift the lid, take a deep breath. The aroma that fills the kitchen is the ultimate indicator that the spices have bonded with the meat. A strong, fragrant scent means the flavors are developing properly.
The 5-Minute Rest That Changes Everything
Letting the chicken rest after baking is crucial. It allows the juices to redistribute, preventing dry meat. A friend once skipped this step and ended up with a stringy chicken that tasted like a dry, old sandwich.
Use a Silicone Baking Mat
A silicone mat ensures even heat distribution and easy cleanup. It also prevents the sheet pan from sticking, making it simple to remove the chicken and veggies without tearing.
Don’t Forget to Flip
Flip the chicken halfway through baking to ensure even cooking. The side that was exposed to the heat first will develop a beautiful crust, while the other side stays juicy.
Keep the Toppings Fresh
Prepare the guacamole and sour cream just before serving. This keeps them from turning brown or losing their fresh flavor. A squeeze of lime on the guac right before serving adds a bright, zesty kick.
Creative Twists and Variations
This recipe is a playground. Here are some of my favorite ways to switch things up:
Tex‑Mex Twist
Add a splash of chipotle in adobo sauce to the marinade for a smoky, spicy kick. Serve with a side of black beans and a drizzle of crema. This variation leans into the classic Tex‑Mex flavor profile, perfect for a fiesta night.
Grilled Peach Variation
Swap the bell peppers for grilled peaches and add a pinch of cinnamon to the spice mix. The sweet, caramelized peaches pair beautifully with the savory chicken, creating a unique sweet‑savory balance.
Vegan Option
Replace the chicken with marinated tofu or tempeh. Use the same spice blend and bake for 25 minutes, flipping halfway. The tofu will absorb the flavors, giving a satisfying bite for plant‑based diners.
Breakfast Fajita
Serve the sheet pan mixture with scrambled eggs, cheese, and a splash of hot sauce for a hearty breakfast. The protein and spices create a breakfast that’s both filling and flavorful.
Low‑Carb Variation
Omit the tortillas and serve the chicken and veggies over cauliflower rice. Top with a dollop of Greek yogurt instead of sour cream for a creamy, low‑carb option.
Asian Fusion
Add a tablespoon of soy sauce and a dash of sesame oil to the marinade. Garnish with sliced scallions and toasted sesame seeds. This twist gives the dish a subtle umami depth and a hint of Asian flavor.
Storing and Bringing It Back to Life
Fridge Storage
Store the cooked chicken and veggies separately in airtight containers for up to 3 days. Keep the tortillas in a separate container to maintain their softness. When ready to eat, reheat the chicken and veggies in a skillet or microwave.
Freezer Friendly
Freeze the cooked components individually for up to 2 months. Thaw in the refrigerator overnight before reheating. The flavors stay intact, and the texture remains satisfying.
Best Reheating Method
Add a splash of water or broth to the pan before reheating. This steams the chicken and veggies, preventing them from drying out. Heat on medium for 5–7 minutes, stirring occasionally.