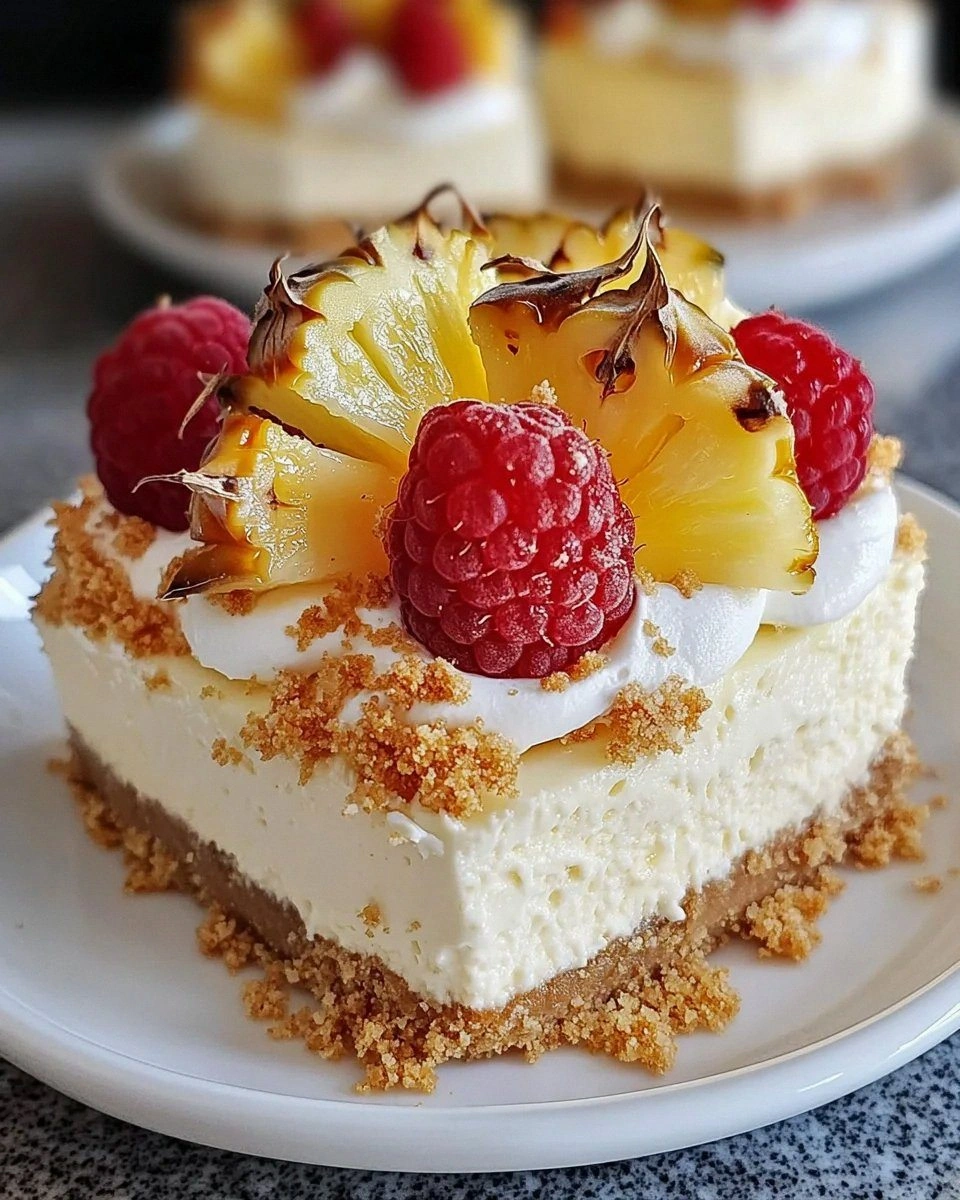
Picture this: I’m in my tiny kitchen, the timer on my old microwave beeping like a frantic drummer, and I’ve just realized I’ve run out of fresh strawberries for that “quick dessert” I promised my roommate. Panic? Absolutely. But then, out of the blue, a can of pineapple rolls over my counter like a golden rescue buoy, and I think, “What if I turned this tropical treasure into a cheesecake that never needs an oven?” That moment sparked the birth of the No‑Bake Pineapple Heaven Cheesecake, a dessert that has since become my go‑to party weapon. I dared myself to create something that would make people forget about the usual heavy, baked cheesecakes, and trust me, I succeeded.
The first bite is a sensory fireworks show. The crust, buttery and crumbly, whispers sweet nostalgia, while the creamy filling glides across your tongue like a silk scarf drenched in sunshine. The pineapple pieces burst with a tangy sparkle that cuts through the richness, leaving a clean, tropical finish that feels like a mini vacation in every mouthful. You can almost hear the ocean waves and feel a warm breeze as you chew—this is not just a dessert; it’s an experience that engages sight, smell, taste, and even that comforting sense of nostalgia you get from a favorite summer memory.
Most recipes out there try to be clever by adding a splash of rum or a swirl of caramel, but they miss the mark because they either overcomplicate the process or drown the delicate pineapple flavor under a blanket of excess sweetness. This version, however, hits the sweet spot by balancing the tang of pineapple with the mellow creaminess of a classic cheesecake, all while staying wonderfully simple—no oven, no fancy equipment, just a few pantry staples and a little bit of patience. I’ll be honest—when I first tasted the finished cake, I ate half the batch before anyone else could lay a finger on it. I dare you to taste this and not go back for seconds.
And here’s the secret twist that sets this recipe apart: a tiny amount of gelatin dissolved in pineapple juice, which gives the filling that perfect, slice‑able firmness without any baking. Most no‑bake cheesecakes rely on chilling alone and end up wobbling like a Jell‑O mold; this one holds its shape like a true cheesecake, yet remains luxuriously creamy. Okay, ready for the game‑changer? Let me walk you through every single step — by the end, you’ll wonder how you ever made it any other way.
What Makes This Version Stand Out
- Flavor Harmony: The bright acidity of pineapple cuts through the rich cream cheese, creating a balanced taste that feels both indulgent and refreshing.
- Texture Triumph: A buttery, crumbly crust paired with a silky, yet firm filling that holds its shape without cracking.
- Simplicity: No oven, no blender—just a whisk, a bowl, and a refrigerator, making it perfect for any kitchen skill level.
- Unique Ingredient: The gelatin‑infused pineapple juice gives the cheesecake a professional‑grade set that most no‑bake versions lack.
- Crowd Reaction: Guests often ask for the recipe before the first bite is even finished, and the “wow” factor is off the charts.
- Ingredient Quality: Using fresh‑cut pineapple (or high‑quality canned) ensures natural sweetness without artificial aftertaste.
- Make‑Ahead Potential: It can be prepared a day ahead, allowing flavors to meld and the texture to perfect itself.
- Season‑Free Delight: Whether it’s a summer BBQ or a winter holiday gathering, this cheesecake shines year‑round.
Inside the Ingredient List
The Flavor Base
The star of this cheesecake is, of course, the pineapple. Whether you opt for fresh chunks or a high‑quality canned variety, the fruit’s natural acidity is what prevents the filling from feeling cloyingly sweet. If you’re using canned pineapple, drain it well and give it a quick pat‑dry with paper towels—this step removes excess liquid that could make the filling soggy. A pro tip: choose pineapple packed in its own juice rather than syrup; the pure juice adds a brighter, cleaner flavor that sings alongside the cream cheese.
The Texture Crew
The crust is built from graham cracker crumbs, melted butter, and a pinch of sugar. The butter not only binds the crumbs together but also adds a luscious mouthfeel that contrasts beautifully with the smooth filling. If you’re gluten‑free, swap the crumbs for a blend of almond flour and shredded coconut; the result is a slightly nutty crust that still crumbles perfectly. The cream cheese is the backbone of the filling—make sure it’s softened to room temperature before mixing, or you’ll end up with lumps that ruin the silky texture.
The Unexpected Star
Gelatin is the unsung hero here. Dissolving it in warm pineapple juice creates a clear, flavor‑neutral set that holds the cheesecake together without adding any grainy texture. Many no‑bake recipes skip gelatin, leading to a wobble that’s more pudding than cheesecake. If you’re vegetarian, you can substitute agar‑agar powder, but you’ll need to follow the package instructions carefully to achieve the same firmness.
The Final Flourish
Heavy whipping cream and powdered sugar are folded in at the end to lighten the filling, giving it that airy lift you’d expect from a baked cheesecake. Vanilla extract adds a subtle aromatic backdrop that ties the tropical notes together. A tiny splash of coconut milk can be swirled in for an extra layer of island‑inspired richness, but it’s entirely optional. Salt, though often overlooked, is crucial; it amplifies the sweetness and balances the pineapple’s tartness, ensuring every bite is perfectly seasoned.
Everything's prepped? Good. Let's get into the real action...
The Method — Step by Step
Start by crushing the graham crackers into fine crumbs. I love using a food processor for this—just a quick pulse and you’ll hear that satisfying crunch. Transfer the crumbs into a medium bowl, add the melted butter (remember that maple hack from earlier) and the sugar, then stir until the mixture resembles wet sand. Press the crumb mixture firmly into the bottom of a 9‑inch springform pan, using the back of a measuring cup to smooth it out. The crust should be compact and even; this is the foundation that will hold up the luscious filling.
Kitchen Hack: Chill the pressed crust in the freezer for 10 minutes before adding the filling; this prevents it from softening too quickly.While the crust chills, whisk together the softened cream cheese and powdered sugar in a large bowl until smooth and creamy. Use a handheld mixer on medium speed; you’ll hear a faint whir that tells you the mixture is coming together nicely. Scrape down the sides of the bowl frequently to avoid any stubborn lumps. Once smooth, add the vanilla extract and a pinch of salt, giving the mixture a final quick beat to incorporate the flavors fully.
In a small saucepan, gently warm the pineapple juice over low heat—just enough to steam, not boil. Sprinkle the gelatin powder over the warm juice and whisk constantly until fully dissolved; this should take about 1–2 minutes. The liquid will become slightly thickened and clear. This is where the magic happens: the gelatin will later give the cheesecake its firm, sliceable texture without any baking.
Watch Out: If the gelatin isn’t fully dissolved, you’ll end up with grainy pockets in the cheesecake. Keep the heat low and whisk continuously.Now, take the heavy whipping cream and beat it until soft peaks form—this should look like gentle clouds rising on the surface. Gently fold the whipped cream into the cream cheese mixture, being careful not to deflate the air you just incorporated. This folding step lightens the filling, giving it that airy, melt‑in‑your‑mouth quality that differentiates a good cheesecake from a great one.
Stir in the crushed pineapple pieces, distributing them evenly throughout the creamy base. The pineapple should be well‑coated but still retain its individual shape, providing bursts of tropical flavor in every bite. If you love extra tang, add a teaspoon of fresh lime zest at this stage; it will brighten the overall profile without overpowering the pineapple.
Slowly drizzle the gelatin‑infused pineapple juice into the mixture while continuously folding. The gelatin will bind the cream, whipped cream, and pineapple together, creating a cohesive filling that sets firmly once chilled. This step is crucial—add the liquid in a thin stream and keep folding until the mixture looks glossy and uniform.
Pour the finished filling over the chilled crust, smoothing the top with an offset spatula. Tap the pan lightly on the counter a few times to release any trapped air bubbles; you’ll hear a soft “pop” that signals the filling is settling evenly. If you’re feeling fancy, swirl a tablespoon of coconut milk on top for a subtle tropical ribbon.
Cover the springform pan with plastic wrap and transfer it to the refrigerator. Let the cheesecake set for at least 4 hours, though overnight is ideal. During this time, the gelatin will fully activate, and the flavors will meld into a harmonious whole. Resist the urge to peek—patience is key, and the result will be worth the wait.
When you’re ready to serve, run a thin knife around the edge of the pan to loosen the cheesecake, then gently release the springform. Slice with a warm knife (dip it in hot water, wipe dry) to achieve clean, crisp cuts. Serve chilled, perhaps with a dollop of whipped cream or a drizzle of caramel for an extra indulgent touch. And now the fun part—watch your guests’ faces light up as they take that first bite.
Kitchen Hack: Warm your knife under hot water before each slice; this prevents the creamy filling from sticking and gives you perfect slices every time.
That's it — you did it. But hold on, I've got a few more tricks that'll take this to another level...
Insider Tricks for Flawless Results
The Temperature Rule Nobody Follows
Never start with cold cream cheese straight from the fridge. Let it sit at room temperature for at least 30 minutes; this ensures a smooth, lump‑free base. I once tried to skip this step and ended up with a gritty texture that felt like sand in a dessert. The difference is night and day—softened cheese blends effortlessly, giving the filling that luxurious silkiness we all crave.
Why Your Nose Knows Best
While the gelatin mixture is warming, give your kitchen a quick sniff. You should catch a faint, sweet pineapple aroma with a hint of earthiness from the gelatin. If you don’t smell anything, the juice isn’t warm enough, and the gelatin may not dissolve properly. Trust your nose; it’s an underrated tool that can save you from a texture disaster.
The 5‑Minute Rest That Changes Everything
After you pour the filling onto the crust, let the cheesecake sit uncovered at room temperature for five minutes before refrigerating. This short rest allows the gelatin to begin setting, which prevents the filling from sinking into the crust later on. I’ve seen cheesecakes that sag because they went straight into the fridge; this tiny pause eliminates that issue.
Swirl It Right
If you decide to add coconut milk or a caramel drizzle, do it in a swirl pattern using a skewer or the back of a spoon. This creates a marbled effect that looks as good as it tastes. A common mistake is to dump the swirl on top and let it sink; gentle swirling keeps the layers distinct and visually appealing.
Freeze for a Frosty Finish
For a summer party, try freezing individual slices for 20 minutes before serving. The cheesecake becomes firm enough to hold a scoop of vanilla ice cream on top without melting instantly. I once served a frozen slice with fresh pineapple wedges, and the contrast between cold and juicy was pure bliss.
Creative Twists and Variations
This recipe is a playground. Here are some of my favorite ways to switch things up:
Tropical Coconut Crunch
Replace half of the graham cracker crumbs with toasted coconut flakes. The added crunch and coconut aroma turn the crust into a mini beach‑side treat that pairs perfectly with the pineapple filling.
Spicy Chili Lime
Mix a pinch of chili powder and a teaspoon of lime zest into the pineapple chunks before folding them in. The subtle heat and citrus zing elevate the tropical flavor, making it a bold choice for adventurous eaters.
Berry Fusion
Swap out half the pineapple for fresh mango or passion fruit cubes. The blend of tropical fruits adds a layered fruitiness that keeps each bite interesting and vibrant.
Chocolate Delight
Stir in 2 tablespoons of melted dark chocolate into the cream cheese mixture before adding the gelatin. The result is a decadent chocolate‑pineapple swirl that satisfies both fruit lovers and chocolate addicts.
Nutty Caramel
Drizzle a homemade caramel sauce over the top and sprinkle chopped toasted macadamia nuts just before serving. The caramel adds buttery sweetness, while the nuts contribute a satisfying crunch.
Vegan Version
Swap the cream cheese for a plant‑based cream cheese alternative, use coconut cream instead of heavy whipping cream, and replace gelatin with agar‑agar. The texture will be slightly different, but the flavor profile remains delightfully tropical.
Storing and Bringing It Back to Life
Fridge Storage
Cover the cheesecake tightly with plastic wrap and store it in the refrigerator for up to 4 days. The gelatin keeps the filling firm, and the crust stays crisp as long as it’s sealed from moisture. When you’re ready to serve, let it sit at room temperature for 10 minutes to soften slightly for easier slicing.
Freezer Friendly
Wrap the entire cheesecake (still in the springform pan) in a double layer of freezer‑safe foil or a large freezer bag. It will freeze beautifully for up to 2 months. To thaw, move it to the fridge overnight, then let it sit at room temperature for 20 minutes before serving. The texture remains silky, and the pineapple flavor stays bright.
Best Reheating Method
If you notice the cheesecake has become a bit too firm after freezing, place a tiny splash of pineapple juice or water over the surface before microwaving for 10‑15 seconds on low power. The steam generated revives the creamy texture without compromising the set structure.