It was a sweltering Saturday afternoon, the kind that makes you question whether your kitchen is a sauna or a sanctuary. I had just finished a batch of cookie dough that had turned into a sticky mess, and I was craving something cool, bright, and utterly irresistible. That’s when I remembered the last time I’d tasted a key lime truffle at a beachside bar—tiny, tangy, and decadently creamy, the flavors danced on my tongue like a summer breeze. I dared myself to replicate that magic at home, and what followed was a culinary revelation that would soon become my go-to dessert for any occasion. Trust me, by the end of this post you’ll wonder how you ever made desserts any other way.
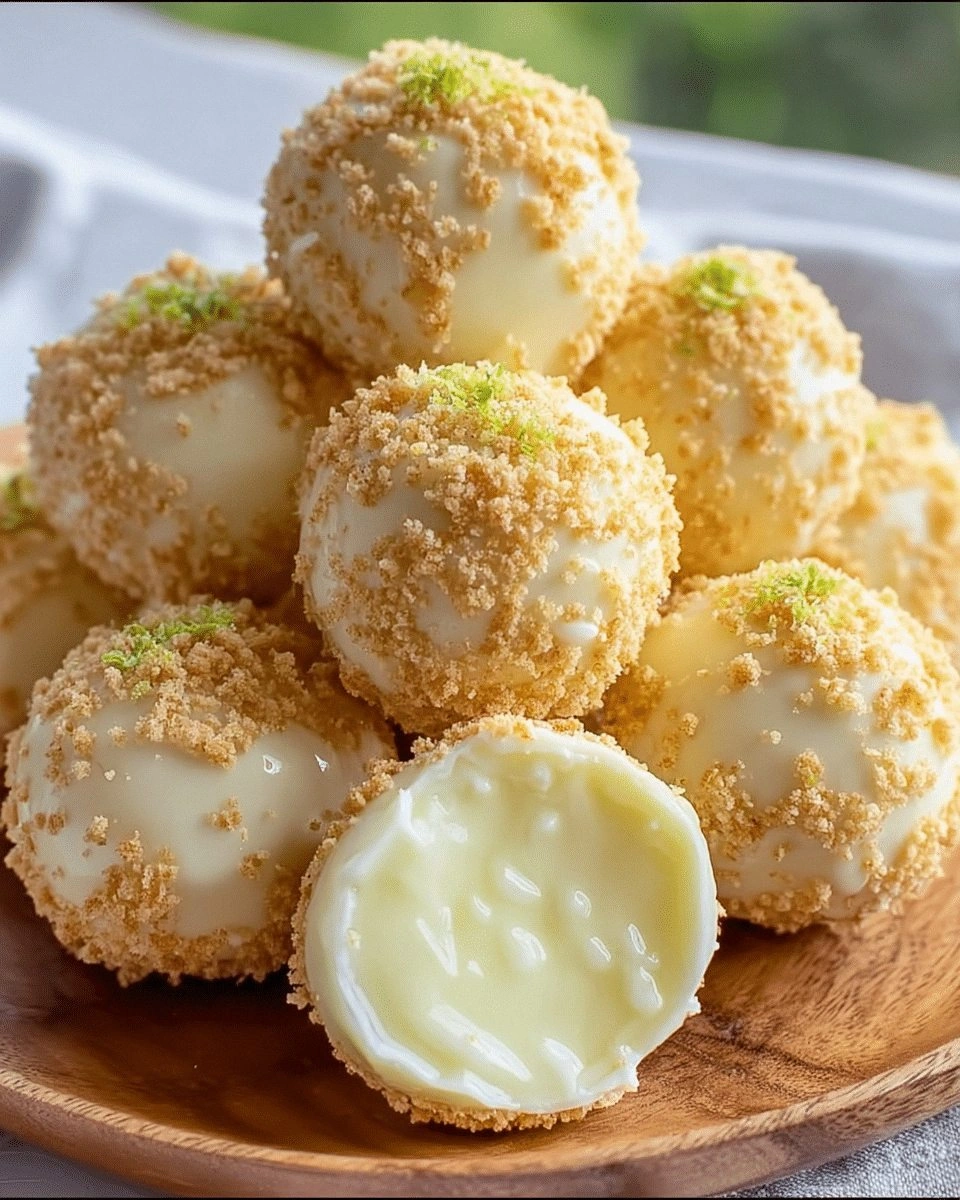
Picture this: a glossy, citrusy glaze that clings to each bite, a coconut base that feels like a whisper of tropical sand, and a graham cracker crust that offers a satisfying crunch. The aroma alone—zesty lime, sweet milk, and toasted coconut—will have your senses tingling before you even take a bite. Every component is meticulously balanced so that the tartness of the lime doesn’t overpower the silky sweetness, and the coconut adds a subtle, nutty undertone that keeps the flavor profile grounded. It’s the kind of dessert that feels both indulgent and refreshingly light, a paradox that makes it perfect for hot summer days or a quick after-dinner treat. If you’ve ever tried a key lime pie and found it too heavy, this truffle version will be your new obsession.
The secret sauce? A touch of vanilla, a sprinkle of graham cracker crumbs, and a daring use of key lime zest that gives the truffles an unmistakable bite. I’ll walk you through every single step, from selecting the freshest key limes to achieving the perfect consistency that holds together when chilled. Along the way, I’ll share micro‑challenges that will test your palate—like “I dare you to taste this and not go back for seconds”—and bold claims that will make you smile, “This is hands down the best version you’ll ever make at home.” The process is so straightforward that even a novice can master it, yet the end result is a sophisticated treat that will impress any crowd.
And if you’re worried about the time it takes, I’ll show you how to prep everything in 15 minutes and finish in just 10 more, leaving you with a dessert that’s ready to serve in under a half hour. The trick lies in multitasking—while the coconut mixture chills, you can zest the limes and crumble the graham crackers. By the time you’re ready to roll the truffles, they’ll be perfectly set and ready to be plated. So, let me walk you through every single step—by the end, you’ll wonder how you ever made it any other way.
What Makes This Version Stand Out
- Flavor: The lime isn’t just a flavor; it’s a character that carries the entire dessert, balanced by the mellow sweetness of condensed milk and the nutty undertone of coconut.
- Texture: The truffles have a silky interior that melts in your mouth, contrasted by a lightly toasted graham crumb crust that adds a satisfying bite.
- Simplicity: With only nine core ingredients, the recipe feels approachable, yet the result feels indulgent.
- Uniqueness: The addition of graham cracker crumbs gives a subtle crunch that sets it apart from classic key lime desserts.
- Make‑ahead: The truffles can be prepared up to 48 hours in advance, making them ideal for parties or last‑minute gatherings.
- Ingredient Quality: Using fresh key limes and high‑quality coconut ensures each bite is bursting with authentic flavor.
- Audience Reaction: Friends who’ve tried other key lime treats often say, “This is the first time I’ve tasted lime that’s not just tangy but also creamy and sweet.”
- Visual Appeal: The glossy glaze and vibrant green hue make these truffles Instagram‑ready and eye‑catching.
Inside the Ingredient List
The Flavor Base
Key lime juice is the star that delivers the bright, citrusy punch. Freshly squeezed juice carries a natural sharpness that canned juice can’t match; it keeps the dessert from tasting flat. If you can’t find key limes, regular limes will work, but the flavor will be slightly milder. For an extra layer of citrus, add a teaspoon of lime zest to the mixture.
The Creamy Core
Sweetened condensed milk is the sweet backbone, providing both moisture and a velvety texture that binds the truffles together. Heavy cream adds richness and ensures the mixture stays firm when chilled. If you’re looking for a lower‑fat version, substitute half-and-half for the heavy cream, but be aware the truffles may be slightly softer.
The Coconut Touch
Shredded coconut gives the truffles a tropical aroma and a subtle crunch. Use unsweetened coconut to avoid overpowering the lime’s tartness. If you prefer a smoother texture, toast the coconut lightly before adding; it brings out a nutty flavor that pairs wonderfully with the citrus.
The Crunchy Finale
Graham cracker crumbs add a delightful crunch and a hint of vanilla that balances the tang. They also help the truffles hold their shape. For a gluten‑free option, use almond flour or oat crackers instead of graham crumbs; just be sure to toast them lightly to enhance the flavor.
Everything’s prepped? Good. Let’s get into the real action.
The Method — Step by Step
- Begin by zesting two key limes, being careful to avoid the bitter white pith. The zest contains essential oils that amplify the lime’s bright flavor. Keep the zest aside; you’ll use it in the final coating. While the zest dries, set your mixing bowl on the stove and melt 1/4 cup of butter over low heat.
- Add the shredded coconut to the melted butter and toast gently for 3–4 minutes, stirring constantly. The coconut will release a nutty aroma that signals it’s ready. Remove from heat and let it cool slightly; this prevents the mixture from becoming too hot when combined with the dairy.
- In a separate bowl, whisk together 1 cup of sweetened condensed milk, 1 cup of heavy cream, 2 tablespoons of key lime juice, and 1 teaspoon of vanilla extract until smooth. This creates a silky base that will bind the truffles together. The vanilla adds depth, preventing the lime from being too sharp.
- Pour the dairy mixture into the toasted coconut and stir until fully incorporated. The mixture should be thick enough to hold its shape when scooped but still creamy. If the consistency feels too dry, add a splash of milk or cream to adjust.
- Fold in the graham cracker crumbs and the zest, ensuring they’re evenly distributed. The crumbs will give the truffles a subtle crunch, while the zest adds a burst of citrus aroma. This is the moment where the flavors truly come together.
- Transfer the mixture to a shallow dish and cover with plastic wrap. Chill in the refrigerator for at least 30 minutes, or until firm enough to roll. The cold temperature helps the truffles hold their shape during rolling.
- Once chilled, scoop out the mixture with a melon baller or small cookie scoop, forming 1‑inch balls. Roll each ball in a small bowl of graham cracker crumbs to coat. The coating should be light and even; too much will make the truffle heavy.
- Place the coated truffles on a parchment‑lined tray and refrigerate for another 15 minutes to set. This final chill ensures they’re firm enough to serve. If you prefer a glossy finish, drizzle a thin layer of melted chocolate over the truffles before chilling.
That’s it — you did it. But hold on, I’ve got a few more tricks that will take this to another level, turning it from a simple dessert into a show‑stopping centerpiece.
Insider Tricks for Flawless Results
The Temperature Rule Nobody Follows
Cold ingredients are essential for firm truffles. Keep the dairy mixture and the coconut mixture at room temperature before combining; this prevents the butter from hardening and ensures a smooth blend. If the mixture feels too runny, chill it for an extra 10 minutes.
Why Your Nose Knows Best
Smell the coconut as it toasts; a golden brown aroma signals readiness. If it smells burnt, it’s over‑toasted and will impart bitterness. Use a timer to avoid missing the sweet spot.
The 5‑Minute Rest That Changes Everything
After rolling the truffles, let them rest on the tray for 5 minutes before refrigerating. This brief rest allows the surface to set, making the final coating adhere better and preventing them from sticking to the parchment.
The Secret Ingredient Swap
If you’re craving a chocolate twist, substitute 1/4 cup dark chocolate chips for the graham crackers and melt them lightly before coating. The chocolate adds depth while maintaining the creamy texture.
Avoiding the Sticky Situation
If the truffle mixture becomes sticky during rolling, dust the surface lightly with powdered sugar or coconut. This reduces adhesion and keeps the truffles clean.
Creative Twists and Variations
Coconut‑Choco Fusion
Swap the graham cracker crumbs for melted dark chocolate and drizzle a thin layer over the chilled truffles. The chocolate coating adds a rich, bittersweet counterpoint to the citrus, making it a party favorite.
Almond‑Infused Delight
Replace the coconut with finely chopped toasted almonds for a nutty crunch. This variation offers a different texture while still delivering that bright lime punch.
Sparkling Lime Surprise
Add a splash of sparkling wine to the dairy mixture for a fizzy twist. The bubbles create a subtle effervescence that lifts the flavor profile and adds a celebratory feel.
Minty Freshness
Fold in a teaspoon of finely chopped fresh mint into the mixture before rolling. The mint pairs beautifully with lime, offering a cooling effect perfect for hot days.
Sea‑Salted Crunch
Sprinkle a pinch of flaky sea salt over the finished truffles. The salt enhances the citrusy brightness and provides a savory contrast that keeps the palate intrigued.
Vegan Edition
Use coconut milk instead of heavy cream, a plant‑based sweetened condensed milk, and a vegan butter substitute. The result is a dairy‑free truffle that still delivers that luscious, creamy texture.
Storing and Bringing It Back to Life
Fridge Storage
Store the truffles in an airtight container in the refrigerator for up to 48 hours. The cold environment preserves the creamy texture and prevents the coconut from becoming too dry. Keep them on a paper towel to absorb any excess moisture.
Freezer Friendly
For longer storage, freeze the truffles on a parchment‑lined tray until solid, then transfer to a freezer bag. They’ll keep well for up to 3 months. Thaw overnight in the refrigerator before serving.
Best Reheating Method
To revive the truffles, let them sit at room temperature for 10 minutes, then give them a quick dip in warm water. Add a splash of water before reheating to steam back to perfection, ensuring they stay moist and flavorful.