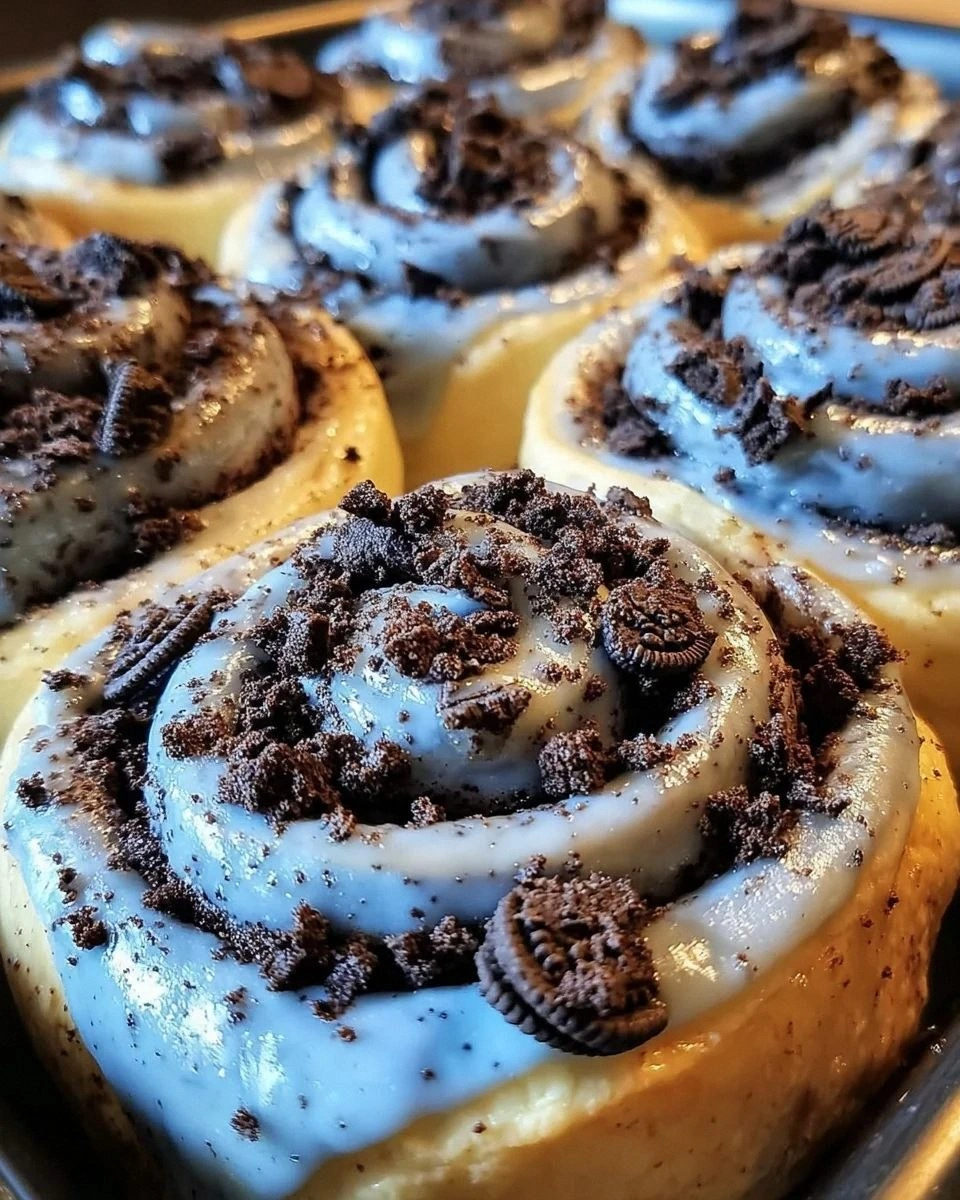
I’ll be honest — I ate half the batch before anyone else got to try it, and that’s because this version of Cookie Monster Cinnamon Rolls is hands down the best version you’ll ever make at home. It started as a late‑night dare from my roommate: “Make something that looks like the Cookie Monster, but actually tastes like a cinnamon roll.” I laughed, I rolled up my sleeves, and I dove headfirst into a kitchen experiment that turned into a full‑blown love affair with blue‑hued dough, chocolate‑crunchy swirls, and a cream‑cheese glaze that drips like a sugary waterfall. The moment I pulled the first tray out of the oven, the entire apartment filled with a scent that was part fresh‑baked bakery, part nostalgic childhood snack, and part pure, unadulterated joy.
Picture yourself pulling this out of the oven, the whole kitchen smelling incredible, the blue dough glistening under the kitchen lights, and the chocolate cookie crumbs sparkling like edible confetti. The rolls are soft enough to melt in your mouth, yet they have a slight chew from the mini chocolate chips that gives you that satisfying bite you crave. When you bite into the center, the warm cinnamon‑spiced filling meets the creamy, slightly tangy icing, and a burst of chocolate cookie crunch erupts – it’s like a party in your mouth where every guest is invited. I dare you to taste this and not go back for seconds; the combination is so addictive you’ll be counting down the minutes until the next batch.
Most recipes get this completely wrong. They either skip the blue coloring, which makes the whole “Cookie Monster” theme fall flat, or they over‑sweeten the glaze, turning the rolls into a cloying mess. Here’s what actually works: a perfectly balanced dough that’s enriched with butter and a touch of egg yolk for richness, a bright blue hue that’s vivid but not overpowering, and a filling that mixes crushed chocolate sandwich cookies with mini chips for texture and flavor depth. The secret weapon? A splash of vanilla and a pinch of salt that keep the sweetness from becoming a one‑note choir.
And now the fun part. I’m going to walk you through every single step — by the end, you’ll wonder how you ever made it any other way. Okay, ready for the game‑changer? This next part? Pure magic. Stay with me here — this is worth it.
What Makes This Version Stand Out
- Bold Color: The blue gel food coloring gives the rolls a playful, eye‑catching hue that screams Cookie Monster without sacrificing flavor. It’s vivid, but we keep it subtle enough that the dough still tastes like a classic cinnamon roll.
- Cookie Crunch: Crushed chocolate sandwich cookies and mini chocolate chips are folded into the filling, creating surprise pockets of crunch that contrast beautifully with the soft dough.
- Cream Cheese Icing: Instead of a simple glaze, we use a tangy cream cheese frosting that adds richness and balances the sweetness of the cookie pieces.
- Fluffy Texture: Warm milk and active dry yeast work together to give the rolls a light, airy crumb that’s almost melt‑in‑your‑mouth.
- Easy Prep: Despite the impressive look, the method is straightforward – no fancy equipment, just a mixing bowl, a rolling pin, and a willingness to have fun.
- Make‑Ahead Friendly: You can prep the dough ahead of time, refrigerate or freeze it, and bake fresh rolls whenever the craving hits.
- Crowd‑Pleaser: Whether it’s a brunch, a birthday party, or a late‑night snack, these rolls get rave reviews and Instagram likes.
- Ingredient Quality: We use real butter, fresh eggs, and high‑quality chocolate cookies – no shortcuts, just pure, indulgent goodness.
Inside the Ingredient List
The Flavor Base
Warm milk is the silent hero that activates the yeast, creating that fluffy texture we all adore. If the milk is too hot, it’ll kill the yeast; too cold, and the rise will be sluggish. Aim for a temperature of about 110°F (43°C) – you should feel a comfortable warmth on the back of your hand. Pro tip: use a kitchen thermometer, because guessing can lead to a flat, dense roll.
Active dry yeast: This is the magic behind rising dough; it makes everything airy and light. Sprinkle it over the warm milk with a pinch of sugar and let it sit for 5‑10 minutes until it becomes frothy. If you skip this proofing step, you’ll end up with a dense, bread‑like texture that defeats the purpose of a cinnamon roll.
The Sweeteners
Granulated sugar: Not just for sweetness; it feeds the yeast and helps the dough rise. We use a modest ¼ cup to keep the rolls from being overly sweet, letting the chocolate and cinnamon shine. If you’re watching sugar, you can cut it down to 2 Tbsp, but expect a slightly less tender crumb.
Vanilla extract: A touch of warmth that enhances the overall flavor. Even a single teaspoon adds depth that you can’t achieve with sugar alone. It’s the secret whisper that makes the rolls taste bakery‑crafted.
The Texture Crew
Egg and egg yolk: These add richness and moisture to your dough. The whole egg provides structure, while the extra yolk gives a buttery sheen and a richer mouthfeel. Skipping the yolk makes the rolls a bit dry and less tender.
Unsalted butter (melted): Melted butter is incorporated into the dough for softness, while softened butter is used in the filling for that luxurious, spreadable texture. Butter also carries flavor better than oil, giving the rolls a decadent bite.
All‑purpose flour: The backbone of your rolls, giving them structure and body. We use 3 cups for a balanced dough – not too heavy, not too light. If you use bread flour, you’ll get a chewier roll; if you use cake flour, it could be too crumbly.
Salt: Just a hint is needed; it balances the sweetness perfectly. A teaspoon is enough to bring out all the flavors without being noticeable.
The Unexpected Star
Blue gel food coloring: This is what gives the rolls their playful Cookie Monster hue. A few drops (about ½ tsp) are enough – add more if you want a deeper shade, but remember that too much can affect the dough’s texture. Food‑grade gel is best because it’s concentrated and doesn’t add extra liquid.
Chocolate sandwich cookies (crushed): Crushed into the filling, they add delightful texture and chocolaty goodness. Use classic chocolate wafers for that nostalgic taste, or go for a double‑chocolate version for an extra‑intense experience. If you’re gluten‑free, look for a certified gluten‑free chocolate cookie.
Mini chocolate chips: These are surprise pockets of sweetness in every bite! We fold them into the filling so they melt just enough to become gooey without losing their shape.
The Final Flourish
Cream cheese: For the icing, it creates a creamy contrast to the sweet rolls. Use full‑fat cream cheese for the best texture; low‑fat versions become grainy.
Powdered sugar: This is what makes your icing so smooth and dreamy. Sift it to avoid lumps, and whisk until it’s silk‑smooth.
Milk (for icing): It helps to reach that perfect drizzle consistency for your icing. Start with 2 Tbsp and add more if needed – you want a pourable glaze, not a thick frosting.
Crushed chocolate cookies (for topping): More cookies on top? Yes, please! They add an extra crunch and visual appeal, making each roll look like a mini masterpiece.
Extra mini chocolate chips (optional): Because, why not? More is more when it comes to dessert! Sprinkle them on top for an extra burst of chocolate.
Everything's prepped? Good. Let's get into the real action…
The Method — Step by Step
-
Begin by warming 1 cup of milk in a saucepan or microwave until it reaches about 110°F. While it’s warming, whisk together 2 ¼ tsp active dry yeast and a pinch of the granulated sugar in a small bowl. When the milk is ready, pour it over the yeast mixture, give it a gentle stir, and let it sit for 5‑10 minutes until it becomes frothy and bubbly, a sure sign that the yeast is alive and kicking.
-
In a large mixing bowl, combine 3 cups of all‑purpose flour, ¼ cup granulated sugar, 1 tsp salt, and 1 tsp vanilla extract. Make a well in the center, then add the frothy yeast mixture, 1 large egg, 1 egg yolk, and 4 Tbsp melted butter. Using a wooden spoon or a stand mixer on low, stir until a shaggy dough forms. Power transition: This is where the magic starts to happen.
Kitchen Hack: Sprinkle a little extra flour on the countertop before kneading; it prevents sticking and gives you a smoother dough without over‑adding flour. -
Turn the dough onto a lightly floured surface and knead for about 8‑10 minutes, or until it becomes smooth, elastic, and no longer sticks to your fingers. The dough should pass the “windowpane test”: stretch a small piece and it should become translucent without tearing. This development of gluten is essential for that airy, cloud‑like crumb.
-
Place the kneaded dough into a lightly oiled bowl, cover it with a clean kitchen towel, and let it rise in a warm spot for 1‑1½ hours, or until it has doubled in size. Watch Out: If your kitchen is too cool, the dough will rise sluggishly; consider pre‑heating your oven to 200°F, turning it off, and letting the dough rise inside for a cozy environment.
Watch Out: Over‑proofing will cause the dough to collapse when baked, resulting in a dense roll. Set a timer and check the dough’s size – it should be about twice its original volume. -
While the dough is rising, prepare the filling. In a medium bowl, combine 1 cup crushed chocolate sandwich cookies, ½ cup mini chocolate chips, 4 Tbsp softened butter, 1 tsp cinnamon, and a pinch of salt. Mix until the butter coats the cookie crumbs and chips, creating a crumbly yet spreadable mixture. Add a few drops of blue gel food coloring (about ½ tsp) and stir until the color is evenly distributed, giving the filling that subtle, monster‑blue hue.
Kitchen Hack: Use a zip‑top bag to crush the chocolate cookies; you get an even texture without a mess. -
Once the dough has doubled, punch it down gently to release excess air. Transfer it to a parchment‑lined baking sheet and roll it out into a rectangle about ¼‑inch thick (approximately 12×18 inches). Drizzle the melted butter over the surface, then spread the cookie‑chocolate filling evenly, leaving a small border around the edges.
-
Starting from the long side, roll the dough tightly into a log, pinching the seam to seal. Slice the log into 12 even pieces using a sharp knife or dental floss (the floss trick gives clean cuts). Place each roll onto the prepared baking sheet, spacing them about 1 inch apart to allow for expansion.
-
Cover the rolls loosely with foil and let them rise again for 30‑45 minutes, until they puff up noticeably. Meanwhile, preheat your oven to 350°F (175°C). This second rise ensures the rolls stay light and fluffy after baking.
-
Bake the rolls for 20‑25 minutes, or until the tops are golden‑brown and a toothpick inserted into the center comes out clean. While they’re baking, whisk together 4 oz softened cream cheese, 1 cup powdered sugar, and 2 Tbsp milk until smooth and glossy. When the rolls are out of the oven, drizzle the cream cheese icing over them while still warm, then sprinkle the remaining crushed chocolate cookies and optional extra mini chips on top.
That sizzle when the icing hits the warm roll? Absolute perfection.
That's it — you did it. But hold on, I've got a few more tricks that'll take this to another level…
Insider Tricks for Flawless Results
The Temperature Rule Nobody Follows
Never underestimate the power of a consistent temperature. Keep your milk at 110°F, your dough’s rising environment at around 80‑85°F, and your oven calibrated to the exact 350°F. If your oven runs hot, the rolls will brown too quickly and the interior will stay undercooked. I once baked in a kitchen with a draft; I placed a bowl of hot water on the counter to create a mini‑steam environment, and the rolls rose like balloons.
Why Your Nose Knows Best
Your sense of smell is a reliable indicator of dough readiness. When the dough has risen, it should have a faint, sweet yeasty aroma. If it still smells bland, give it a few more minutes. Trusting your nose can prevent over‑proofing, which is a common pitfall for home bakers.
The 5‑Minute Rest That Changes Everything
After you roll the dough into a log and before you slice, let it rest for 5 minutes. This short pause relaxes the gluten, making the slices less likely to spring back and tear. A friend tried skipping this step once – the rolls were uneven and some pieces fell apart. That tiny rest is a game‑changer.
The Icing Timing Trick
Apply the cream cheese icing while the rolls are still warm (within 2‑3 minutes of exiting the oven). The heat melts the icing just enough to create a glossy drizzle that seeps into every crevice. If you wait too long, the icing will sit on top like a hard glaze, losing that luscious melt‑in‑your‑mouth feel.
Freeze‑And‑Bake for Future Cravings
If you want to make a big batch ahead of time, after the first rise, shape and freeze the unbaked rolls on a parchment sheet. Once frozen solid, transfer them to a zip‑top bag. When you’re ready, let them thaw in the fridge overnight, then give them a final rise before baking. This method preserves the fluffy texture and saves you a morning.
Creative Twists and Variations
This recipe is a playground. Here are some of my favorite ways to switch things up:
Nutty Banana Surprise
Swap half of the chocolate sandwich cookies for crushed banana bread pieces and add ¼ cup chopped walnuts to the filling. The banana adds a mellow sweetness that pairs beautifully with the chocolate, and the walnuts give an extra crunch.
White Chocolate Raspberry
Replace the mini chocolate chips with white chocolate chips and fold in a tablespoon of raspberry jam into the filling. The tangy jam cuts through the richness, creating a sophisticated flavor profile that’s perfect for brunch.
Spicy Mexican Mocha
Add a pinch of cayenne pepper and a teaspoon of espresso powder to the dough. The subtle heat and coffee notes elevate the chocolate, making the rolls feel grown‑up while still being playful.
Vegan Delight
Use plant‑based milk, replace the egg with a flax egg (1 tbsp ground flax + 3 tbsp water), swap butter for coconut oil, and use vegan cream cheese. The texture remains indulgent, and the flavor stays true to the original.
Holiday Peppermint Crunch
Storing and Bringing It Back to Life
Fridge Storage
Place cooled rolls in an airtight container or a zip‑top bag and store them in the refrigerator for up to 4 days. The dough stays soft, and the icing remains creamy. When ready to eat, microwave a single roll for 15‑20 seconds or warm in a 300°F oven for 5 minutes.
Freezer Friendly
Wrap each roll individually in plastic wrap, then place them in a freezer‑safe bag. They’ll keep for up to 2 months. To reheat, let them thaw in the fridge overnight, then bake at 350°F for 8‑10 minutes, adding a tiny splash of water to the pan to create steam and revive the fluffiness.
Best Reheating Method
For the ultimate “just‑out‑of‑the‑oven” experience, preheat a skillet over low heat, add a teaspoon of butter, and gently press a roll into the pan for 30 seconds per side. The butter adds a crisp exterior while the interior stays soft, and the icing melts back into a glossy sheen.