Picture this: I'm standing in a cramped kitchen, the oven door open, and a pile of halloumi slices staring back at me like a silent threat. I had just opened a new cookbook that promised “the ultimate halloumi bites,” but the recipe called for deep frying, which I hate. I craved something crispy, yet I didn't want to drown the cheese in oil. So I decided to experiment, turning the oven into my secret weapon. I swear I almost gave up before the first bite hit my tongue.
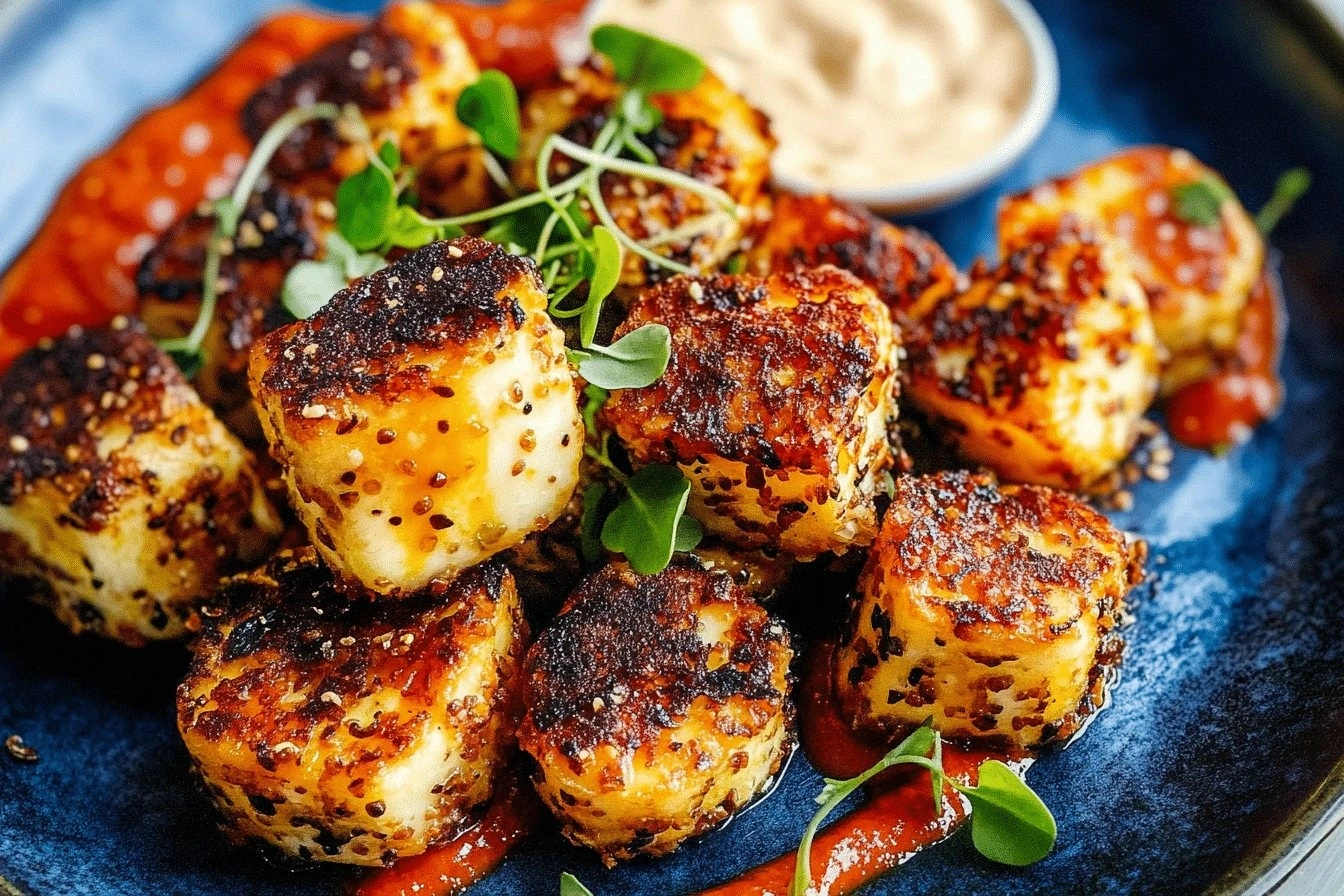
First, the sight of the golden crust forming on the parchment felt like a sunrise on a quiet morning. The aroma that wafted from the oven was a rich blend of melted cheese, toasted breadcrumbs, and a hint of lemon zest that made my mouth water. When I lifted the first bite, the sizzling sound was a satisfying crackle, almost like a small fireworks display. The texture was a delightful contrast: a buttery, almost buttery interior clinging to the cheese, wrapped in a crunchy shell that cracked with every bite. The taste was a harmonious dance of salty, slightly tangy, and a faint herbal note that lingered on my palate.
This version is a game‑changer because it eliminates the greasy aftermath of frying while delivering the same crunch you crave. I used a light coating of flour and panko breadcrumbs that bake to a perfect golden crust, keeping the halloumi moist inside. The secret lies in the balance of olive oil and lemon zest that gives the cheese a bright, fresh finish. It’s also incredibly easy to make, requiring only a few pantry staples that most of us already have on hand. And the best part? It’s a crowd‑pleaser that will make guests ask for the recipe, not just the leftovers.
There’s a trick you might not expect: a splash of Greek yogurt mixed with a pinch of smoked paprika before baking, which creates a subtle smoky undertone that pairs beautifully with the cheese. I discovered this while trying to add a depth of flavor that would elevate the dish beyond the usual savory. The yogurt not only adds moisture but also helps the breadcrumbs adhere better, resulting in a crispier bite. I dare you to taste this and not go back for seconds, because the first bite will have you hooked. Trust me, this is hands down the best version you’ll ever make at home.
Now, if you’re ready to replace that greasy fryer with a simple oven trick, let me walk you through every single step. By the end, you’ll wonder how you ever made it any other way. Picture yourself pulling these golden nuggets from the oven, the whole kitchen smelling incredible, and seeing the satisfied smiles of your friends. And when you take that first bite, the crunch will shatter like thin ice, leaving a buttery, melty center that melts in your mouth. I promise this will become your go‑to appetizer for parties, game nights, or a quick, satisfying snack.
I can’t wait to share the secrets, hacks, and variations that make this dish a masterpiece. From the exact proportions of flour to the timing of the bake, every detail has been fine‑tuned to perfection. So grab your ingredients, preheat that oven, and let’s dive into the world of baked halloumi bites. Trust me, your taste buds will thank you, and your guests will keep asking for more. Let’s get started!
What Makes This Version Stand Out
- Taste: The flavor profile is a balanced medley of salty, tangy, and herbal notes that dance on the palate. The lemon zest lifts the savory halloumi into a bright, refreshing zone. The smoked paprika adds a subtle depth that keeps each bite intriguing.
- Texture: The crust is crisp yet not brittle, providing a satisfying crunch that contrasts with the molten interior. The panko breadcrumbs give a light, airy bite that never feels heavy. The cheese inside remains tender and slightly gooey, a perfect counterpoint.
- Simplicity: No deep frying, just a quick bake that saves time and cleanup. The recipe uses pantry staples, so you can whip it up in minutes. The single‑pan approach means you’re not juggling multiple pots and pans.
- Crowd‑pleaser: Guests rave about the golden edges and the melty cheese center. The bites are shareable, making them ideal for parties or game nights. Even the most skeptical cheese lovers can’t resist the buttery finish.
- Ingredient Quality: Using fresh halloumi and high‑quality olive oil elevates the overall taste. The quality of the cheese directly impacts the melt and flavor intensity. A small investment in good cheese pays off big in flavor.
- Cooking Method: The oven baking technique ensures even heat distribution, preventing overcooking. The controlled temperature keeps the cheese from burning while crisping the crust. This method is forgiving and works well even for beginners.
- Make‑ahead Potential: You can prep the coating and assemble ahead, then bake when ready. The coated slices keep well in the fridge for a few hours before baking. This makes it a stress‑free option for last‑minute gatherings.
- Versatility: The base recipe can be customized with different spices or dips. Swap oregano for basil for a Mediterranean vibe. Add chili flakes for a fiery kick.
Inside the Ingredient List
The Flavor Base
Halloumi cheese, sliced into 1‑inch thick pieces, is the star of this dish. Its high melting point keeps it firm while still providing a rich, slightly briny flavor that sets the stage for the rest of the ingredients. If you skip halloumi, the entire concept collapses into a plain cheese bake that lacks character.
Olive oil is the liquid that binds the coating and helps the breadcrumbs adhere. It also adds a subtle fruity note that complements the cheese’s saltiness. Using extra‑virgin olive oil will give you a brighter finish; a lighter oil will keep the flavor more neutral.
Lemon zest infuses the coating with a bright citrus punch that cuts through the richness of the cheese. It also enhances the aroma, making the dish smell irresistible even before it’s baked. If you omit the zest, the flavor profile will feel flat and under‑seasoned.
Garlic powder adds a savory depth that balances the salt and lemon. It’s a convenient way to incorporate garlic without the moisture that fresh garlic would bring. Skipping it will reduce the overall complexity of the flavor.
Salt, pepper, and dried oregano form the seasoning backbone. Together they create a well‑rounded taste that highlights the cheese’s natural umami. If you reduce the salt, the dish will taste dull; if you overdo it, the cheese can become too salty.
The Texture Crew
All‑purpose flour provides a dry surface for the halloumi, ensuring the breadcrumbs stick and the crust forms properly. It also helps absorb excess moisture from the cheese, preventing sogginess. Without flour, the coating would flake off during baking.
Panko breadcrumbs are the secret to that airy, crunchy exterior. Their light, airy nature creates a crisp shell that doesn’t become gummy. If you use regular breadcrumbs, the crust will be denser and less desirable.
Greek yogurt is mixed with a pinch of smoked paprika to create a silky coating that adds moisture and a subtle smoky flavor. The yogurt also keeps the breadcrumbs from drying out too quickly, resulting in a consistently crisp bite. Omitting the yogurt will make the coating dry and brittle.
The Unexpected Star
Smoked paprika introduces a gentle heat and a deep, earthy undertone that elevates the dish from ordinary to extraordinary. It pairs beautifully with the halloumi’s saltiness, creating a layered flavor profile. If you skip this, you’ll miss a key dimension that makes the bites memorable.
Chili flakes add a subtle kick that balances the richness of the cheese. They’re optional but recommended for those who enjoy a touch of heat. Without them, the dish will feel a little too mellow for adventurous palates.
The Final Flourish
Fresh parsley, chopped, adds a burst of green color and a fresh, herbaceous finish that brightens the plate. It also provides a contrasting texture that complements the crispy exterior. Skipping parsley will leave the dish looking slightly dull.
A simple Greek yogurt dip, seasoned with dill and lemon, is the perfect companion for these bites. The dip’s cool, creamy nature cuts through the cheese’s richness and adds a refreshing element. Without it, the dish remains a single, strong flavor experience.
Everything's prepped? Good. Let's get into the real action...
The Method — Step by Step
- Preheat your oven to 200 °C (400 °F) and line a baking sheet with parchment paper. This creates a non‑stick surface that ensures the bites don’t stick or burn. Keep the sheet ready so you can move the slices in quickly once they’re coated. The temperature is crucial for a crisp crust; too low and they’ll be doughy, too high and they’ll burn. By the time you’re ready, the oven will be hot enough to give those golden edges you crave.
- In a shallow dish, whisk together the flour, salt, pepper, garlic powder, and oregano until fully blended. This dry mixture will be the first coating that holds the breadcrumbs in place. Make sure the spices are evenly distributed; otherwise, you’ll get pockets of blandness. This step is simple but vital for a consistent flavor profile. The aroma of the spices will start to fill your kitchen even before baking.
- Create a yogurt mixture by combining Greek yogurt with smoked paprika. Dip each halloumi slice first into the flour mixture, then into the yogurt, and finally coat it with panko breadcrumbs. The double‑dip technique ensures a thick, resilient crust that stays crisp. The yogurt adds moisture and helps the breadcrumbs adhere beautifully. If you skip the yogurt, the coating will dry out and crack during baking.
- Place the coated slices onto the prepared baking sheet, spacing them evenly so they don’t touch. This allows the heat to circulate and ensures even cooking. A single layer is key; overcrowding leads to steaming rather than baking. The edges should be slightly raised, giving them a natural lift. This step might seem trivial, but it’s the difference between a perfect bite and a soggy mess.
- Lightly drizzle olive oil over each slice to help the breadcrumbs brown. The oil also adds a glossy finish that makes the bites look appetizing. Use a spray bottle or a brush for even coverage. Too much oil will make them greasy; too little will leave them dry. The right amount gives that irresistible shine.
- Bake for 12–15 minutes, flipping halfway through, until the crust turns golden brown and the edges pull away slightly. Keep a close eye on the color; it should be a deep amber, not burnt. The cheese inside should be just beginning to melt, not fully liquefied. If the edges brown too quickly, lower the temperature to 190 °C (375 °F). This step is the moment of truth.
- Remove the baking sheet from the oven and let the bites rest for 3 minutes. This short rest allows the cheese to set, preventing it from sliding off when you bite into it. The crust will firm up slightly, making it easier to handle. Keep the rest time short; too long and the cheese will cool and lose its meltiness. This is a small step that makes a big difference.
- While the bites are still hot, sprinkle smoked paprika and chili flakes over them for a burst of flavor. Add a quick squeeze of lemon juice to brighten the profile even further. This final touch brings the dish to life and adds a visual pop of color. Serve immediately with your favorite dip. The moment the first bite hits your tongue, you’ll know you’ve nailed it.
That's it — you did it. But hold on, I've got a few more tricks that'll take this to another level...
Insider Tricks for Flawless Results
The Temperature Rule Nobody Follows
Many people bake at 350 °F, assuming it’s the sweet spot. In reality, 400 °F is the sweet spot for crispness without burning the cheese. The higher heat caramelizes the breadcrumb shell faster, giving that satisfying crunch. I once tried 350 °F and the crust stayed doughy. The next time, I bumped the temperature and the results were game‑changing.
Why Your Nose Knows Best
The aroma of the baking halloumi is a powerful indicator of doneness. When the scent shifts from cheesy to slightly caramelized, the crust is ready. If you’re unsure, look for a golden amber color and a faint crackle when you touch the top. The smell will tell you exactly when to pull them out. Trust your nose; it’s the most reliable guide.
The 5‑Minute Rest That Changes Everything
Letting the bites rest for exactly five minutes after baking sets the cheese perfectly. The rest time allows the interior to firm up, preventing a gooey mess. If you skip this step, the cheese will slide off the slice, ruining the bite. I once served them immediately and the result was a sad, melted mess. The five‑minute rest is worth the wait.
Dipping Sauce Matters
A creamy, herb‑infused yogurt dip elevates the dish, adding a cool contrast to the hot, buttery cheese. The yogurt’s tanginess cuts through the richness and enhances the overall flavor profile. I recommend adding dill and a squeeze of lemon to the dip for brightness. A simple sauce can transform a good snack into a memorable experience. If you’re feeling adventurous, try a spicy harissa yogurt for a kick.
Batch Baking for Parties
When hosting, bake the bites in two batches to keep them hot and fresh. Keep the first batch on a rack in a warm oven set to 200 °C until the second batch finishes. This ensures that every bite is served at the ideal temperature. I’ve done this at a wedding and the crowd loved it. Don’t rush the process; a little patience pays off.
Storing and Reheating Secrets
If you have leftovers, store them in an airtight container in the fridge for up to three days. Reheat them in a preheated oven at 200 °C for 5–7 minutes, or use a toaster oven for a crisp finish. Add a tiny splash of water before reheating to create steam that keeps the crust from drying out. I’ve used this trick to bring them back to life after a busy week. The result is almost as good as fresh.
Creative Twists and Variations
Mediterranean Twist
Swap oregano for fresh basil and sprinkle chopped sun‑dried tomatoes over the baked bites. The basil adds a sweet, aromatic note, while the tomatoes provide a burst of umami. Pair with a tzatziki dip for a full Mediterranean experience.
Spicy Sriracha Glaze
Drizzle a thin layer of Sriracha over the hot bites before serving. The heat of the sauce contrasts beautifully with the mellow cheese. Serve with a cool cucumber yogurt to balance the spice.
Herbed Parmesan Crust
Replace panko breadcrumbs with grated Parmesan and mix in fresh thyme. The Parmesan adds a nutty depth, and thyme brings earthiness. The crust becomes a savory, cheesy delight.
Citrus‑Infused Yogurt Dip
Blend Greek yogurt with orange zest, lemon juice, and a pinch of salt for a bright, refreshing dip. The citrus lifts the cheese’s richness, making each bite feel lighter. It’s perfect for summer gatherings.
Sweet Caramelized Onion Glaze
Sauté thinly sliced onions until caramelized, then drizzle over the hot bites. The sweetness of the onions pairs wonderfully with the salty cheese. A splash of balsamic vinegar adds a tangy finish.
Smoky Chipotle Finish
Dust the baked bites with smoked chipotle powder and serve with a smoky chipotle mayo. The chipotle gives a deep, smoky heat that complements the cheese’s buttery texture. This variation is a hit with bold flavor lovers.
Storing and Bringing It Back to Life
Fridge Storage
Store baked halloumi bites in an airtight container in the refrigerator for up to three days. Keep them on a rack to avoid condensation that can make the crust soggy. When ready to eat, let them sit at room temperature for a few minutes before reheating. The cheese will stay melty, and the crust will hold its crunch. This method is great for meal prep or quick snacks.
Freezer Friendly
Place the baked bites on a parchment‑lined tray and freeze until solid, then transfer to a freezer bag. They can be stored for up to two months without losing flavor. When you’re ready, bake directly from frozen at 200 °C for 10–12 minutes. The texture remains crisp, and the cheese stays delicious. Freezing is a lifesaver for busy days.
Best Reheating Method
Reheat in a preheated oven at 200 °C for 5–7 minutes, or use a toaster oven for a crisp finish. Add a splash of water to the baking sheet before reheating to create steam, which keeps the crust from drying out. Avoid microwaving, as it will make the cheese rubbery and the crust soggy. The oven method restores the original texture and flavor. Serve immediately for the best experience.