I was standing in my kitchen, staring at a box of corned beef that had been sitting in my fridge for a week, feeling the urge to do something heroic with it. The thought of a bland, overcooked sandwich lingered, but I knew a better destiny awaited those meaty cubes. I had been experimenting with Reuben flavors for months, and last night I dared myself to turn the classic sandwich into bite‑sized, hand‑held wonders that could be served at a party, a game night, or a lazy Sunday brunch. That moment of culinary rebellion turned into a revelation, and I can’t keep it to myself.
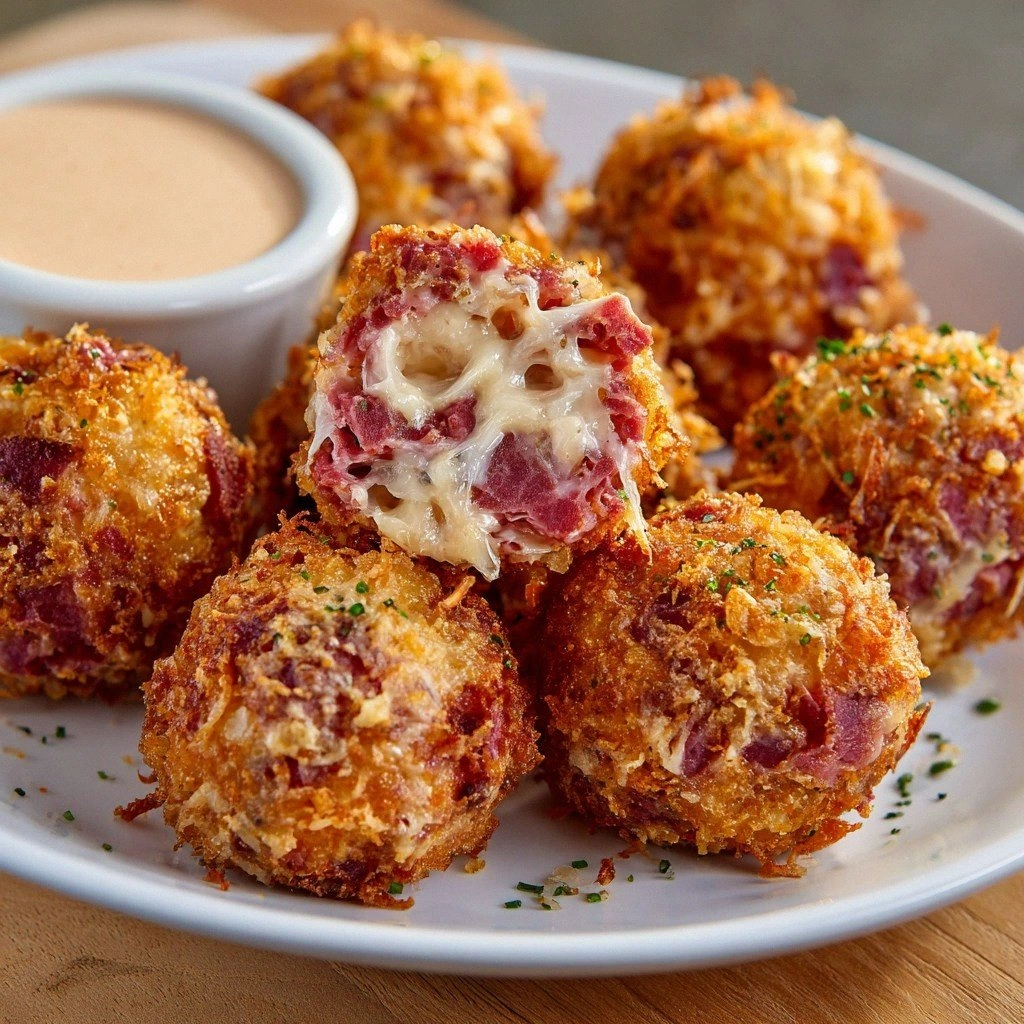
Picture this: a golden, crisp shell that crackles like thin ice when you bite into it, revealing a molten core of melted Swiss, sauerkraut’s tang, and corned beef’s savory depth. The aroma is a symphony of roasted garlic and onions, a warm invitation that draws people in faster than a pizza delivery. The first bite is a textural dance—crispy exterior, gooey interior—and the flavor profile hits every note on the Reuben scale: salty, tangy, smoky, and just a hint of sweet from the sauerkraut. That moment when the sauce drizzles over the ball, coating it like velvet, is pure magic.
What sets this version apart is not just the bite‑size convenience. It’s the deliberate layering of textures, the use of fresh, high‑quality corned beef, and the secret blend of spices that elevate the traditional sandwich into a showstopper. I’ve added a subtle kick to the sauce that keeps the palate engaged, and I’ve perfected the batter so the balls hold together without becoming soggy. I dare you to taste this and not go back for seconds; I’ve already lost a handful to my own craving.
If you’ve ever struggled with making Reuben‑style bites that stay together, you’re not alone—this recipe is a fix for that exact problem. Picture yourself pulling this out of the pan, the kitchen smelling incredible, the crowd erupting in applause, and you feeling like a culinary wizard. Let me walk you through every single step—by the end, you’ll wonder how you ever made it any other way.
What Makes This Version Stand Out
- Taste: The flavor is a perfect balance of salty, tangy, and smoky, with a subtle heat that lingers without overwhelming the palate.
- Texture: Crispy, golden shells give way to a molten, cheese‑laden center that melts in your mouth.
- Simplicity: Every ingredient is pantry‑friendly, and the method requires no fancy equipment.
- Uniqueness: The addition of a spicy Thousand Island‑style sauce adds a fresh twist that sets these balls apart from ordinary Reuben sandwiches.
- Crowd Reaction: Party guests can’t resist the bite‑size format, and the sauce makes it a conversation starter.
- Ingredient Quality: Using high‑quality corned beef and fresh sauerkraut transforms the dish into a gourmet experience.
- Cooking Method: A quick fry in neutral oil locks in moisture and creates that coveted crunch.
- Make‑Ahead Potential: These balls can be prepared ahead, frozen, and reheated with minimal loss of quality.
Inside the Ingredient List
The Flavor Base
Corned beef is the star of the show, bringing a savory, salty depth that is quintessential to any Reuben experience. The key is to use fresh, high‑quality corned beef that’s been chopped into bite‑sized cubes; this ensures even cooking and a consistent flavor throughout each ball. If you’re using a pre‑seasoned variety, you can reduce the amount of added salt, but be careful not to over‑season the mix, or the balls will become too salty.
The Tangy Companion
Sauerkraut adds a zesty kick that balances the richness of the meat and cheese. It’s essential to drain it well—excess moisture will make the mixture soggy and prevent a crisp crust. If you prefer a milder tang, use a smaller portion or rinse the kraut under cold water, but keep in mind that part of the charm is that sharp bite.
The Creamy Core
Swiss cheese provides a mild, nutty flavor that melts beautifully, creating a gooey interior that contrasts with the crunchy exterior. A good rule of thumb is to use one cup of shredded Swiss per four servings; this amount is enough to coat the mixture without overpowering it. If you’re looking for a sharper cheese, a blend of Swiss and cheddar works wonders, but be aware that cheddar can melt faster and might cause the balls to become overly soft.
The Binding Crew
Breadcrumbs act as the glue that holds everything together. Regular breadcrumbs are fine, but if you’re aiming for a gluten‑free version, swap them for almond or oat breadcrumbs. The breadcrumbs also absorb excess moisture and help the balls maintain a firm structure during frying. A pinch of garlic powder and onion powder add depth without overpowering the primary flavors.
The Final Flourish
The beaten egg is a binder that keeps the mixture cohesive, while a splash of oil for frying gives the balls their signature crispness. Salt and pepper are essential for seasoning—use them sparingly at first, taste, and adjust. The oil should be neutral (vegetable or canola) to avoid interfering with the Reuben flavors.
Everything's prepped? Good. Let's get into the real action.
The Method — Step by Step
- Step 1: In a large mixing bowl, combine the chopped corned beef, drained sauerkraut, shredded Swiss cheese, and breadcrumbs. Stir gently until the mixture is uniform. The goal is to coat every cube without crushing the cheese. This is the foundation of flavor—don’t rush it. If you’re feeling adventurous, sprinkle in a pinch of paprika for a subtle smoky note.
- Step 2: Beat the egg in a shallow dish. Add garlic powder, onion powder, salt, and pepper to the egg, whisking until the spices are fully incorporated. The egg should be bright and slightly frothy—this indicates it’s ready for binding. Pour the egg mixture over the meat blend, then toss until every component is evenly coated. The mixture should feel moist but not wet.
- Step 3: Shape the mixture into small, bite‑sized balls—about the size of a golf ball. Aim for uniformity so they cook evenly. If you’re worried about them falling apart, let them rest in the fridge for 15 minutes to firm up. This step is crucial for that perfect bite; a good shape ensures a crisp exterior.
- Step 4: Heat the oil in a deep skillet or pot to 350°F (175°C). Use a thermometer for accuracy. The oil should be hot enough that a small piece of dough sizzles immediately upon contact. Too hot, and the balls will burn; too cool, and they'll soak up oil. Keep the temperature steady—this is where precision pays off.
- Step 5: Carefully lower the balls into the oil in batches, being mindful not to overcrowd the pan. Fry for 3–4 minutes, turning occasionally, until they achieve a golden brown hue. The edges should start pulling away from the center, signaling a crisp crust. Keep an eye on the temperature—maintaining 350°F ensures even cooking.
- Step 6: Once golden, remove the balls with a slotted spoon and place them on a paper towel‑lined plate to drain excess oil. Let them rest for a minute; the steam will settle, and the interior will firm slightly. This rest period is often overlooked but essential for that perfect bite.
- Step 7: While the balls cool, whip up the spicy Thousand Island sauce. In a bowl, combine mayo, ketchup, a dash of hot sauce, a splash of apple cider vinegar, and a pinch of sugar. Whisk until smooth. Adjust the heat to taste—this sauce should coat the balls like velvet without drowning them.
- Step 8: Serve the balls immediately, accompanied by the sauce for dipping. The aroma of sizzling oil and the crunch of the crust will draw people in, and the sauce’s tang will keep the flavor alive. If you’re plating for a crowd, arrange the balls in a circle with the sauce in the center—an eye‑catching presentation that’s as delicious as it is visual.
That's it—you did it. But hold on, I've got a few more tricks that'll take this to another level. The secret sauce, the precise timing, and the subtle seasoning tweaks are what separate a good batch from a legendary one.
Insider Tricks for Flawless Results
The Temperature Rule Nobody Follows
Maintaining a steady 350°F is the key to a crisp exterior and a juicy interior. Many cooks let the oil cool when adding the first batch, which causes the balls to soak up excess oil and become soggy. Use a thermometer, and if you’re working in a hot kitchen, keep a small heat source like a low flame under the pan to maintain temperature.
Why Your Nose Knows Best
The aroma is your best judge of doneness. When the balls begin to sizzle and emit a deep, nutty smell, that’s your cue to flip them. The scent is a natural indicator of the Maillard reaction, which gives the crust its golden color and savory flavor.
The 5‑Minute Rest That Changes Everything
Letting the fried balls rest on a paper‑towel line for five minutes allows the steam to escape and the interior to set. I’ve seen friends skip this step, resulting in a mushy center that collapses when they bite. Trust me, that short rest makes the difference between a mediocre and a memorable bite.
The Right Egg Ratio
Using a single large egg is enough to bind the mixture, but if you’re making a larger batch, consider using an extra egg or a splash of milk to keep the mixture from drying out during frying. The egg’s proteins create a network that traps moisture, keeping the interior moist.
The Spicy Thousand Island Twist
Adding a dash of sriracha or chipotle mayo to the sauce brings a subtle heat that complements the Reuben flavors. If you prefer a milder sauce, simply reduce the hot sauce amount. The sauce should coat the balls like velvet, not drown them.
Creative Twists and Variations
This recipe is a playground. Here are some of my favorite ways to switch things up:
Tex‑Mex Reuben Balls
Swap the Swiss cheese for pepper jack and add a teaspoon of cumin to the mixture. Serve with a chipotle‑yogurt dip. This variation brings a smoky, spicy kick that pairs perfectly with the corned beef.
Mediterranean Fusion
Use feta cheese and chopped olives in the mix, and replace the Thousand Island with a lemon‑yogurt sauce. The briny olives add a salty contrast that elevates the dish into a Mediterranean‑style bite.
BBQ Corned Beef Balls
Marinate the corned beef in a smoky BBQ sauce before mixing. Add a splash of molasses to the sauce for sweetness. The result is a sweet‑smoky ball that’s irresistible.
Vegan Reuben Balls
Replace the corned beef with a mix of sautéed mushrooms and plant‑based meat substitute. Use a vegan cheese that melts well and a vegan mayo for the sauce. This version keeps all the classic flavors while being fully plant‑based.
Gourmet Truffle Twist
Add a teaspoon of truffle oil to the batter and sprinkle truffle salt over the finished balls. The earthy aroma of truffle elevates the dish to a luxurious level.
Spicy Cajun Reuben Balls
Infuse the batter with Cajun seasoning and serve with a spicy remoulade. The fiery kick will have your guests reaching for more.
Storing and Bringing It Back to Life
Fridge Storage
Place the cooled balls on a parchment‑lined tray in the refrigerator for up to 3 days. Store them in an airtight container to keep the crust from becoming soggy. When ready to serve, reheat in a 350°F oven for 10 minutes or in a skillet for a quick re-crisp.
Freezer Friendly
Freeze the balls in a single layer on a baking sheet for 2–3 hours, then transfer to a freezer bag. They’ll stay good for up to 2 months. When reheating, bake at 375°F for 12 minutes or microwave on high for 90 seconds, then finish in a hot skillet for crispness.
Best Reheating Method
To bring back that fresh‑fry crunch, heat a skillet over medium heat, add a splash of oil, and place the balls in. Cook for 2–3 minutes per side, or until golden. For a quick option, use a toaster oven set to 400°F for 5 minutes. A tiny splash of water before reheating steams the interior, restoring moisture without making the exterior soggy.