One-Bowl Chocolate Chip Banana
Picture this: you’re halfway through a hectic Saturday, the fridge is a kaleidoscope of leftovers, and your craving for something sweet has turned into a full‑blown culinary obsession. You remember the last time you tried a banana bread that felt like a soggy slab of dough, and you swear you’ll never settle for that again. Today, I’m pulling out the ultimate one‑bowl banana bread that defies that memory, turning humble bananas into a luscious, chocolate‑laden loaf that practically melts in your mouth. The aroma that will fill your kitchen as it bakes is like a warm hug from a childhood memory, and the first bite is a symphony of sweet banana, rich chocolate, and a buttery crust that crackles just enough to satisfy the crunch craving in everyone.
I’m not just talking about any banana bread; this is the version that takes the classic to the next level, with a trick that most recipes miss—using the banana’s natural sweetness to replace half the sugar, and a splash of vanilla that deepens the flavor profile. I dare you to taste this and not go back for seconds. The batter is thick enough to hold its shape, yet silky when you scoop it out. The chocolate chips are evenly distributed, so each bite is a surprise of molten chocolate that coats the bread like velvet. If you’ve ever struggled with a dry loaf, this one will make you wonder how you ever made it any other way.
The real secret lies in the simplicity of the method: one bowl, one pan, one oven, and a few minutes of your time. No pre‑mixing, no separate wet or dry bowls, no whisking. Just mash, mix, fold, bake. I’ll walk you through every single step, and by the end, you’ll have a loaf that looks like it came from a bakery, with a golden crust, a moist crumb, and a chocolatey finish that will have your friends begging for the recipe. And trust me, the kitchen will smell incredible for at least an hour after you pull it out.
So grab your mixing bowl, preheat the oven, and let’s dive into the magic that turns bananas and chocolate into a single‑bowl masterpiece. I promise, the process is as satisfying as the result—no fancy tools, no complicated techniques, just pure, honest baking that celebrates the humble banana. Let me walk you through every single step — by the end, you’ll wonder how you ever made it any other way.
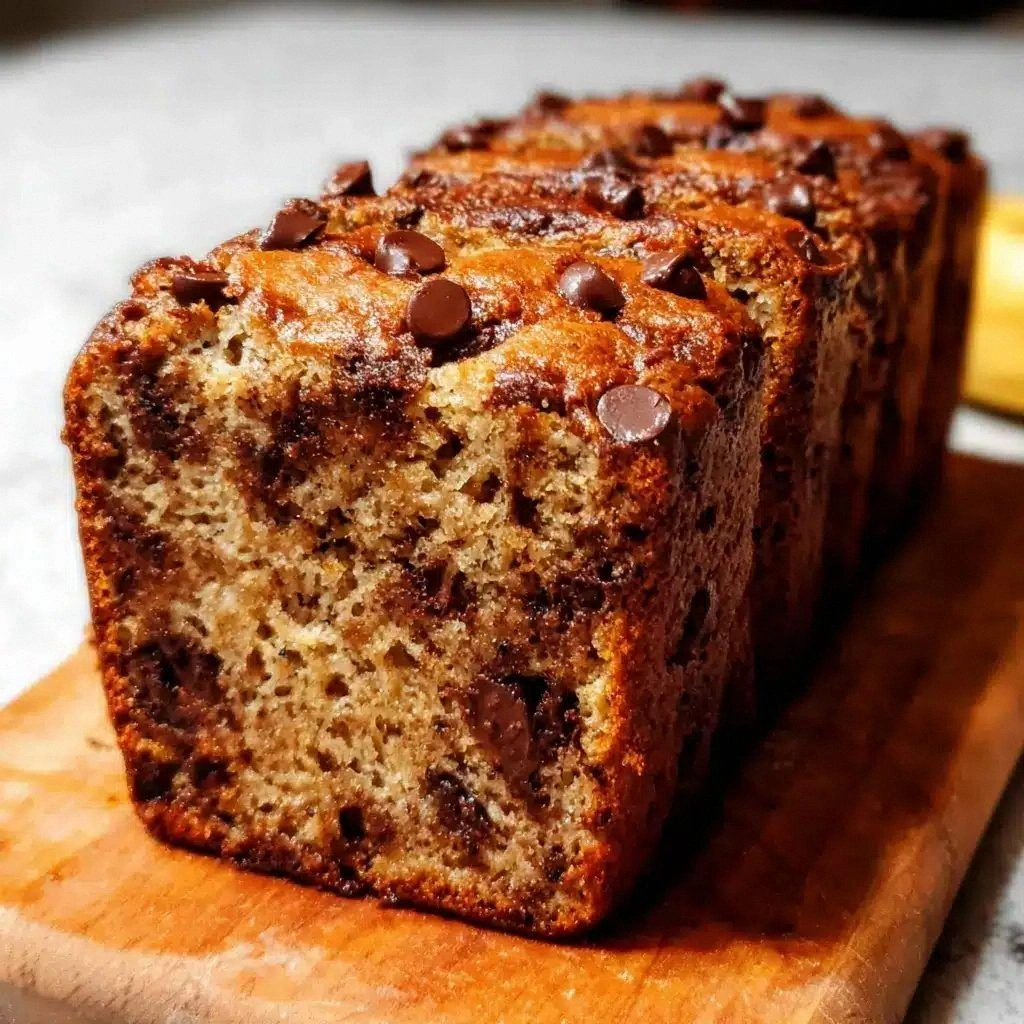
What Makes This Version Stand Out
- Flavor: The combination of ripe bananas and semisweet chocolate creates a depth that’s both sweet and slightly bitter, a balance that elevates the entire loaf.
- Texture: The batter’s thickness keeps the bread moist while the chocolate chips melt into gooey pockets, giving each bite a delightful contrast.
- Simplicity: One bowl, one pan, one oven—no separate wet or dry mixtures, no whisking, just a quick mash and fold.
- Time‑Efficiency: Prep takes 15 minutes, bake 30, total 45; perfect for a quick weekend treat or a last‑minute dessert.
- Versatility: Swap out the chocolate chips for walnuts, pecans, or dried fruit for a personalized twist.
- Make‑ahead: The loaf can be cooled and stored for up to four days, or frozen for longer shelf life.
- Audience Appeal: It’s a crowd‑pleaser that satisfies both kids and adults with its sweet, comforting flavor.
- Ingredient Quality: Using fresh, ripe bananas and high‑quality chocolate chips ensures the best flavor profile.
Alright, let’s break down exactly what goes into this masterpiece…
Inside the Ingredient List
The Flavor Base
All-purpose flour is the backbone of this loaf, giving it structure and a tender crumb. If you’re looking for a lighter texture, swap half the flour for whole wheat; just keep the ratio of dry ingredients the same. Skipping flour entirely will result in a batter that doesn’t set properly, so it’s essential for that classic banana bread feel.
The Texture Crew
Baking soda is the leavening agent that helps the bread rise and gives it that airy interior. A pinch of salt balances the sweetness and brings out the chocolate’s depth. The melted butter adds richness, while the egg binds everything together and contributes to the crumb’s softness. If you’re vegan, replace the butter with coconut oil and the egg with a flaxseed egg for a similar effect.
The Unexpected Star
The ripe bananas are the star; their natural sugars replace half the granulated sugar, cutting calories while adding depth. Mash them until smooth but leave a few lumps—this keeps the bread from becoming too dense. If you can’t find ripe bananas, a cup of unsweetened applesauce works, though the flavor profile shifts slightly.
The Final Flourish
Semisweet chocolate chips are the pièce de résistance, offering pockets of molten chocolate that melt in your mouth. If you prefer a darker bite, switch to dark chocolate chips; if you’re a fan of sweet, try white chocolate. Adding a tablespoon of espresso powder can intensify the chocolate flavor without altering the sweetness.
Everything's prepped? Good. Let's get into the real action…
The Method — Step by Step
- Preheat the oven to 350°F (175°C) and grease a 9×5 inch loaf pan or line it with parchment paper. While the oven heats, gather all your ingredients so you’re ready to roll. The pan should be at room temperature to avoid temperature shock when the batter is poured in.
- In a large bowl, whisk together the flour, baking soda, and a pinch of salt. This dry mix will be the backbone of your banana bread. Make sure the flour is sifted if you prefer an extra fluffy crumb.
- In a separate bowl, mash the ripe bananas with a fork until mostly smooth but still slightly lumpy for texture. Stir in the melted butter, sugar, egg, and vanilla extract until the mixture is glossy. The batter should look like a thick, creamy pudding.
- Pour the wet banana mixture into the dry bowl. Stir gently with a spatula, just until the batter is moistened; it should be thick and slightly lumpy. Overmixing will make the bread tough, so keep it gentle.
- Fold in the chocolate chips, ensuring even distribution. The chips will melt into pockets of gooey chocolate. If you’re feeling adventurous, add a tablespoon of peanut butter to the mix for a nutty undertone.
- Pour the batter into the prepared loaf pan, smoothing the top with a spatula. Tap the pan lightly on the counter to release air bubbles. The batter should spread evenly and fill the pan’s corners.
- Bake for 30 minutes, or until a toothpick inserted into the center comes out clean. The loaf should develop a golden crust. Keep an eye on the edges; if they brown too fast, tent the loaf with foil. This prevents over-browning.
- Remove from oven and let the bread cool in the pan for 10 minutes before transferring to a wire rack to cool completely. This step prevents the loaf from becoming soggy at the bottom.
- Slice and serve warm or at room temperature. Drizzle a little honey if you want extra sweetness. Store any leftovers in an airtight container for up to four days.
That's it — you did it. But hold on, I've got a few more tricks that'll take this to another level…
Insider Tricks for Flawless Results
The Temperature Rule Nobody Follows
Many bakers bake banana bread at 375°F, but the lower 350°F allows the loaf to rise evenly without scorching the crust. If you’re in a hot climate, keep an eye on the loaf; the oven can run hotter than the dial suggests. I once baked at 375°F and the top charred while the center stayed raw. Lesson learned.
Why Your Nose Knows Best
When the loaf starts to look golden, trust your nose. A faint, sweet aroma means the sugars are caramelizing just right. If you smell a sharp, burnt scent, pull it out immediately. My friend once left the bread for an extra five minutes and it was a charred disaster.
The 5-Minute Rest That Changes Everything
Letting the loaf rest in the pan for 10 minutes before moving it to a rack preserves the moisture at the bottom. Skipping this step often results in a soggy crumb that feels like a sponge. I’ve seen people try to slice the bread while still hot, only to have the chocolate chips melt into a sticky mess.
Use a Loaf Pan with a Lining
A parchment‑lined pan gives you a clean release and a beautiful crust. The paper also prevents the batter from sticking, so you can remove the loaf without breaking the edges. If you don’t have parchment, a silicone mat works just as well.
Don’t Overmix
Once the wet and dry ingredients are combined, stir just until the flour is moistened. Overmixing creates gluten strands that make the bread tough. My first batch was a hard, rubbery loaf because I kept stirring. I’ve learned that a few gentle folds are enough.
Creative Twists and Variations
This recipe is a playground. Here are some of my favorite ways to switch things up:
Nutty Banana Crunch
Add ½ cup chopped walnuts or pecans for a crunchy texture. The nuts complement the banana’s sweetness and add a buttery flavor. Serve with a dollop of whipped cream for a dessert that feels indulgent.
Chocolate‑Covered Banana Swirl
Fold in a handful of white chocolate chips and swirl with a chocolate‑brownie batter for a two‑tone loaf. The white chocolate adds a sweet, creamy contrast while the brownie batter gives a fudgy center.
Espresso‑Infused Delight
Add a tablespoon of espresso powder to the dry mix to deepen the chocolate flavor. The coffee undertones pair beautifully with the banana’s natural sweetness, making it a perfect after‑dinner treat.
Spiced Banana Bread
Stir in ½ teaspoon cinnamon, a pinch of nutmeg, and a dash of ground ginger. The spices give the loaf a warm, aromatic profile that feels like a cozy hug on a chilly evening.
Vegan Banana Bliss
Swap the butter for melted coconut oil, replace the egg with a flaxseed “egg,” and use a plant‑based chocolate chip. The result is a moist, chocolatey loaf that’s entirely dairy‑free.
Banana‑Chocolate Chip Muffins
Divide the batter into a 12‑cavity muffin tin and bake at 350°F for 20‑22 minutes. Muffins are perfect for on‑the‑go breakfasts or snack time. The individual portions make it easy to share.
Storing and Bringing It Back to Life
Fridge Storage
Cool the loaf completely, then wrap it tightly in plastic wrap or aluminum foil. Store in the refrigerator for up to four days. The moisture from the fridge keeps the bread from drying out, but be sure to let it return to room temperature before slicing.
Freezer Friendly
Slice the loaf before freezing; this allows you to thaw only what you need. Wrap each slice in plastic wrap and place in a freezer bag. Freeze for up to three months. When ready, thaw at room temperature or toast slices for a warm, crisp bite.
Best Reheating Method
Reheat slices in a toaster oven at 350°F for 5 minutes, or in a microwave on medium for 30 seconds. Add a tiny splash of water before reheating; it steams the bread back to perfection, preventing it from becoming rubbery.