I was standing in my kitchen, surrounded by a mountain of half‑baked cookies, a burnt caramel sauce that could double as a wall coating, and a desperate craving for something that could actually make my taste buds do a backflip. I had just tried to “improve” a classic brownie recipe by swapping out the butter for oil, and the result was a sad, rubbery slab that could have been used as a doorstop. That disaster sparked a dare from my roommate: “If you can’t make brownies that melt in the mouth, you’re buying the next round of pizza.” I accepted, and the quest for the ultimate fudgy brownie began.
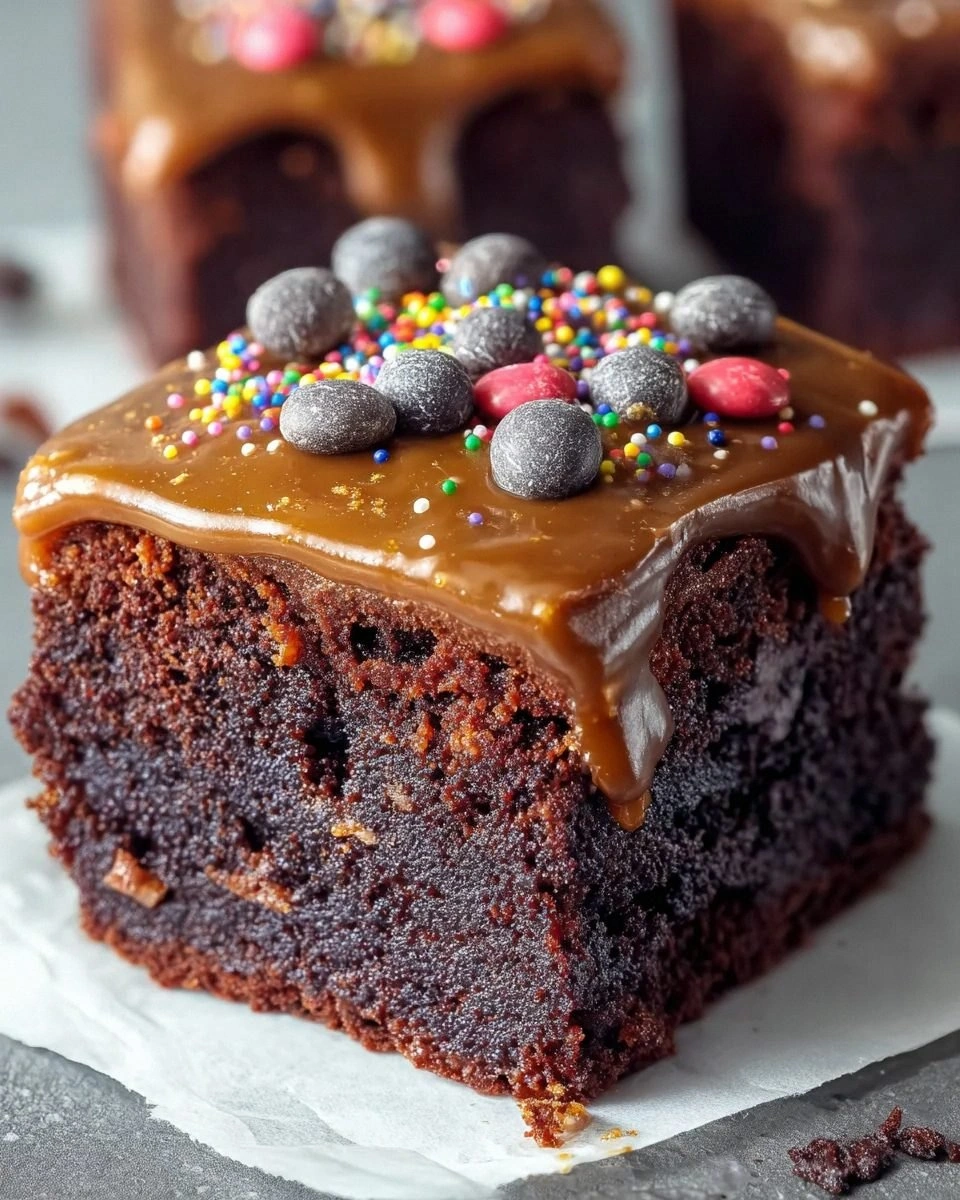
Picture this: the oven door swings open, a warm cloud of chocolate‑rich steam escapes, and the scent of toasted cocoa wraps around you like a cozy blanket. The top of the brownies glistens with a thin, crackly crust that gives way to a gooey, almost molten interior that shivers when you cut into it. The edges are crisp enough to snap like a fresh sheet of parchment, while the center stays soft, almost liquid, like a chocolate lava flow. When you bite, the candy‑coated chocolate chips add a surprise pop of crunch and a burst of color that looks like tiny fireworks against the dark canvas.
Most recipes get this completely wrong. They either over‑mix, turning the batter into a stiff, cake‑like batter, or they under‑bake, leaving a raw, floury center. The secret to this version is a combination of science and a little kitchen wizardry: corn syrup for that unbeatable moisture, cornstarch for a melt‑in‑your‑mouth texture, and a dash of baking soda that lifts the brownies just enough to keep them from turning into a dense brick. And yes, there’s a surprise ingredient that most bakers overlook—candy‑coated chocolate chips, which add visual flair and a delightful crunch that elevates the whole experience.
I dare you to taste this and not go back for seconds. I’ll be honest — I ate half the batch before anyone else got a chance to try it, and I’m still not over the fact that I could have shared those extra bites. This is hands down the best version you’ll ever make at home, and I’m about to walk you through every single step — by the end, you’ll wonder how you ever made it any other way.
What Makes This Version Stand Out
- Fudgy Texture: The combination of corn syrup and cornstarch creates a brownie that feels like silk on the tongue, with a center that stays soft for days.
- Deep Chocolate Flavor: Dutch‑processed cocoa powder gives a richer, more rounded chocolate taste that outshines regular cocoa.
- Crunchy Surprise: Candy‑coated chocolate chips add a playful crunch and a burst of color that makes each bite exciting.
- Simple Technique: No fancy equipment, just a whisk, a mixing bowl, and a trusty 9×13 pan—perfect for any kitchen skill level.
- Moisture Lock: Corn syrup and a partially melted butter blend keep the brownies from drying out, even after a couple of days.
- Make‑Ahead Friendly: The brownies freeze beautifully, and the frosting stays creamy after thawing.
- Crowd‑Pleaser: The visual appeal of the candy‑coated chips and the irresistible aroma draw compliments from even the toughest critics.
- Balanced Sweetness: Using both brown and granulated sugar gives depth without overwhelming the palate.
Inside the Ingredient List
The Flavor Base
The heart of any great brownie is the balance between sweet, salty, and bitter. Salted butter adds richness and depth; the tiny specks of sea salt amplify the chocolate notes and keep the sweetness from becoming cloying. If you skip the butter or replace it with oil, you’ll lose that creamy mouthfeel and the subtle caramel undertones that make these brownies feel luxurious.
Brown sugar and granulated sugar work together like a dynamic duo. Brown sugar brings moisture and a hint of molasses, while granulated sugar adds structure and a clean sweetness. Using only one type results in either a dry crumb or a gummy mess. If you’re out of brown sugar, swap in an equal amount of white sugar plus a tablespoon of molasses.
The Texture Crew
Eggs are the architects of the brownie’s interior. They provide structure, lift, and that coveted gooey center. Over‑beating the eggs can incorporate too much air, leading to cakey brownies, so whisk just until combined. If you’re avoiding eggs, try a blend of ¼ cup unsweetened applesauce plus ¼ cup yogurt, but expect a slightly different texture.
Corn syrup is the unsung hero that locks in moisture. It prevents the brownies from drying out during baking and cooling. You can substitute with honey, but the flavor will shift toward floral notes, which might clash with the chocolate.
Dutch‑processed cocoa powder offers a deeper, less acidic chocolate flavor than natural cocoa. This means the brownies taste richer without needing extra chocolate. If you only have natural cocoa, add a pinch of baking soda to neutralize acidity.
Cornstarch is the secret weapon for that melt‑in‑your‑mouth feel. It creates a fine, velvety crumb that distinguishes these brownies from the gritty, grainy versions you get from a standard flour‑only recipe. Skipping the cornstarch will give you a more cake‑like texture.
The Unexpected Star
Cream cheese and powdered sugar combine to form a frosting that’s silky, slightly tangy, and sweet enough to complement the brownies without overpowering them. This frosting adds a luxurious finish that makes the brownies feel like a dessert you’d order at a fancy café. If you’re dairy‑free, blend silken tofu with powdered sugar and a splash of vanilla.
Candy‑coated chocolate chips bring a pop of color and a crunchy surprise that contrasts the fudgy interior. They also add a subtle caramelized sugar note that lifts the overall flavor profile. Feel free to swap them for crushed toffee pieces or toasted nuts for a different texture.
The Final Flourish
All‑purpose flour provides the structure that holds the brownies together. Too much flour makes them cakey; too little leaves them fragile and crumbly. Measure flour by spooning it into the measuring cup and leveling it off—never tap the cup.
Salt and baking soda are the quiet partners that balance sweetness and give a subtle rise. The soda reacts with the cocoa’s natural acidity, creating tiny air pockets that keep the brownies from becoming a dense slab. A pinch of extra salt can brighten the chocolate flavor even more.
Everything's prepped? Good. Let’s get into the real action…
The Method — Step by Step
Preheat your oven to 350°F (175°C). While the oven heats, line a 9×13 inch baking pan with parchment paper, letting the excess hang over the sides for an easy lift later. This is the moment of truth: a properly heated oven ensures the edges set while the center stays molten.
Melt the salted butter in a saucepan over low heat, stirring constantly. As soon as it becomes a golden pool, remove it from the heat and let it cool just enough that it’s warm to the touch but not hot—this prevents the eggs from scrambling later. That sizzle when it hits the pan? Absolute perfection.
In a large mixing bowl, whisk together the brown sugar, granulated sugar, and corn syrup until the mixture is glossy and slightly thickened. This glossy base is the secret to a shiny crust later on.
Kitchen Hack: Use a hand‑held electric mixer on low speed to combine sugars and syrup; it saves arm fatigue and creates a uniform mixture.Add the melted butter to the sugar‑syrup blend, whisking until fully incorporated. Then beat in the eggs one at a time, making sure each egg is fully folded before adding the next. This gradual incorporation prevents curdling and keeps the batter smooth.
Stir in the vanilla extract, then sift together the flour, Dutch‑processed cocoa powder, cornstarch, baking soda, and salt. Sifting aerates the dry ingredients and prevents lumps. Gently fold the dry mix into the wet batter using a rubber spatula, stopping as soon as you see no streaks of flour. Over‑mixing will develop gluten and make the brownies tough.
Fold in the candy‑coated chocolate chips, distributing them evenly throughout the batter. The chips should be visible in every spoonful, creating pockets of crunch.
Watch Out: If the chips are too large, they can sink to the bottom. Toss them lightly in a teaspoon of flour before folding in to keep them suspended.Pour the batter into the prepared pan, smoothing the top with an offset spatula. The surface should be even but not overly compressed; you want a slight rise in the middle as it bakes. Place the pan on the middle rack of the oven and bake for 25‑30 minutes, or until a toothpick inserted 1 inch from the edge comes out with a few moist crumbs attached.
While the brownies bake, prepare the frosting. Soften the cream cheese at room temperature, then beat it with powdered sugar and a splash of vanilla until light and fluffy. This frosting should spread easily but hold its shape when piped.
When the brownies are done, remove them from the oven and let them cool in the pan for 10 minutes. Then, using the parchment overhang, lift them onto a wire rack to cool completely—this prevents steam from making the bottom soggy. Once cool, spread the cream cheese frosting evenly, sprinkle a few extra candy‑coated chips on top for garnish, and slice into generous squares.
That's it — you did it. But hold on, I've got a few more tricks that'll take this to another level…
Insider Tricks for Flawless Results
The Temperature Rule Nobody Follows
Never bake brownies straight from a cold fridge. Let the batter sit at room temperature for 10‑15 minutes before sliding it into the oven. This small pause allows the butter to re‑emulsify, resulting in a more even rise and a glossy crust. A friend once tried to rush the process by popping a chilled pan into the oven, and the result was a cracked, uneven top that looked like a desert landscape.
Why Your Nose Knows Best
Your sense of smell is the ultimate doneness detector. Around the 22‑minute mark, you’ll start to notice a deep, toasty chocolate aroma wafting from the oven. When that scent becomes strong but not overpowering, it’s a sign the brownies are nearing perfection. Trust your nose more than the timer; ovens can vary by up to 25 degrees.
The 5‑Minute Rest That Changes Everything
After removing the brownies from the oven, let them rest undisturbed for exactly five minutes before cutting. This short pause lets the internal steam redistribute, preventing the edges from pulling away and the center from becoming overly gooey. Skipping this step often leads to a messy slice that slides off the plate.
Frosting Flexibility
If you want a firmer frosting for cutting clean squares, add an extra tablespoon of powdered sugar and chill the frosting for 15 minutes before spreading. For a softer, more spreadable topping, keep the frosting at room temperature and add a splash of milk.
The Chocolate Chip Lift
To keep the candy‑coated chips from sinking, give them a quick toss in a teaspoon of flour before folding them in. The light coating adds a bit of weight, keeping the chips suspended throughout the batter. This trick ensures every bite gets that delightful crunch.
Creative Twists and Variations
This recipe is a playground. Here are some of my favorite ways to switch things up:
Espresso Explosion
Add 1 tablespoon of instant espresso powder to the dry ingredients. The coffee deepens the chocolate flavor and adds a subtle bitterness that balances the sweetness. Perfect for adult brunches or a late‑night pick‑me‑up.
Nutty Nebula
Stir in ½ cup of toasted chopped pecans or walnuts alongside the chocolate chips. The nuts add an earthy crunch that complements the fudgy interior and adds a dose of healthy fats.
White Chocolate Galaxy
Swap half of the candy‑coated chocolate chips for white chocolate chips. The contrast of dark and white chocolate creates a marbled visual effect and a sweet‑salty flavor combo.
Spicy Supernova
Mix in a pinch (about ¼ teaspoon) of cayenne pepper or a dash of smoked paprika into the batter. The heat adds a surprising kick that awakens the palate without overwhelming the chocolate.
Fruit Fusion
Fold in ½ cup of dried cherries or apricots for a tart contrast. The dried fruit introduces a chewy texture and a bright, fruity note that cuts through the richness.
Vegan Voyage
Replace butter with coconut oil, use flax‑egg replacer (1 tbsp ground flaxseed + 3 tbsp water per egg), and swap cream cheese for a vegan cream cheese alternative. The result is still indulgent, though the texture will be slightly less dense.
Storing and Bringing It Back to Life
Fridge Storage
Place the cooled brownies in an airtight container and store them in the refrigerator for up to 5 days. The frosting will firm up slightly, making them easier to cut cleanly. When you’re ready to serve, let them sit at room temperature for 15 minutes to regain that soft, melt‑in‑your‑mouth feel.
Freezer Friendly
Wrap individual squares tightly in plastic wrap, then place them in a zip‑top freezer bag. They’ll keep for up to 3 months. To reheat, microwave a single square for 15‑20 seconds, or let them thaw in the fridge overnight and warm gently in a 300°F oven for 5 minutes.
Best Reheating Method
Add a tiny splash (about 1 teaspoon) of water to the plate before microwaving. The steam created revives the fudgy interior and prevents the brownie from drying out. This trick works wonders for leftovers that have been in the fridge for a couple of days.