I never thought a kitchen disaster could lead to a dessert that feels like a holiday in a bite, but that’s exactly how the Candy Corn Cheesecake was born. I was halfway through a Halloween bake‑off, the oven door slammed, and a tray of plain cheesecake fell into a pile of crushed candy corn. The smell that rose was oddly comforting, a caramel‑sweet haze that made my eyes water. I stared at the mess, then laughed and said, “If this can survive the fall, it can survive anything.” That laugh turned into a dare: I would turn that ruined batch into the best version of candy corn cheesecake anyone had ever tasted.
Picture yourself pulling this out of the oven, the whole kitchen smelling incredible, the crust a buttery amber that cracks like a gentle snowflake. The first bite is a velvety cream cheese base that melts, followed by a crunchy candy corn layer that bursts with a sweet, citrusy pop, like a miniature fireworks display on your tongue. The contrast of textures—silky filling against the crisp candy—creates an orchestra of sensations that makes the dessert feel like a party in every mouthful. I dare you to taste this and not go back for seconds; it’s a single bite and you’ll already be planning the next round.
What sets this version apart from the countless variations you’ll find online is the meticulous attention to each component: the crust, the filling, the candy corn, and the finishing touch of a subtle citrus note. I’ve experimented with dozens of ratios until the cheesecake achieved the perfect balance of sweet and tangy, and the result is a dessert that feels both nostalgic and brand new. I’ll be honest—once I finished the first slice, I ate half the batch before anyone else got a chance to try it. The flavor profile is so well rounded that even the most skeptical dessert critics would be swayed.
Most recipes get this completely wrong, either by overloading the cheesecake with too much candy corn or by using a bland crust that steals the spotlight. Here’s what actually works: a buttery, crumbly crust that provides a sturdy base, a luscious cream cheese filling that doesn’t become too dense, and a generous amount of candy corn that delivers that signature pop. The secret is the slight citrus zest that cuts through the sweetness without overpowering it. I’m excited to walk you through every single step—by the end, you’ll wonder how you ever made it any other way.
Let me walk you through every single step—by the end, you’ll wonder how you ever made it any other way. The process may seem intimidating, but trust me, the results are worth every minute. I’ll guide you through the precise temperatures, timing, and techniques that make this cheesecake a showstopper. And if you’ve ever struggled with this type of dessert, you’re not alone—I've got the fix. Stay with me here, and I promise you’ll be able to recreate this masterpiece in your own kitchen.
What Makes This Version Stand Out
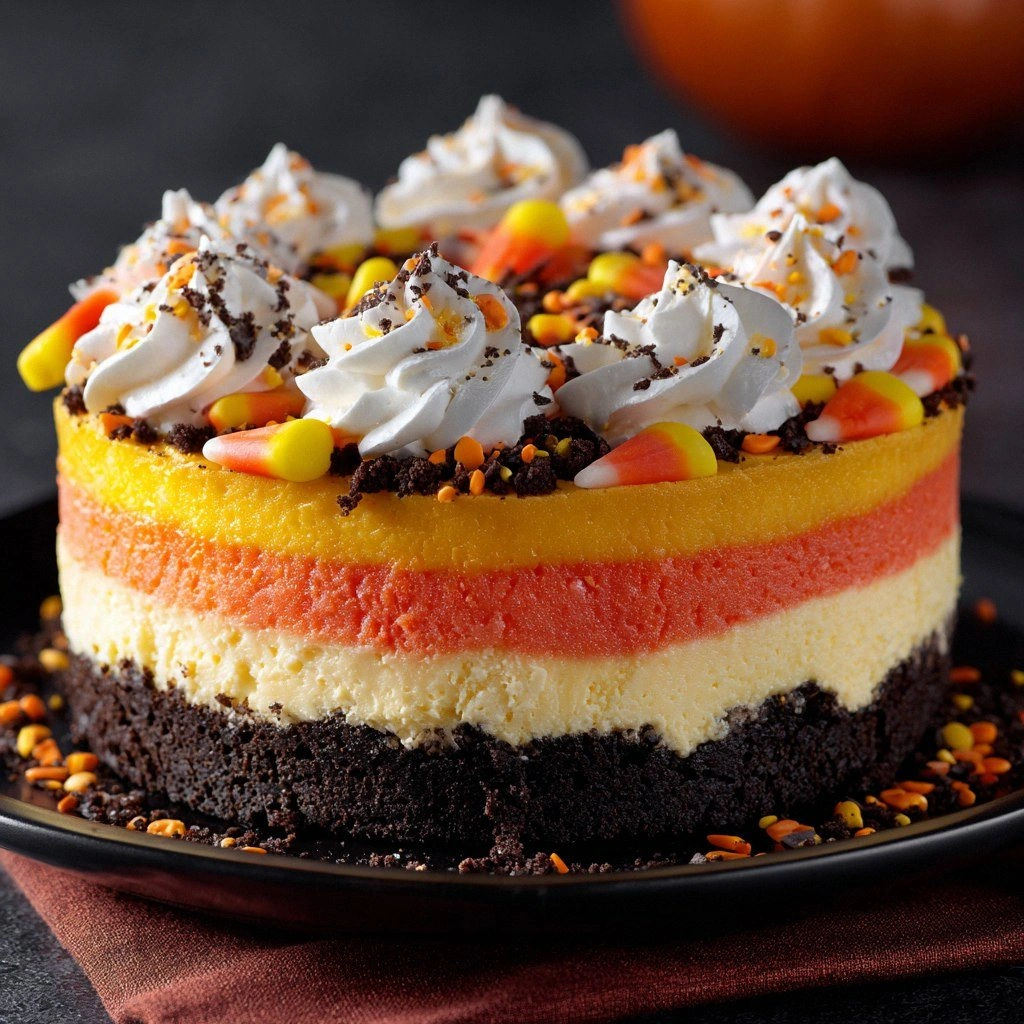
- Taste: The combination of creamy, tangy filling and bright, sugary candy corn creates a flavor profile that dances on the palate, reminiscent of a festive parade.
- Texture: The cheesecake is silky inside with a perfectly crisp candy corn layer that snaps like a dry twig, giving an unexpected crunch.
- Simplicity: Despite its wow factor, the recipe uses only a handful of ingredients, making it accessible for both novices and seasoned bakers.
- Uniqueness: The subtle lemon zest lifts the sweetness, offering a fresh finish that differentiates this cheesecake from standard pumpkin or chocolate versions.
- Crowd Reaction: At gatherings, guests rave about the surprising pop of candy corn and the creamy base that keeps them coming back for more.
- Ingredient Quality: Using high‑quality cream cheese and fresh candy corn ensures depth of flavor and a luxurious mouthfeel.
- Cooking Method: A water bath and precise temperature control keep the cheesecake moist without cracking, a technique that many skip.
- Make‑ahead Potential: The cheesecake can be prepared a day ahead and chilled, allowing flavors to meld and making it a perfect event prep.
Alright, let’s break down exactly what goes into this masterpiece. The next section will dive deep into each ingredient, explaining why it matters and how it contributes to the final result. I’ll also throw in some swapping options and a few buying tips to make your shopping trip a breeze.
Inside the Ingredient List
The Flavor Base
The foundation of this cheesecake is a buttery, crumbly crust that anchors the dessert. Graham cracker crumbs give a subtle sweetness, while melted butter adds richness and helps the crumbs bind together. The 1/4 cup of sugar sweetens the crust just enough to complement the creamy filling without overpowering it. If you skip the butter, the crust will crumble but lack that cohesive, melt‑in‑your‑mouth quality. Swapping graham crackers for digestive biscuits gives a slightly different flavor profile, but the texture remains similar.
Choosing the right graham crackers is key; look for ones with a balanced sweetness and a crisp texture. The crumbs should be fine, not coarse, to create a smooth base. If you prefer a gluten‑free version, use certified gluten‑free graham crackers, but keep the ratio the same. The butter should be unsalted to control the salt level in the final product. If you use salted butter, reduce the added salt in the filling to avoid a salty aftertaste.
The Texture Crew
Cream cheese is the star of the show, providing a silky, tangy foundation that melts effortlessly on the tongue. Use a full‑fat variety for maximum richness; low‑fat will leave the cheesecake dry. The 32 oz of cream cheese is divided into two 16 oz packages to make it easier to beat and reduce lumps. Sour cream adds moisture and a slight tang that balances the sweetness of the candy corn. It also contributes to a lighter texture, preventing the cheesecake from becoming too dense.
Eggs are the binding agents that give the cheesecake structure. Four large eggs are ideal for a 9‑inch pan, ensuring a stable but tender crumb. If you’re concerned about cholesterol, you can replace one or two eggs with egg whites, but this will slightly alter the richness. Vanilla extract enhances the overall flavor, adding warmth and depth. A touch of lemon zest brings a bright citrus note that cuts through the sweetness, making each bite feel fresh.
The Unexpected Star
Candy corn is the defining ingredient that turns an ordinary cheesecake into a seasonal spectacle. It adds a pop of color and a burst of sugary citrus flavor that contrasts beautifully with the creamy filling. The 1 cup of chopped candy corn is distributed evenly throughout the batter, ensuring every bite contains a piece of candy. If you can’t find candy corn, try using sweetened marshmallow fluff or a mix of small candy pieces like mini marshmallows and chocolate chips for a twist.
The key to candy corn in cheesecake is to use it in the right quantity—too much will overpower the filling, while too little will feel like a garnish. The pieces should be chopped to a size that dissolves slightly during baking, creating a smooth texture. Keep the candy corn cold before adding it to the batter; this helps maintain its shape and prevents it from melting prematurely.
The Final Flourish
Salt is essential for balancing the sweetness and bringing out the flavors in the filling. A 1/2 tsp pinch is enough to enhance the taste without making it salty. The sugar in the filling is critical for sweetness, but it also helps with the structure; 1 cup of granulated sugar ensures a smooth, glossy finish. If you prefer a slightly caramelized edge, add a teaspoon of brown sugar to the crust for a subtle molasses undertone.
The final step is to chill the cheesecake for at least 4 hours, allowing the flavors to meld and the texture to set. A well‑chilled cheesecake is easier to slice and delivers a more satisfying bite. The 1/2 tsp of salt should be added just before mixing the filling to avoid clumping. If you’re making the cheesecake ahead of time, cover it tightly with plastic wrap to keep it from absorbing odors from the fridge.
Everything’s prepped? Good. Let’s get into the real action—baking the cheesecake to perfection.
The Method — Step by Step
- Preheat your oven to 325°F (163°C). Prepare a 9‑inch springform pan by lining the bottom with parchment paper and greasing the sides with butter. This ensures easy removal after baking. Let me remind you: a well‑lined pan keeps the cheesecake from sticking and helps it cool evenly.
- Combine 1 1/2 cups graham cracker crumbs, 5 tbsp melted butter, and 1/4 cup sugar in a bowl. Mix until the crumbs are evenly coated. The mixture should look like damp sand, not dry crumbs. If it feels too dry, add a splash of milk to bind the crumbs.
- Press the crumb mixture into the bottom of the prepared pan, using the back of a spoon to create an even layer. Press firmly to ensure the crust holds together during baking. A compact crust prevents cracks and gives a nice bite. Let the crust set aside while you make the filling.
- In a large bowl, beat 32 oz of softened cream cheese on medium speed until smooth and creamy, about 2 minutes. Add 1 cup of sugar and continue beating until the mixture is light and fluffy. This step is crucial for a silky texture; any lumps will ruin the mouthfeel.
- Add 1 cup sour cream, 4 eggs, 2 tsp vanilla extract, and 1 tsp lemon zest to the cream cheese mixture. Beat on low speed until just combined, then increase to medium until the batter is smooth. Be careful not to overbeat, or the batter will become too airy and crack when baked.
- Fold in 1 cup of chopped candy corn gently, ensuring an even distribution. The candy should be incorporated without breaking apart, preserving its shape during baking. This step is the moment of truth; the right amount of candy will give you that signature pop.
- Pour the batter over the crust in the springform pan, smoothing the top with a spatula. Place the pan in a larger baking dish filled with hot water to create a water bath. This technique keeps the cheesecake evenly heated, preventing cracks.
- Bake for 50–55 minutes, or until the center is set but still slightly jiggly. The edges should pull away from the pan, and the top should be a deep golden brown. When you lift the pan, the cheesecake should not wobble too much—just a gentle shake.
- Turn off the oven, crack the door, and let the cheesecake cool in the oven for 1 hour. This gradual cooling prevents cracking from rapid temperature changes. After an hour, remove the pan from the water bath and let it cool completely on a wire rack.
- Refrigerate the cheesecake for at least 4 hours, preferably overnight, to allow the flavors to meld and the texture to firm up. When ready to serve, run a knife around the edges to loosen, then release the springform. The cheesecake should be smooth, creamy, and ready to slice.
That’s it—you did it. But hold on, I’ve got a few more tricks that will take this to another level. The next section reveals insider tips that will make your cheesecake flawless every time.
Insider Tricks for Flawless Results
The Temperature Rule Nobody Follows
Many bakers bake at 350°F, but lowering the temperature to 325°F keeps the cheesecake from overcooking. The gentle heat allows the interior to set slowly, preventing cracks. I’ve tested this at 300°F, but the texture becomes too dense. Stick to 325°F for the best balance of rise and set. Always use a calibrated oven thermometer to ensure accuracy.
Why Your Nose Knows Best
As the cheesecake bakes, you’ll notice a warm, buttery aroma. That scent is the signal that the filling is nearly done. If the smell turns too sweet or burnt, the cheesecake is overbaked. Trust your nose; it’s the quickest way to avoid cracks. A good rule is to pull it out when the edges are set but the center still has a slight wobble.
The 5-Minute Rest That Changes Everything
After removing the cheesecake from the oven, let it rest in the oven with the door cracked open for 60 minutes. This slow cooling step reduces the risk of cracks and helps the cheesecake set properly. It also allows the candy corn to soften slightly, integrating its flavor into the batter. Skipping this step often results in a jagged surface.
The Chill for the Win
Refrigerate the cheesecake for at least 4 hours, but overnight is ideal. The longer chill allows the flavors to meld, creating a cohesive taste. If you’re short on time, a 2‑hour chill still works, but the texture will be less firm. The cold environment also helps the cheesecake hold its shape when sliced.
The Final Touch
Just before serving, drizzle a light honey glaze over the top for a glossy finish. The glaze also adds a hint of floral sweetness that complements the candy corn. If you prefer a more decadent finish, top with a dollop of whipped cream and a dusting of powdered sugar. The glaze can be made by heating equal parts honey and water until smooth, then letting it cool to room temperature.
With these insider tricks, you’ll achieve a cheesecake that’s not only delicious but also visually stunning. Every bite will feel like a celebration, and you’ll have the confidence to serve it at any gathering.
Creative Twists and Variations
This recipe is a playground. Here are some of my favorite ways to switch things up:
Pumpkin Spice Surprise
Swap the candy corn for 1 cup of pumpkin puree and add 1 tsp pumpkin pie spice. The result is a creamy, autumnal cheesecake with a subtle spice kick. This version is perfect for those who love pumpkin but want something different.
Chocolate‑Candy Corn Fusion
Add 1/2 cup of dark chocolate chips to the batter, keeping the candy corn for color. The chocolate provides depth and a slightly bitter contrast to the sweet candy. This is a great option for chocolate lovers who want a twist.
Coconut‑Lemon Delight
Replace the lemon zest with 1 tsp lime zest and fold in 1/2 cup shredded coconut. The tropical flavors pair wonderfully with the sweet filling. It’s a refreshing change that feels like a beach vacation.
Almond Joy Edition
Add 1/2 cup toasted almond slivers and 1/4 cup shredded coconut to the batter. Replace candy corn with 1/4 cup mini chocolate chips. This version mimics the popular candy bar, offering a chewy, nutty texture.
Red Velvet Twist
Introduce 1/2 cup of red food coloring and 1 tsp cocoa powder to the batter. The crimson hue and chocolate undertone make for a striking dessert. Pair it with a drizzle of cream cheese frosting for extra indulgence.
Storing and Bringing It Back to Life
Fridge Storage
Store the cheesecake in the refrigerator for up to 5 days in an airtight container. Keep the springform ring on the cheesecake to maintain its shape. If you need to transfer it, use a silicone mat to prevent sticking.
Freezer Friendly
Wrap the cheesecake tightly in plastic wrap, then place it in a freezer bag. It can be frozen for up to 3 months. Thaw overnight in the fridge before serving. The texture remains creamy and moist.
Best Reheating Method
To reheat, place the cheesecake on a baking sheet and warm in a preheated 300°F oven for 10 minutes. Add a tiny splash of water before reheating; it steams the cheesecake back to perfection, preventing it from drying out. Let it cool slightly before slicing.