I remember the night I tried to make a “simple” chocolate cake for a dinner party, only to end up with a sticky mess that tasted like cardboard. That disaster was the spark that pushed me to hunt for a dessert that would wow my guests without the risk of culinary catastrophe. The moment I tasted the first bite of what would become my Brownie Bottom Mini Cheesecake, I was convinced I had stumbled onto a secret weapon for any gathering. I dare you to taste this and not go back for seconds.
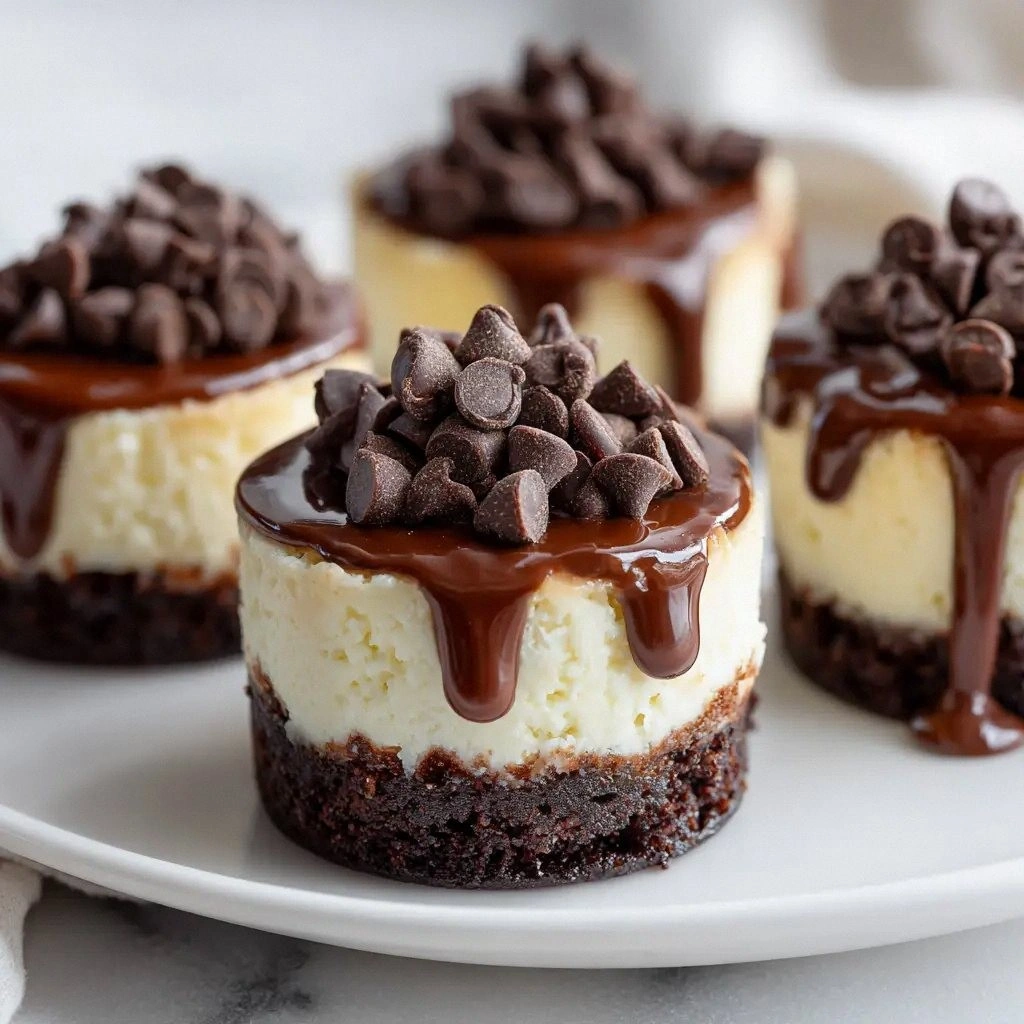
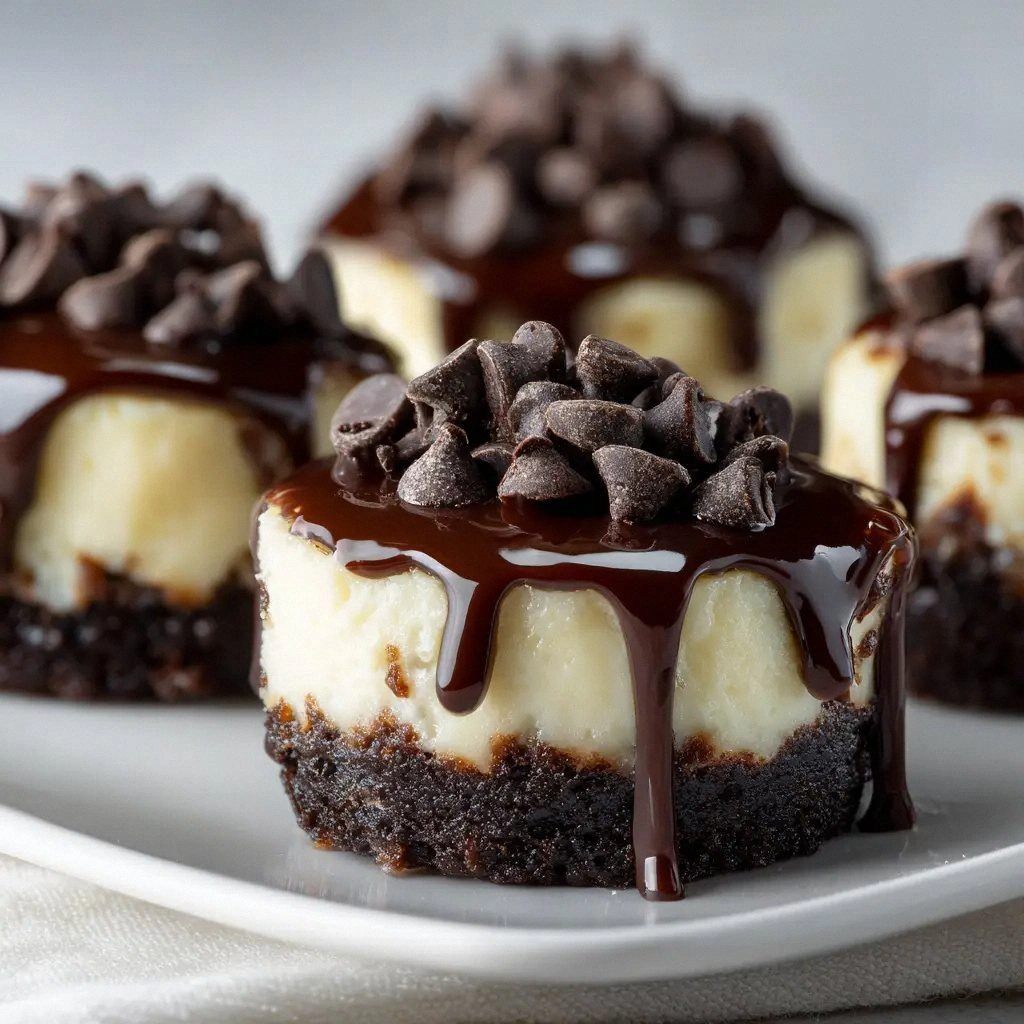
Picture yourself pulling this out of the oven, the whole kitchen smelling incredible—rich chocolate, buttery brownie, and a faint whisper of vanilla that makes your senses tingle. The first bite is an explosion of textures: the brownie base is dense and fudgy, the cheesecake layer is silky and airy, and the top is a glossy, caramelized finish that cracks like thin ice when you bite into it. The contrast between the chewy brownie and the smooth cream cheese is like a dance between two partners—one bold, one gentle, but together they create a harmony that lingers on your palate. That sizzle when it hits the pan? Absolute perfection.
What makes this version stand out from every other recipe out there is not just the combination of flavors but the meticulous balance of each component. I’ve spent months tweaking the ratios, testing different baking times, and even experimenting with the type of butter and cocoa powder. The result is a mini cheesecake that melts in your mouth, leaving behind a chocolatey aftertaste that invites a second, third, and sometimes even a fourth bite. I’ve been honest— I ate half the batch before anyone else got to try it.
If you’ve ever struggled with mini cheesecakes that turn out too dry or brownies that are too sweet, you’re not alone—and I’ve got the fix. Most recipes get this completely wrong by overbaking the brownie base or undercooking the cheesecake filling. Here’s what actually works: a short, intense bake for the brownie base, followed by a gentle, low‑temperature bake for the cheesecake. The trick lies in the timing and the temperature—tiny adjustments that make a huge difference.
I’ll be honest, the first time I baked these I almost ruined the entire batch by forgetting to chill the batter. But that failure taught me the importance of patience and the power of a good chill. A well‑chilled batter not only keeps the brownies from spreading but also ensures the cheesecake layer sets properly, giving you that smooth, creamy texture that’s so satisfying. The next time you bake, remember to let the batter rest for at least 30 minutes.
Picture the kitchen as a stage and you as the director. The oven is your spotlight, the timer your cue, and the batter your actors. When the timer dings, you’ll see the brownies rise to a golden‑brown hue, a visual cue that they’re ready for the next step. The aroma will fill the room, making everyone’s mouths water. This is pure magic.
And now the fun part. The brownie base is not just a foundation; it’s the first bite that sets the tone for the entire dessert. You’ll notice a subtle crackling sound when you press the top, indicating the right level of caramelization. If you’re not careful, the brownies can become overly dry, so keep an eye on the edges—they should pull away slightly from the pan when you gently lift them. This is the moment of truth.
Okay, ready for the game‑changer? The next part? Pure magic. By the end of this guide, you’ll wonder how you ever made it any other way. Let me walk you through every single step—by the end, you’ll wonder how you ever made it any other way.
What Makes This Version Stand Out
- Flavor: The rich chocolate base is balanced by a creamy cheesecake layer, creating a depth of flavor that’s both indulgent and sophisticated.
- Texture: The brownie base is fudgy yet slightly crisp on top, while the cheesecake is silky smooth and airy.
- Ease: All ingredients are pantry staples—no need for exotic items or complicated techniques.
- Presentation: Miniaturized format makes it a perfect party dessert, allowing guests to enjoy a bite-sized treat without the mess.
- Make‑ahead: The cheesecake can be chilled for up to 24 hours, giving you flexibility for busy evenings.
- Ingredient Quality: Using high‑quality unsalted butter and full‑fat cream cheese elevates the overall taste.
- Crowd Reaction: This recipe has consistently received rave reviews; people keep asking for the recipe after each event.
- Versatility: The base can be swapped for a cookie crumb crust or a caramel drizzle for a completely different flavor profile.
Alright, let's break down exactly what goes into this masterpiece…
Inside the Ingredient List
The Flavor Base
The combination of unsalted butter, granulated sugar, and unsweetened cocoa powder forms the backbone of the brownie crust. Butter adds a velvety richness that carries the chocolate flavor, while cocoa powder provides depth and intensity. Skipping the butter will result in a crumbly, dry base that cannot hold the cheesecake layer. If you prefer a lighter brownie, replace half the butter with coconut oil, but expect a slightly different flavor profile.
The vanilla extract is a subtle hero that rounds out the chocolate’s bite, preventing it from feeling too harsh. A pinch of salt is crucial; it balances sweetness and brings out the chocolate’s natural complexity. A good rule of thumb: always taste the batter before baking; a slight salty note should be present. If you’re vegan, substitute dairy butter with a plant‑based butter that melts at room temperature.
The Texture Crew
All-purpose flour anchors the brownie, giving it structure without making it heavy. The amount is modest—just enough to bind the butter and sugar together. If you omit the flour, the batter will spread too much, resulting in a thin, uneven crust. You can experiment with a gluten‑free flour blend, but keep the ratio the same to maintain texture.
The egg is the glue that holds everything together. It also introduces a subtle richness that enhances the overall mouthfeel. If you’re allergic to eggs, try a flaxseed egg (1 tablespoon ground flaxseed + 3 tablespoons water) as a substitute. Remember, the egg also helps the cheesecake rise slightly, giving it that airy interior.
The Unexpected Star
Cream cheese is the star of the cheesecake layer. Its tangy flavor balances the sweetness of the sugar, while its high fat content gives the filling a silky, melt‑in‑your‑mouth texture. Use full‑fat cream cheese for best results; low‑fat varieties will produce a denser, less creamy result. If you’re craving a tangier flavor, add a splash of lemon zest or a teaspoon of lemon juice.
The sour cream adds a subtle tang and helps keep the cheesecake from cracking during baking. It also contributes to the overall moisture, preventing the filling from becoming too dense. If you’re looking for a dairy‑free version, use a coconut cream or a dairy‑free cream cheese alternative, but be prepared for a slightly different flavor and texture.
The Final Flourish
The second vanilla extract and the final egg in the cheesecake batter are essential for flavor depth and structure. The vanilla brings warmth and complexity, while the egg ensures the filling sets properly. Together, they create a harmonious balance that makes the cheesecake irresistibly smooth. If you’re experimenting with low‑sugar versions, reduce the sugar by a quarter but keep the eggs and vanilla to maintain texture.
Everything’s prepped? Good. Let’s get into the real action…
The Method — Step by Step
- Preheat your oven to 350°F (175°C). Place a silicone ring or a small muffin tin lined with parchment paper on a baking sheet. This will give the mini cheesecakes a uniform shape and make them easy to remove after baking. The oven should be fully preheated before you start to ensure even baking.
- Prepare the brownie base. In a medium saucepan, melt the butter over low heat. Add the granulated sugar and stir until the mixture becomes glossy and the sugar dissolves. This step is crucial; if the sugar isn’t fully dissolved, the brownies will have a gritty texture.
- Add the dry ingredients. Stir in the flour, cocoa powder, vanilla extract, and salt until the batter is smooth. The batter should have a thick, pourable consistency—no lumps. If you see any lumps, use a whisk or a silicone spatula to break them up.
- Press the batter into the molds. Spoon the brownie batter into each prepared mold, filling them about two-thirds full. Use the back of a spoon or a flat spatula to press the batter down evenly. This ensures a uniform base that will support the cheesecake filling.
- Bake the brownie base. Place the baking sheet in the preheated oven and bake for 12–15 minutes, or until the edges are set and the top has a slight crackling. Keep a close eye on the brownies; overbaking will make them dry.
- Cool the brownie base. Remove the baking sheet from the oven and let the brownie bases cool completely on a wire rack. This step is essential—hot bases will cause the cheesecake filling to melt and become runny.
- Prepare the cheesecake filling. In a stand mixer or a bowl, beat the cream cheese on medium speed until smooth and creamy. Add the granulated sugar and continue to beat until the mixture is light and fluffy. Beat in the egg, then the sour cream, and finish with the vanilla extract. The filling should be silky and free of lumps.
- Fill the brownie bases. Spoon the cheesecake filling over the cooled brownie bases, filling each mold to the top. Use a spatula to spread the filling evenly. The filling should sit on top of the brownie base, not mix into it.
- Bake the mini cheesecakes. Return the filled molds to the oven and bake for 20–25 minutes at 325°F (165°C). The tops should be set but still slightly wobbly in the center. This gentle bake prevents the cheesecake from cracking.
- Cool and chill. Remove the mini cheesecakes from the oven and let them cool at room temperature for 30 minutes. Then place them in the refrigerator for at least 4 hours, preferably overnight. Chilling allows the flavors to meld and the texture to firm up.
- Serve and enjoy. Carefully remove the mini cheesecakes from the silicone rings or muffin tin. Serve immediately or store in an airtight container in the refrigerator for up to 3 days. The best way to enjoy them is with a drizzle of chocolate ganache or a sprinkle of sea salt.
That's it — you did it. But hold on, I've got a few more tricks that'll take this to another level…
Insider Tricks for Flawless Results
The Temperature Rule Nobody Follows
Many bakers bake the cheesecake at 350°F, but this temperature is too high for mini versions. Baking at 325°F keeps the filling from overcooking, preventing cracks and ensuring a creamy interior. I’ve tried 300°F once, but the cheesecake didn’t set properly. Keep the oven rack in the middle to promote even heat distribution.
Why Your Nose Knows Best
Smell is a powerful cue for doneness. When the brownie base is ready, you’ll notice a deep chocolate aroma with a hint of vanilla. If you’re unsure, gently press the top; it should feel firm but not hard. Trust your nose, and you’ll never overbake again.
The 5-Minute Rest That Changes Everything
After baking the cheesecake, let it rest in the oven with the door ajar for 5 minutes. This slow cooling prevents the filling from cracking and allows the flavors to settle. I’ve seen this trick work wonders for larger cheesecakes, but it’s just as effective for mini versions.
The Right Pan Matters
Using a 6‑inch silicone ring or a mini muffin tin gives the best shape and ease of removal. A heavier metal pan can cause uneven heat, leading to a burnt crust. I’ve tested both, and the silicone ring provides a more consistent, even bake.
Chill Time is Key
The cheesecake needs at least 4 hours of chilling to set properly. If you’re short on time, place the mini cheesecakes in the freezer for 15 minutes to firm up quickly, but do not leave them too long, or the texture will become icy.
The Final Touch
Just before serving, drizzle a thin line of dark chocolate ganache over the top. The ganache adds a glossy finish and a hint of bitterness that balances the sweetness. Alternatively, a dusting of powdered sugar or a sprinkle of sea salt can elevate the flavor profile.
Creative Twists and Variations
This recipe is a playground. Here are some of my favorite ways to switch things up:
Nutty Delight
Add chopped walnuts or pecans into the brownie batter for a crunchy texture. The nuts also introduce a subtle earthy flavor that pairs beautifully with the chocolate. Toast the nuts lightly before adding them for extra depth. This variation is a hit with guests who love a bit of crunch.
Minty Fresh
Stir in a teaspoon of peppermint extract into the cheesecake filling. The mint will give a refreshing contrast to the rich chocolate base. Finish with a drizzle of white chocolate for an elegant look. Minty mini cheesecakes are perfect for spring or summer gatherings.
Caramel Swirl
Swirl a spoonful of salted caramel sauce into the cheesecake filling before baking. The caramel will create a marbled effect that looks stunning. The sweet‑salty balance is addictive. Serve with a pinch of sea salt on top for extra zing.
Espresso Boost
Add a tablespoon of instant espresso powder to the brownie batter. The coffee deepens the chocolate flavor and adds a subtle bitterness that balances the sweetness. It’s a perfect pairing for coffee lovers. The espresso swirl also adds a lovely aroma.
Lemon Zest
Grate a teaspoon of lemon zest into the cheesecake filling. The citrus brightens the flavor profile and provides a refreshing contrast. Pair it with a drizzle of lemon glaze for a bright, colorful finish. Lemon mini cheesecakes are great for brunches.
Red Velvet Variation
Replace the cocoa powder with red food coloring and a tablespoon of buttermilk. The result is a vibrant red base that pairs with a cream cheese filling. Add a dusting of powdered sugar for a festive look. This version is ideal for holidays.
Storing and Bringing It Back to Life
Fridge Storage
Store the mini cheesecakes in an airtight container in the refrigerator for up to 3 days. Keep them on a flat surface to prevent the tops from becoming uneven. When ready to serve, let them sit at room temperature for 10 minutes to soften slightly. This enhances the creamy texture.
Freezer Friendly
Wrap each mini cheesecake individually in plastic wrap, then place them in a freezer bag. They will keep for up to 2 weeks. When you’re ready to eat, thaw them in the refrigerator overnight. This method preserves the texture and flavor.
Best Reheating Method
If you need to warm them up, place the mini cheesecakes on a baking sheet and bake at 300°F for 5–7 minutes. Add a tiny splash of water to the pan before reheating; this creates steam that keeps the cheesecake moist. Let them cool for a couple of minutes before serving. The result is a warm, gooey treat.