Picture this: it’s a rainy Saturday afternoon, the kind that makes you want to crawl under a blanket with a steaming mug and something sweet that smells like a hug from your grandma. I was halfway through a marathon of TV dramas when the kitchen timer went off, and the only thing I could think of was a dessert that could stand up to the gloom. I tossed a handful of apples into a pot, let them simmer, and before I knew it, I was staring at a bowl of golden‑brown applesauce that smelled like autumn in a jar. That moment sparked a daring promise – I would craft the ultimate Amish Applesauce Cake, and I wasn’t about to settle for any old recipe.
Most applesauce cakes out there feel like a bland, soggy pancake that’s been left out too long. I’ve tried a dozen versions that left me wondering why anyone would ever call this “comfort food.” Then, after a frantic night of trial and error, I discovered a secret combination of spices, a buttery glaze, and a technique that gives the crumb a tender, almost melt‑in‑your‑mouth texture while still holding its shape. I dare you to taste this and not go back for seconds; the vanilla glaze alone is a glossy, buttery curtain that draws you in like a spotlight on a stage.
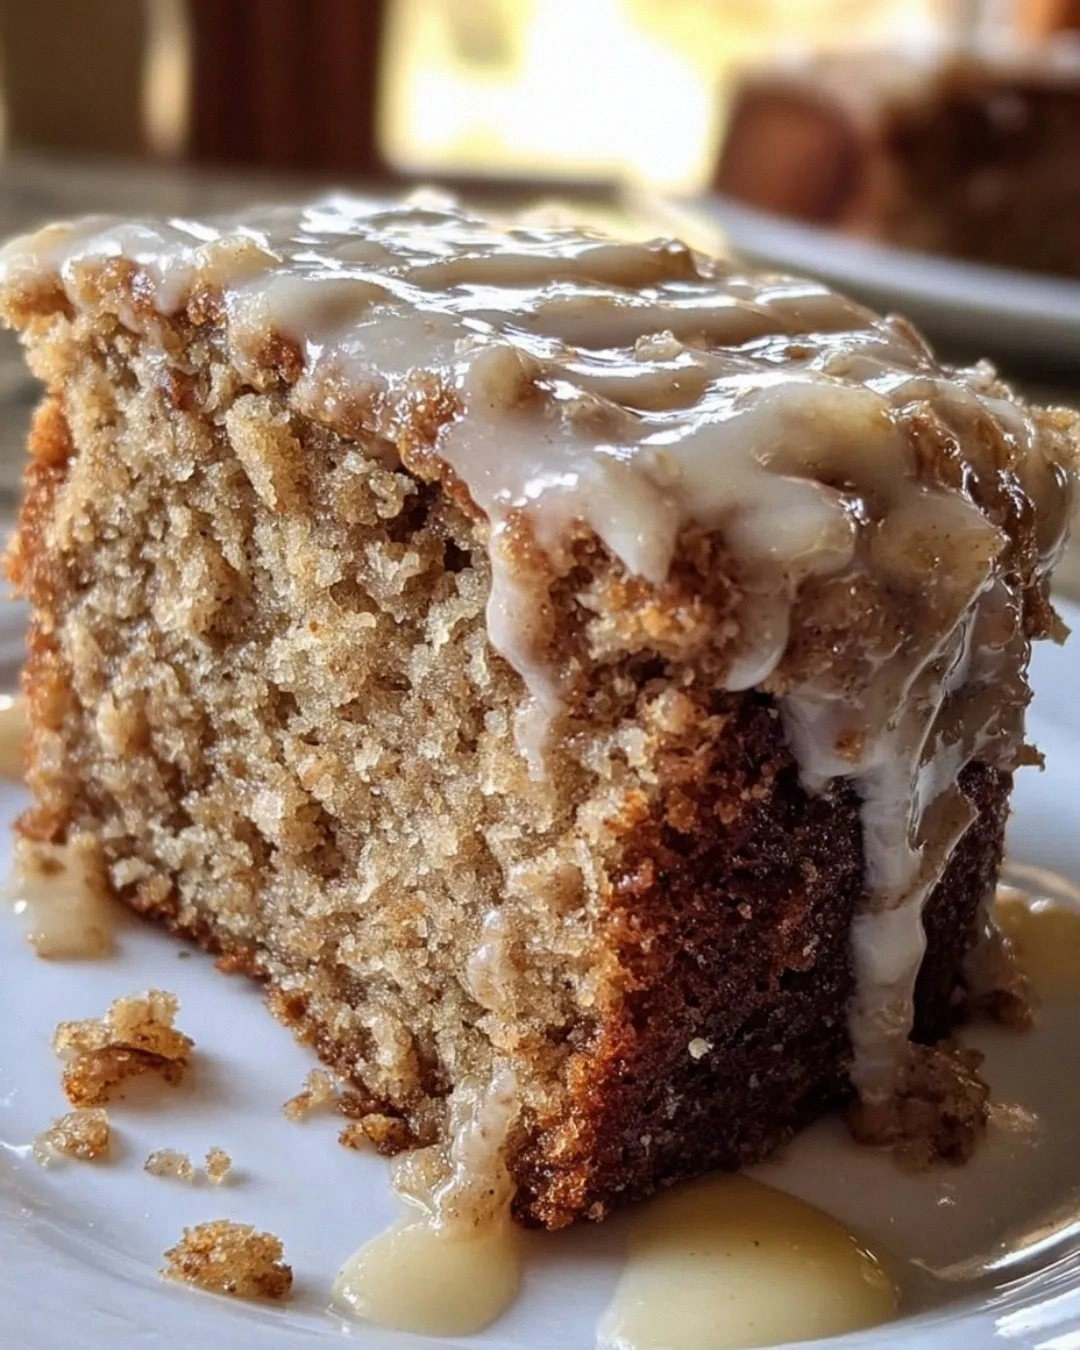
What makes this version truly stand out is the balance of sweet and spice, the moistness from the applesauce, and the subtle crunch from a handful of raisins that pop like tiny fireworks in each bite. I’ll be honest — I ate half the batch before anyone else got a chance to try it, and that’s a confession worth sharing because it proves just how addictive this cake is. Most recipes get the moisture level completely wrong, resulting in a soggy mess, but here we get a cake that’s as light as a cloud yet as satisfying as a warm blanket.
And here’s the kicker: I’m throwing a pinch of ground nutmeg into the mix, a spice you rarely see in traditional Amish cakes but that adds a depth of flavor you’ll swear is magic. Okay, ready for the game‑changer? The glaze is infused with pure vanilla extract, not just a splash, creating a glossy finish that looks as good as it tastes. Picture yourself pulling this out of the oven, the whole kitchen smelling incredible, the top glistening like a freshly polished window. Let me walk you through every single step — by the end, you’ll wonder how you ever made it any other way.
What Makes This Version Stand Out
- Moisture Mastery: The combination of applesauce and melted butter creates a crumb that stays tender for days, unlike cakes that dry out within hours.
- Spice Symphony: A duo of cinnamon and nutmeg gives a warm, aromatic backdrop that sings louder than any store‑bought mix.
- Glaze Glory: A vanilla‑kissed powdered‑sugar glaze adds a glossy finish that not only looks elegant but adds a sweet buttery snap.
- Simple Simplicity: Only pantry staples are required, no exotic ingredients, making it perfect for a quick weeknight or a lazy Sunday.
- Crowd Magnet: This cake has a reputation for disappearing within minutes at potlucks; it’s that universally loved.
- Make‑Ahead Magic: Bake it a day ahead, wrap tightly, and the flavors actually improve, giving you a stress‑free dessert.
Inside the Ingredient List
The Flavor Base
Flour is the structural backbone; using all‑purpose flour gives the perfect balance between tenderness and stability. If you swap it for cake flour, the cake will be too delicate and may crumble. When measuring, spoon the flour into the cup and level it off – packing it will make the cake dense and heavy.
Sugar not only sweetens but also contributes to the tender crumb by interfering with gluten formation. A cup of granulated sugar is ideal; you could experiment with brown sugar for a deeper caramel note, but that will also darken the cake and alter the glaze’s clarity.
Applesauce is the hero of this recipe, providing moisture, subtle sweetness, and a natural apple flavor that pairs perfectly with the spices. Use unsweetened applesauce to keep the sugar balance under control. If you only have fresh apples, simmer them down to a puree – just be sure to strain any excess liquid.
The Texture Crew
Butter, melted and cooled, adds richness and a buttery aroma that makes the cake feel indulgent. If you’re looking for a lighter version, substitute half the butter with a neutral oil, but expect a slightly different mouthfeel.
Eggs act as a binder and lift, creating a light, airy crumb. Beating them just until blended prevents over‑aeration, which can cause the cake to rise too quickly and then collapse.
Milk introduces a bit of dairy fat that softens the crumb and helps the glaze adhere later on. Whole milk works best; low‑fat options will produce a drier texture.
The Unexpected Star
Cinnamon and nutmeg are the spice duo that turns a plain cake into a comforting classic. Cinnamon adds warmth, while nutmeg gives a subtle, earthy depth that’s often missed in other recipes. Toast the spices briefly in a dry pan for an extra aromatic boost – this step is pure magic.
Raisins, though optional, add bursts of sweet chewiness that contrast the soft crumb. If you’re not a fan, replace them with chopped walnuts for a crunchy twist, or omit entirely for a pure applesauce experience.
The Final Flourish
The vanilla glaze is a simple mixture of powdered sugar, milk, and pure vanilla extract. The key is to add the milk slowly, whisking constantly, until you reach a pourable consistency that will coat the cake without running off. A thicker glaze will set into a delicate crust, while a thinner one creates a silky sheen.
For a glossy finish, let the glaze sit for a minute after mixing – the sugar crystals will dissolve completely, giving you that professional‑look sheen. If you prefer a thicker drizzle, add a touch more powdered sugar; if you want it runnier for a soaking effect, add a splash more milk.
Everything’s prepped? Good. Let’s get into the real action…
The Method — Step by Step
Preheat your oven to 350°F (175°C) and grease a 9‑inch round cake pan with butter, then line the bottom with parchment. The pan should feel slick to the touch, like a well‑oiled skillet, ensuring the cake releases cleanly after baking. As the oven warms, you’ll hear the gentle hum of the heating element, a sound that signals the start of something delicious.
In a large mixing bowl, whisk together the flour, baking soda, baking powder, salt, cinnamon, and nutmeg. This dry blend should look speckled with golden brown flecks of spice – that’s the promise of flavor. If you want to boost the aroma, toast the spices for 30 seconds in a dry skillet before adding them; the scent will fill your kitchen like a warm hug.
In a separate bowl, combine the melted butter, sugar, and applesauce. Beat with a handheld mixer on medium speed until the mixture is smooth and glossy – think of it as a caramel‑colored river flowing in the bowl. This is the moment where the sugar starts to dissolve, creating a silky base that will keep the cake moist for days.
Now crack in the eggs, one at a time, beating gently after each addition. The mixture will become lighter and a little frothy, a sign that air is being incorporated for a tender crumb. Stir in the milk and vanilla extract, scraping the sides of the bowl to ensure nothing sticks.
Gradually fold the dry ingredients into the wet mixture using a spatula. The batter should be thick but pourable, with a few streaks of flour that disappear after a few gentle turns. Resist the urge to over‑mix; a few lumps are okay – they’ll dissolve as the cake bakes.
Fold in the raisins (or walnuts, if you prefer) with a gentle hand. These little pockets of sweetness will burst as the cake bakes, creating pockets of chewy joy. If you’re feeling adventurous, toss in a handful of shredded coconut for an extra layer of texture.
Pour the batter into the prepared pan, smoothing the top with a spatula. The surface should be even, like a calm lake before a storm. Slide the pan into the oven and set a timer for 30 minutes. Around the 20‑minute mark, give the oven a gentle shake – you’ll hear the edges start to pull away from the sides, a sure sign the cake is nearly done.
When a toothpick inserted into the center comes out clean or with just a few crumbs, the cake is ready. Let it cool in the pan for 10 minutes, then turn it out onto a wire rack. The aroma at this stage is intoxicating – think of warm apples, butter, and spice mingling in a fragrant dance.
While the cake cools, whisk together the powdered sugar, milk, and vanilla for the glaze. Add the milk a tablespoon at a time, tasting as you go, until you reach a pourable but not runny consistency. Drizzle the glaze over the warm cake, letting it cascade down the sides like a sweet waterfall.
That’s it — you did it. But hold on, I’ve got a few more tricks that’ll take this to another level…
Insider Tricks for Flawless Results
The Temperature Rule Nobody Follows
Never bake a cake straight from the fridge. Let the batter sit at room temperature for 10 minutes before sliding it into the oven. This small pause allows the butter to soften just enough to create a uniform rise, preventing the dreaded “sunken middle.” A friend once tried to skip this step, and the cake turned out flat as a pancake – lesson learned.
Why Your Nose Knows Best
Rely on scent, not just time. When the cake reaches the 25‑minute mark, start sniffing the oven. A sweet, caramel‑like aroma means the crust is forming; if you smell raw batter, give it another 5‑10 minutes. Trusting your nose prevents over‑baking, which can dry out the crumb.
The 5‑Minute Rest That Changes Everything
After removing the cake from the oven, let it rest in the pan for exactly five minutes before transferring to a rack. This short rest lets the steam finish the cooking process, ensuring the interior stays moist while the exterior firms up enough to handle the glaze without crumbling.
Glaze Temperature Trick
Warm the glaze slightly before drizzling. A glaze that's too cold will seize and become grainy, while a warm glaze flows smoothly and creates that glossy finish. Heat it for 10 seconds in the microwave or set the bowl over a pot of simmering water.
Pan Choice Matters
A heavy‑bottomed metal pan distributes heat evenly, giving you a uniform rise. If you use a glass pan, the edges may over‑brown while the center stays undercooked. This is why I swear by my trusty 9‑inch metal round pan – it’s the unsung hero of every successful bake.
Creative Twists and Variations
This recipe is a playground. Here are some of my favorite ways to switch things up:
Maple‑Brown Sugar Swirl
Replace half the granulated sugar with dark brown sugar and add a tablespoon of pure maple syrup to the wet mixture. The result is a deeper, caramel‑rich flavor that pairs beautifully with the apples.
Cranberry‑Orange Burst
Swap the raisins for dried cranberries and add a teaspoon of orange zest to the batter. The tartness of the cranberries and the citrus zing give the cake a festive twist perfect for holiday gatherings.
Pumpkin Spice Edition
Substitute half the applesauce with canned pumpkin puree and add a pinch of ground cloves. This version turns the cake into a cozy fall centerpiece, and the glaze can be spiked with a dash of pumpkin spice for extra warmth.
Gluten‑Free Goodness
Use a 1:1 gluten‑free flour blend in place of all‑purpose flour. The texture remains tender, and the flavor stays true to the original. Just be sure to sift the gluten‑free flour to avoid any gritty pockets.
Chocolate Chip Surprise
Fold in a half‑cup of mini chocolate chips with the raisins. The melty chocolate pockets contrast the apple spice, creating a delightful surprise in every bite.
Vegan Version
Swap butter for coconut oil, use flax eggs (1 tbsp ground flaxseed + 3 tbsp water per egg), and replace milk with almond milk. The glaze can be made with powdered sugar, a splash of almond milk, and vanilla – still glossy, still sweet.
Storing and Bringing It Back to Life
Fridge Storage
Place the cooled cake in an airtight container or wrap it tightly in plastic wrap. It will stay fresh for up to five days. If the glaze has set hard, gently reheat the cake in the microwave for 10‑15 seconds; the glaze will soften instantly.
Freezer Friendly
Wrap the cake tightly in a double layer of foil, then place it in a freezer‑safe bag. It freezes beautifully for up to three months. To thaw, move it to the fridge overnight, then let it sit at room temperature for 30 minutes before serving.
Best Reheating Method
Preheat your oven to 300°F (150°C), place the slice on a baking sheet, and cover loosely with foil. Heat for 8‑10 minutes. For an extra burst of moisture, add a tiny splash of water to the foil before sealing – the steam revives the crumb and keeps it tender.