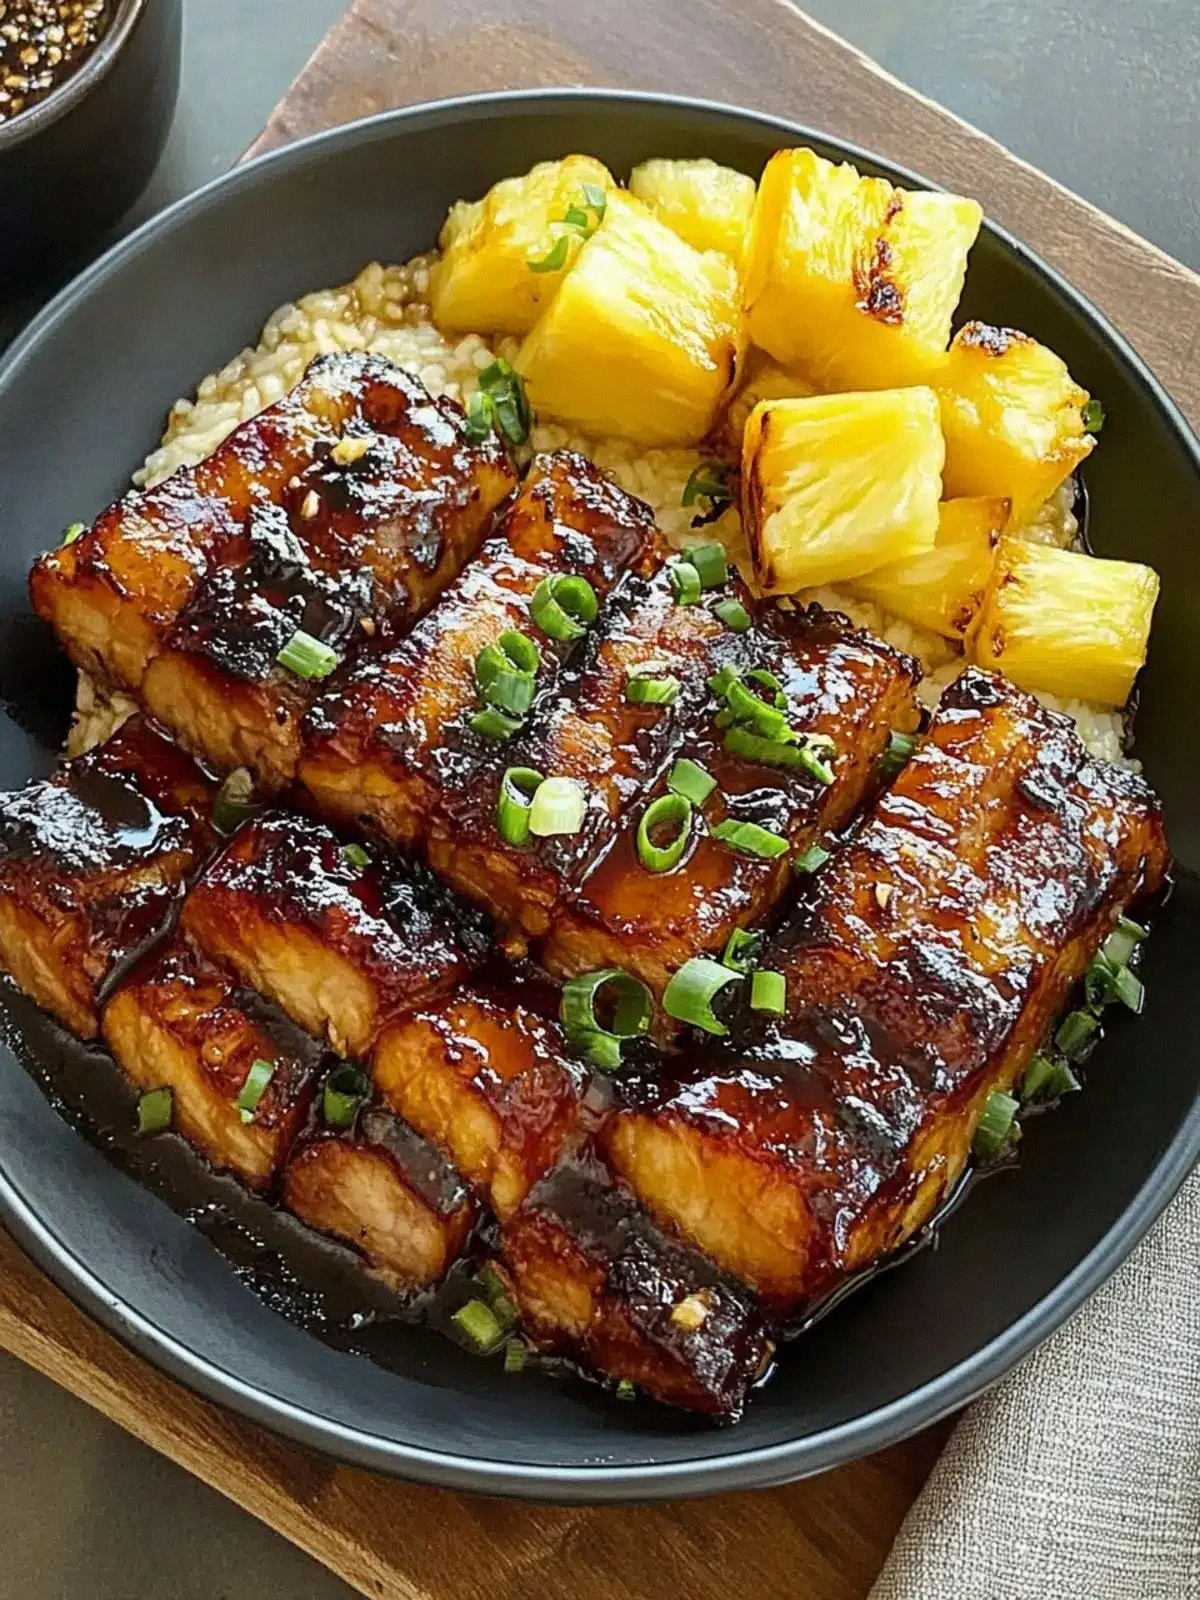
Picture this: you’re in the middle of a Sunday brunch, the kitchen is a glorious mess of flour, eggs, and a half‑finished souffle, when a neighbor drops by with a craving for something bold and unexpected. I’m talking about a pork belly that’s less “sweat‑and‑baste” and more “sweet‑and‑savory symphony.” The moment that first sizzling bite hits your tongue, you’re not just tasting pork—you’re tasting the sun‑kissed sweetness of pineapple, the sharp bite of orange, and a hint of salt that pulls everything together like a well‑orchestrated choir. That’s the moment that sparked my obsession with this dish, and trust me, it’s a game‑changer.
If you’ve ever tried a standard pork belly recipe, you know the result can swing wildly from dry, rubbery chunks to greasy, flavorless mush. That’s because the technique and glaze are everything. In this version, I’ve discovered the secret to a melt‑in‑your‑mouth texture that still has a satisfying crackle on the edges—like a perfectly caramelized sugar ribbon. The pineapple isn’t just a sweet garnish; it’s a flavor engine that infuses the meat with a subtle acidity that balances the fat. And the orange juice? It’s the liquid gold that gives the glaze its glossy, irresistible sheen.
I dare you to taste this and not go back for seconds. That’s not hyperbole; it’s a promise. The glaze coats the pork like velvet, and each bite is a burst of caramelized sweetness followed by a citrusy zing that lingers on your palate. The texture is a delicate dance between tender, buttery meat and crisp, caramelized edges that shatter like thin ice. If you’ve ever struggled to get a pork belly that’s both juicy and crisp, you’re not alone—and I’ve got the fix.
What sets this version apart is the blend of ingredients and the meticulous timing. I’ve tweaked the ratio of pineapple to orange, added a whisper of salt to let the sweetness shine, and perfected the sear so the fat renders without losing flavor. Most recipes get this completely wrong, but here’s what actually works: a short, high‑heat sear followed by a low‑heat glaze that allows the sugars to caramelize slowly. Picture yourself pulling this out of the oven, the whole kitchen smelling incredible, and your guests’ eyes widening as they see that glossy, caramelized surface.
If you’re ready to elevate your pork belly game, stay with me. This next part? Pure magic. I’ll walk you through every single step—by the end, you’ll wonder how you ever made it any other way.
What Makes This Version Stand Out
- Flavor Balance: The pineapple and orange juice create a sweet‑tang interplay that cuts through the pork’s richness, giving each bite a refreshing lift.
- Crisp Texture: A quick high‑heat sear followed by a gentle glaze ensures the outer layer caramelizes into a golden crust while the interior stays melt‑in‑your‑mouth.
- Ingredient Simplicity: With just four core ingredients, you can achieve a gourmet result without a pantry full of exotic items.
- Time Efficiency: The entire process takes under an hour, making it a perfect weeknight dinner that feels indulgent.
- Make‑Ahead Friendly: The glazed pork belly can be refrigerated or frozen and reheated without losing its caramelized charm.
- Crowd‑Pleaser: The glossy glaze and aromatic scent make it a showstopper at gatherings, and the sweet‑savory profile appeals to both kids and adults.
- Versatility: Serve it over rice, noodles, or a fresh salad; the glaze adapts to any side dish.
- Low‑Waste: Use pineapple scraps for a quick salsa or a tangy sauce—no waste, just more flavor.
Inside the Ingredient List
The Flavor Base
The pineapple is the star of the show. Fresh pineapple brings a bright, sweet acidity that balances the pork’s natural fattiness. If you’re using canned pineapple, opt for the whole‑fruit variety to avoid added sugars and keep the texture lively. Skipping pineapple would leave the glaze too heavy on the orange, and you’d lose that tropical punch.
The Texture Crew
The pork belly itself is a canvas of fat and meat. Choosing a slab with an even thickness ensures uniform cooking; a thicker piece takes longer to render, while a thinner one can dry out. If you prefer a leaner cut, trim some of the fat, but remember the fat is what keeps the meat juicy and allows the glaze to cling.
The Unexpected Star
Orange juice may seem like a simple addition, but it’s the secret to a glossy glaze. The natural sugars in fresh orange juice caramelize beautifully, and the citrus oils add a fragrant lift. If you’re out of orange juice, a splash of white wine or apple juice can substitute, but the aroma will shift slightly.
The Final Flourish
A pinch of salt is all you need to elevate the flavors. Salt enhances sweetness and balances acidity, bringing harmony to the glaze. Don’t be tempted to add more salt; over‑salting can overpower the pineapple and orange notes.
Everything’s prepped? Good. Let’s get into the real action.
The Method — Step by Step
- Preheat your oven to 375°F (190°C). Pat the pork belly dry with paper towels; this step is crucial for a crisp exterior. The drier the surface, the better the Maillard reaction that creates that golden crust.
- Score the pork belly in a crosshatch pattern about 1/4 inch deep. Scoring allows the fat to render more efficiently and lets the glaze seep into the meat. Don’t worry about cutting too deep—just enough to break the surface.
- In a small saucepan, combine the pineapple and orange juice. Bring to a gentle simmer over medium heat, stirring occasionally, until the mixture thickens to a syrupy consistency. The glaze should coat the back of a spoon—this indicates proper caramelization.
- Season the pork belly with salt, pressing it into the scored lines. The salt will draw out moisture, helping the meat stay juicy while the glaze adheres firmly.
- Place the pork belly on a wire rack set over a rimmed baking sheet. This setup allows air to circulate, preventing sogginess. Brush a generous amount of glaze over the surface, making sure to reach the scored edges.
- Bake for 30 minutes, then increase the oven temperature to 425°F (220°C) and continue baking for another 10–15 minutes. Watch the glaze—when it bubbles and turns a deep amber, the pork is ready.
- Remove the pork from the oven and let it rest on a cutting board for 10 minutes. Resting allows the juices to redistribute, ensuring each slice stays moist.
- Slice the pork belly into bite‑sized pieces, cutting across the grain for maximum tenderness. Arrange the slices on a platter, drizzling any remaining glaze from the pan over the top for a glossy finish.
- Serve immediately with your choice of side—steamed rice, sautéed greens, or a fresh cucumber salad will complement the sweet‑savory notes beautifully.
- If you’re not serving right away, cover the pork belly loosely with foil and refrigerate. Reheat in a preheated oven at 350°F (175°C) for 10 minutes to revive the crispness.
That’s it—you did it. But hold on, I’ve got a few more tricks that will take this to another level.
Insider Tricks for Flawless Results
The Temperature Rule Nobody Follows
Many cooks bake pork belly at a single high temperature, which often results in uneven cooking. I swear by the two‑stage method: start at 375°F to render fat slowly, then bump up to 425°F for a caramelized finish. This keeps the meat tender inside while giving the glaze a beautiful, glossy sheen.
Why Your Nose Knows Best
The first scent that hits your nose is your best indicator that the glaze is ready. A sweet, caramelized aroma signals that the sugars have browned properly. If the scent is too sweet or raw, let it cook longer; if it’s burnt, lower the heat immediately.
The 5-Minute Rest That Changes Everything
Many chefs skip the resting step, thinking it’s unnecessary. Resting the pork for exactly 10 minutes after baking allows the fat to redistribute and the juices to settle. This results in slices that stay moist and avoid the “dry center” problem.
Use a Wire Rack for Airflow
Placing the pork belly on a wire rack ensures that heat circulates around the meat, preventing a soggy bottom. If you don’t have a rack, a makeshift one made of a perforated tin can works just as well.
Scoop the Pan Glaze for Extra Flavor
Don’t discard the glaze that stays in the pan after baking. Reduce it further to a syrupy consistency and drizzle it over the plated pork. This adds a glossy finish and an extra layer of sweetness that keeps the dish from drying out.
Keep the Scored Lines Clean
When slicing, avoid cutting too close to the scored lines. Doing so can cause the glaze to run off and create uneven flavor distribution. Aim for a clean cut across the grain, letting the caramelized edges stay intact.
Creative Twists and Variations
This recipe is a playground. Here are some of my favorite ways to switch things up:
Spicy Pineapple Glaze
Add a pinch of crushed red pepper flakes or a splash of sriracha to the glaze for a kick. The heat contrasts the sweet pineapple, creating a dynamic flavor profile that pairs well with a cooling cucumber salad.
Herb‑Infused Pork Belly
Stir in fresh thyme or rosemary into the glaze before baking. The earthy herbs complement the citrus notes, giving the dish a Mediterranean twist that’s surprisingly harmonious.
Smoked Pineapple Glaze
Add a teaspoon of smoked paprika or a few drops of liquid smoke to the glaze. The smoky undertone adds depth, making the pork belly feel like a slow‑cooked barbecue.
Coconut Pineapple Glaze
Replace half the orange juice with coconut milk for a tropical, creamy glaze. The coconut adds richness that balances the pineapple’s acidity, creating a dessert‑like main dish.
Balsamic Pineapple Glaze
Swap the orange juice for balsamic vinegar and reduce the glaze to a thick syrup. The tangy acidity of balsamic creates a complex, savory glaze that pairs wonderfully with roasted vegetables.
Pineapple Soy Glaze
Add a tablespoon of soy sauce to the glaze for a sweet‑salty umami hit. This variation is perfect for pairing with Asian‑style sides like bok choy or steamed jasmine rice.
No matter which variation you choose, the core technique remains the same: a high‑heat sear followed by a slow caramelization of the glaze. Experiment, taste, and share your favorite combinations!
Storing and Bringing It Back to Life
Fridge Storage
Cool the pork belly completely, then wrap it tightly in parchment paper and place it in an airtight container. Store in the refrigerator for up to 3 days. The glaze will firm up slightly, but it remains flavorful.
Freezer Friendly
For longer storage, wrap the pork belly in foil and then in a freezer bag, removing as much air as possible. Freeze for up to 3 months. Thaw overnight in the refrigerator before reheating.
Best Reheating Method
Reheat in a preheated oven at 350°F (175°C) for 10 minutes, then finish on a hot skillet for 2 minutes to restore crispness. Add a splash of water to the pan to create steam, which keeps the pork from drying out.
Reheat with a Splash of Water
Just before reheating, sprinkle a teaspoon of water over the pork belly and cover the skillet with a lid. The steam will gently re‑moisten the meat, keeping it juicy and tender.
Serve Fresh, Even After Reheating
After reheating, drizzle the residual glaze over the pork belly for an extra burst of flavor. Serve immediately with a side of fresh herbs or a quick citrus salad to cut through the richness.
Avoid Overcooking
When reheating, keep a close eye on the pork belly—overcooking will make the glaze hard and the meat tough. Use a thermometer; the internal temperature should reach 165°F (74°C) for safety, but no higher.