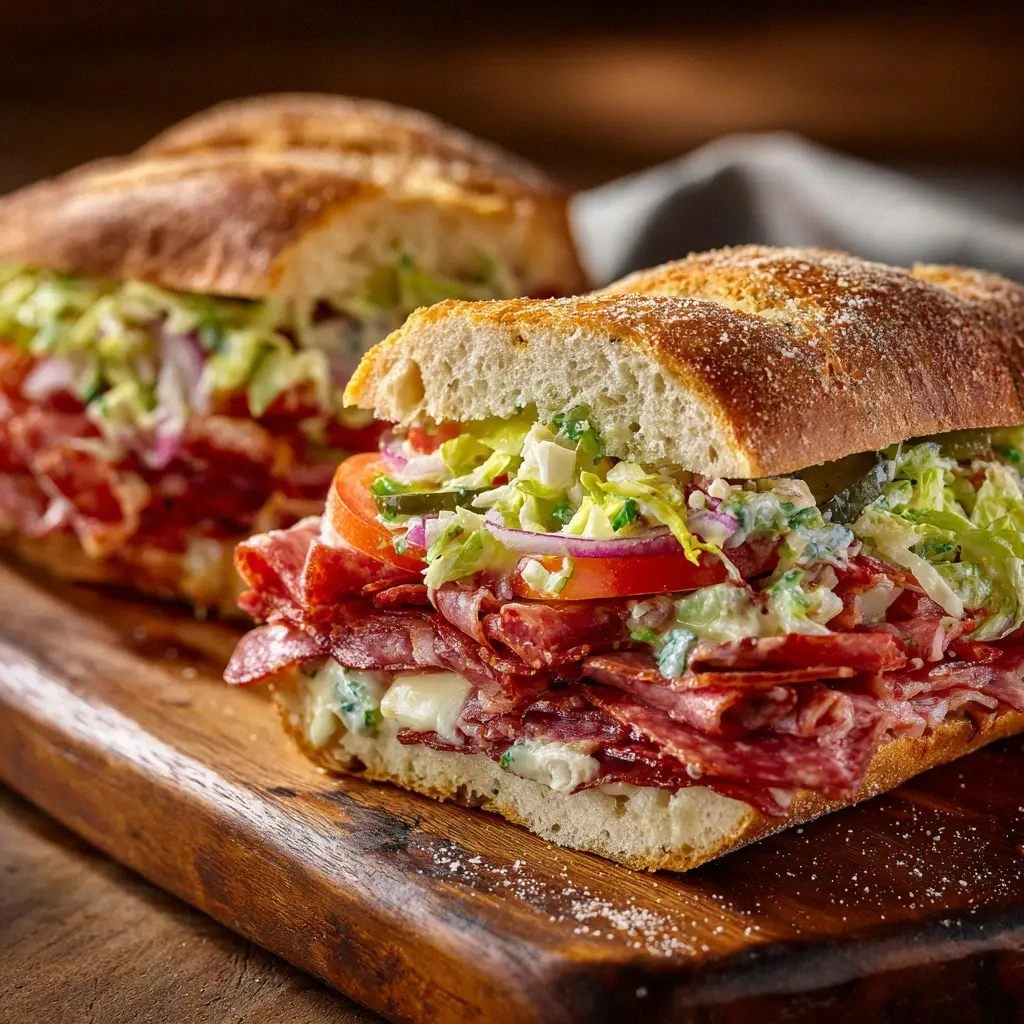
It all started on a rainy Tuesday when the kitchen lights flickered and my trusty sandwich machine decided to take an unscheduled nap. I was halfway through a classic Italian grinder, the meats stacked high, when the machine sputtered, sent a hot splash of mayo into the air, and the whole thing looked like a culinary crime scene. I laughed, but the taste was still there—rich, smoky, and impossibly layered. That night, I dared myself to recreate the sandwich from scratch, and what emerged was a hand‑crafted masterpiece that could make even the most seasoned deli chef jealous.
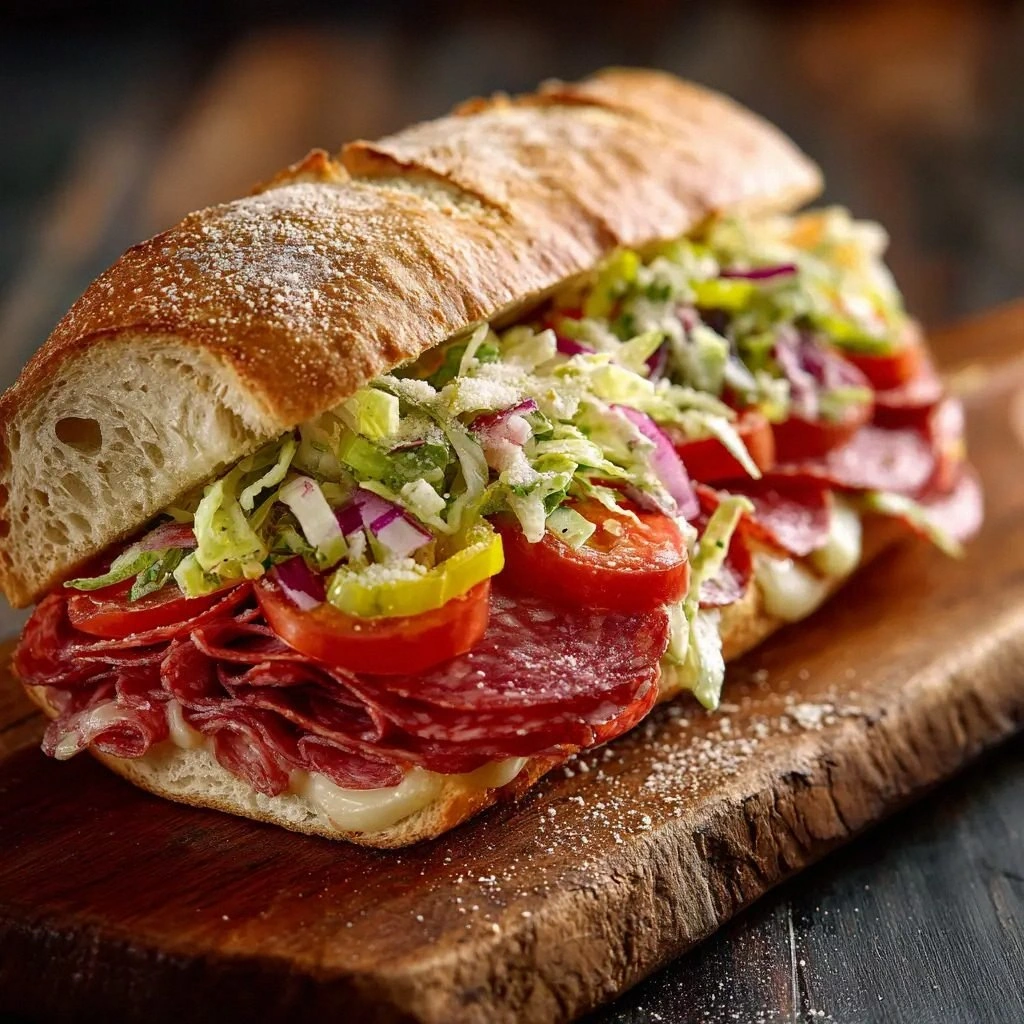
Picture the aroma of fresh oregano mingling with the sharp tang of red wine vinegar, the gentle hiss of garlic sautéing into the dressing, and the faint crackle of a toasted hoagie crust. The sound of a knife slicing through crisp lettuce, the visual burst of red pepperoncini, and the sight of silky provolone melting over savory meats—all of these senses converge in one bite. The first taste is a symphony: the mayo coats the bread like velvet, the meats deliver a savory punch, and the vegetables add a bright, refreshing counterpoint. The texture is a delightful contrast between crunchy lettuce, juicy tomato, and the chewy, cured meats.
I was honest—after tasting the first bite, I could not stop myself from reaching for a second. The flavors danced, the textures sang, and the sandwich felt like a warm hug from a friend who knows exactly what you need. That is why this version stands out from every other recipe out there: it is not just a sandwich; it is a celebration of Italian deli staples elevated with a homemade touch that you can’t find in a frozen section.
Most recipes get this completely wrong by either over‑cooking the bread or under‑seasoning the meats. I’ll be honest—when I first made it, I almost tossed the entire batch into the microwave, but the result was soggy, bland, and utterly disappointing. Instead, I kept the bread lightly toasted, layered the meats while they were still slightly warm, and added a generous dollop of mayo‑vinegar sauce that coats every crumb. That simple tweak turned a good sandwich into an unforgettable experience.
If you've ever struggled with balancing flavors in a grinder, you're not alone—I've had my share of experiments that ended in culinary chaos. But this recipe is different. By the end, you'll wonder how you ever made it any other way. I dare you to taste this and not go back for seconds. Picture yourself pulling this out of the oven, the whole kitchen smelling incredible, and a crowd of friends lining up for a bite. Let me walk you through every single step—by the end, you'll wonder how you ever made it any other way.
What Makes This Version Stand Out
- Bold Flavor: The mayo‑vinegar sauce delivers a creamy, tangy base that elevates every bite, turning ordinary meats into a gourmet experience.
- Texture Contrast: Crisp lettuce, juicy tomato, and chewy meats create layers that satisfy both the palate and the eye.
- Ingredient Quality: Using high‑grade Genoa salami, capicola, and prosciutto ensures a depth of flavor that can’t be replicated with generic deli meats.
- Simple Assembly: The sandwich comes together in under 30 minutes, making it perfect for weeknight meals or last‑minute game‑day snacks.
- Make‑Ahead Potential: Assemble the sandwich the night before and store it in the fridge; the flavors meld even better.
- Crowd‑Pleaser: This sandwich is a guaranteed hit at parties, potlucks, or a quick lunch for friends.
- Versatile Base: Swap out meats or add veggies to suit dietary preferences without losing the sandwich’s core character.
- Visual Appeal: The colorful layers—red pepperoncini, green lettuce, and golden bread—make every bite Instagram‑worthy.
Alright, let's break down exactly what goes into this masterpiece. Below are the essential ingredients, grouped to help you understand their role and why they’re indispensable.
The Flavor Base
Mayonnaise is the creamy anchor that holds the sandwich together. It coats the bread, preventing it from drying out while adding a subtle richness. Skipping mayo would leave the sandwich feeling light and unfulfilling, turning the experience into a bland, dry loaf.
Red wine vinegar brings a bright acidity that cuts through the richness of the meats and cheese. It’s the secret to a balanced bite; without it, the sandwich would feel heavy and one‑dimensional. If you can’t find red wine vinegar, a splash of white wine vinegar works, but the flavor profile will shift slightly toward a more citrusy note.
Garlic, finely minced, adds a punch of aromatic depth that lingers on the palate. A single clove can overwhelm the other flavors, so I recommend keeping it to two cloves. If you’re sensitive to garlic, try roasting it lightly to mellow its bite.
Dried oregano contributes a warm, herbal undertone that harks back to Italian kitchens. It’s the herb that ties the sandwich together, giving it that unmistakable deli feel. A pinch of basil or a dash of thyme could replace oregano, but the final flavor will differ.
Black pepper is the subtle heat that balances the sweetness of the tomato and the saltiness of the cured meats. A half teaspoon is enough; too much can overpower the delicate balance. If you prefer a milder taste, reduce the pepper to a quarter teaspoon.
The Texture Crew
Red onion adds a sharp bite that cuts through the richness of the meats. Thinly sliced, it creates a satisfying crunch with each bite. If you’re not a fan of raw onions, caramelize them in a pan until they’re sweet and translucent.
Pepperoncini peppers bring a mild, tangy heat that adds a pop of color and flavor. They’re a staple in Italian grinders and provide that classic deli zing. For a spicier kick, swap pepperoncini for banana peppers or hot cherry peppers.
Iceberg lettuce provides a crisp, refreshing bite that balances the heavy meats. Shredded into thin ribbons, it creates a pleasant crunch. If you prefer a softer texture, romaine or mixed greens work just as well.
Tomato slices add juiciness and a sweet, acidic counterpoint to the salty meats. Thick slices ensure the sandwich doesn’t become soggy. For a different twist, try adding a slice of roasted red pepper.
The Unexpected Star
Provolone cheese is the creamy, melty layer that unites all the flavors. It’s a mild cheese that won’t overpower the meats but will add a silky texture. If you want a sharper cheese, try a slice of mozzarella or a light spread of ricotta.
Genoa salami, capicola, and prosciutto are the heart of the sandwich. These cured meats bring smoky, savory depth that is essential to the grinder’s identity. Using high‑quality cuts ensures a richer flavor; cheaper alternatives can result in a bland, overly salty sandwich.
The Final Flourish
The hoagie roll or Italian bread is the vessel that holds all the components together. A sturdy, crusty roll gives the sandwich a satisfying bite, while a softer bread can become soggy if not toasted. Slice the roll lengthwise, leaving a hinge on one side, and lightly toast it to lock in the structure.
All the ingredients are now ready to be assembled into a sandwich that’s both visually stunning and deliciously complex. The layers should be arranged in a specific order to ensure each bite delivers a balanced flavor profile.
Everything's prepped? Good. Let's get into the real action.
The Method — Step by Step
- Begin by whisking together the mayonnaise, red wine vinegar, minced garlic, dried oregano, and black pepper in a medium bowl. The mixture should form a silky, homogeneous sauce that coats the back of a spoon. Taste it; it should be tangy with a hint of herbaceous warmth. This is the flavor base that will bind the sandwich together.
- Add the thinly sliced red onion and pepperoncini to the dressing, stirring gently to combine. The onions should be evenly coated, their crunch preserved. If you prefer a milder onion flavor, blanch the slices in hot water for 30 seconds before adding.
- Slice the Genoa salami, capicola, and prosciutto into thin, bite‑sized pieces. Lay them out on a clean cutting board so they can be easily layered later. The meats should be fresh, not dried out, to maintain their moisture and flavor.
- Place the sliced provolone cheese on top of the meats, ensuring each slice covers the meat evenly. The cheese should be soft enough to melt slightly when the sandwich is pressed together. If you want a stronger cheese flavor, add a thin layer of mozzarella on top of the provolone.
- Slice the tomato into thick rounds, about 1/4 inch thick, and arrange them over the cheese. The tomato should be ripe and juicy but firm enough to hold its shape. A pinch of salt on the tomato slices can help draw out excess moisture.
- Shred the iceberg lettuce into thin ribbons. Spread the lettuce over the tomato slices, ensuring it’s evenly distributed. The lettuce adds a fresh, crunchy contrast that balances the richness of the meats and cheese.
- Prepare the hoagie roll by slicing it lengthwise, leaving a hinge on one side. Lightly toast the inside of the roll on a skillet or grill until the crust is golden and slightly crisp. This step locks in the bread’s structure and prevents it from becoming soggy.
- Spread a generous amount of the mayo‑vinegar dressing on both halves of the toasted roll. The dressing should coat the bread like a velvety blanket, sealing the sandwich and adding moisture. Don’t be shy—this is where the sandwich gets its signature flavor.
- Layer the meats, cheese, tomato, and lettuce in that order onto the bottom half of the roll. Press gently to ensure the layers stick together, but avoid crushing the ingredients. The sandwich should feel sturdy yet not overly compact.
- Close the sandwich with the top half of the roll, pressing down firmly to compress the fillings into a cohesive unit. Wrap the sandwich in parchment paper or foil to keep the layers from shifting during transport. Let it rest for 5 minutes before slicing to allow the flavors to meld.
That's it — you did it. But hold on, I've got a few more tricks that'll take this to another level. These insider tips will help you perfect the sandwich every time, whether you're cooking for a crowd or just craving a gourmet lunch.
Insider Tricks for Flawless Results
The Temperature Rule Nobody Follows
Many people assume that the sandwich must be served hot, but the best flavor emerges when the meats are at room temperature. Let the meats rest for 30 minutes before assembly; this allows the flavors to develop fully and prevents the bread from becoming soggy when the juices run.
Why Your Nose Knows Best
Before you start assembling, give the sandwich a quick sniff. A hint of garlic, oregano, and cured meat should waft up. If the aroma feels flat, the mayo‑vinegar sauce may need more seasoning or a touch of fresh lemon juice to brighten it.
The 5‑Minute Rest That Changes Everything
After wrapping the sandwich, let it rest for 5 minutes before slicing. This short pause allows the flavors to mingle and the bread to absorb the dressing, creating a harmonious bite. I’ve seen people skip this step and end up with a sandwich that feels disjointed.
Layering for Balance
Always layer the meats first, then cheese, followed by tomato and lettuce. This order ensures that the heavier, saltier ingredients don’t drown out the lighter, fresh flavors. If you like a more dramatic presentation, alternate the layers for a checkerboard effect.
Crunch Factor
Add a handful of toasted pine nuts or crushed crackers on top of the lettuce before sealing the sandwich. This extra crunch keeps the sandwich interesting and adds a nutty flavor that complements the cured meats.
Serving Suggestion
Serve the sandwich with a side of tangy coleslaw or a crisp cucumber salad. The acidity and crunch of the salad cut through the richness of the meats, creating a well‑balanced plate. I always pair it with a cold glass of sparkling water for a refreshing finish.
Creative Twists and Variations
This recipe is a playground. Here are some of my favorite ways to switch things up:
Veggie‑Only Grinder
Swap the meats for grilled portobello mushrooms, roasted red peppers, and a spread of hummus. The result is a hearty, plant‑based sandwich that still delivers the crunch and flavor of a classic grinder.
Spicy Kick
Add sliced jalapeños or a drizzle of hot honey to the mayo‑vinegar dressing. The heat will contrast the smoky meats and add an extra layer of excitement.
Cheese Swap
Replace provolone with aged cheddar or gouda for a sharper, more complex flavor. The cheese will melt slightly, creating a gooey, decadent texture.
Breakfast Grinder
Use a toasted English muffin instead of a hoagie roll, add a fried egg, and top with a smear of pesto. This breakfast version brings a savory, protein‑rich start to your day.
Herb‑Infused Bread
Brush the inside of the roll with garlic butter before toasting, then sprinkle fresh basil and oregano on top. The herbaceous bread adds an aromatic layer that complements the sandwich’s core flavors.
Sweet & Savory Twist
Add a thin layer of fig jam or honey on the bottom half of the roll before layering the meats. The sweet undertone balances the salty, cured meats and creates a unique flavor profile.
Storing and Bringing It Back to Life
Fridge Storage
Wrap the assembled sandwich tightly in parchment paper or foil and store it in the refrigerator for up to 2 days. The bread will stay crisp, and the flavors will meld beautifully over time. If you’re packing for lunch, keep the sandwich in a separate container from the dressing to avoid sogginess.
Freezer Friendly
For longer storage, wrap the sandwich in foil and place it in a freezer bag. It will keep for up to 3 months. When ready to eat, thaw it in the refrigerator overnight and reheat in a toaster oven for 5 minutes to restore crispness.
Best Reheating Method
The secret to a great reheated grinder is a quick toast. Place the sandwich in a preheated oven at 350°F for 5 minutes, or use a panini press. Add a splash of water to the pan before heating; this steams the sandwich back to perfection, keeping the bread from drying out.