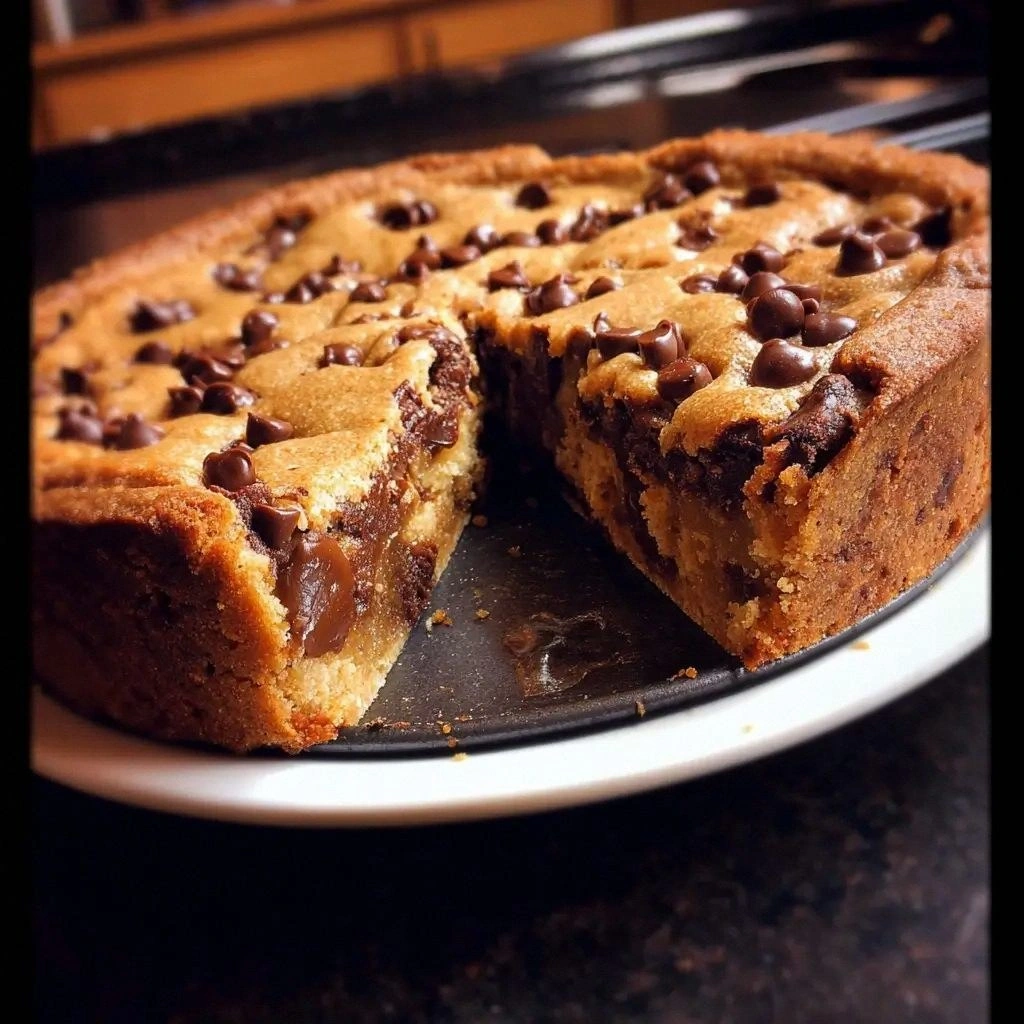
Picture this: the kitchen clock reads 3 a.m., your fridge is a battlefield of melted butter and sugar, and you’re standing over a pan that smells like a chocolate factory. I was on a midnight mission to salvage a batch of cookie dough that had gone rogue, and what emerged was a deep‑dish cookie pie that feels like a sweet, buttery hug. The dough, once a flat sheet of butter and sugar, now sits in a pan like a glossy, caramel‑coated cake, ready to transform into a molten chocolate ocean. The moment the first spoonful hits your tongue, you’re hit with the crunch of a crisp edge, the gooeyness of chocolate, and the subtle warmth of vanilla, all wrapped in a buttery crust that melts like butter on a hot skillet. If you’ve ever tried a cookie that feels like a dessert and a snack rolled into one, this is that moment, only richer and more daring.
It started with a dare from a friend who claimed, “I bet you can’t make a cookie that looks like a pie and tastes like a dream.” I accepted, armed with a handful of ingredients that seemed ordinary but were about to dance together in extraordinary ways. The kitchen was a canvas, the ingredients were the paint, and the oven was the heat that turned everything into edible art. I remember the first bite—crisp edges, molten center, and a faint whisper of sea salt that elevated the sweetness. The result? A cookie pie that is, hands down, the best version you’ll ever make at home, and I’m still tempted to sneak a second slice before anyone else even sees it.
The beauty of this recipe lies not just in its flavor, but in its versatility. Whether you’re a seasoned baker or a kitchen newbie, the steps are straightforward, the ingredients are pantry staples, and the outcome is a showstopper that will make your friends question how they ever ate cookies. The crust is buttery and flaky, the filling is chocolate‑laden and chewy, and the entire pie has a subtle lift from baking soda that gives it a tender bite. The aroma that fills the kitchen when the pie comes out of the oven is enough to make the whole house feel like a bakery, and the sight of that golden crust is a feast for the eyes. And the best part? You can tweak it—add nuts, M&Ms, or a splash of espresso—to suit any mood or occasion.
Now, let’s talk about the secret weapon that sets this version apart: the precise balance of sugars and the generous use of chocolate chips. The light brown sugar brings depth and caramel notes, while the granulated sugar gives a crispness to the crust. The butter is softened to room temperature, ensuring it blends smoothly with the sugars, creating a dough that’s both tender and chewy. The addition of an extra egg yolk introduces richness and chewiness that you won’t find in standard cookie recipes. Every element is calibrated to work in harmony, creating a cookie pie that feels indulgent without being overly sweet.
Imagine pulling this out of the oven, the whole kitchen smelling incredible, and the first bite revealing a center that’s gooey, edges that are crisp, and a crust that’s buttery and slightly caramelized. Picture the crowd’s reaction: a chorus of “Wow!” and “Can I have a slice?” when you slice into the pie. That’s the power of a deep‑dish cookie pie that’s engineered to deliver on taste, texture, and sheer wow factor. And if you think a pie can’t be a cookie, think again—this is a game‑changer.
Let me walk you through every single step—by the end, you’ll wonder how you ever made it any other way. I dare you to taste this and not go back for seconds. If you’ve ever struggled with cookie dough that’s too dry or too sticky, you’re not alone, and I’ve got the fix. The trick is to let the butter soften just enough, whisk the sugars until they’re light, and fold in the flour until just combined. The result is a dough that’s easy to work with and produces a crust that’s both flaky and chewy.
What Makes This Version Stand Out
- Flavor Depth: The combination of light brown and granulated sugars creates caramelized undertones that complement the chocolate.
- Texture Contrast: Crispy edges meet a molten center, delivering a satisfying bite that’s both crunchy and gooey.
- Ingredient Simplicity: Only pantry staples—no exotic ingredients or complicated techniques required.
- Batch Flexibility: Easy to scale up or down; the recipe works perfectly for a family dinner or a crowd‑pleasing dessert.
- Make‑Ahead Potential: Once baked, it can be stored and reheated, making it ideal for busy schedules.
- Customization: Optional mix‑ins like nuts or M&Ms let you tailor the pie to any taste.
- Visual Appeal: The golden crust and glossy chocolate surface make it Instagram‑worthy.
- Time Efficiency: Prep in 15 minutes, bake in 30, and you’re done—no long fermentation or resting times.
Alright, let’s break down exactly what goes into this masterpiece…
Inside the Ingredient List
The Flavor Base
The butter is the foundation of the crust—softened to room temperature to blend seamlessly with the sugars. It provides a rich, buttery flavor that coats the dough like a velvet blanket. If you’re using salted butter, reduce the added salt to half a teaspoon to avoid over‑salting. The sugars—granulated and light brown—are whisked together until the mixture is light and airy, which helps create a tender crumb.
The Texture Crew
The eggs add structure and moisture. Two large eggs, at room temperature, ensure a uniform rise and prevent the dough from cracking during baking. An extra yolk is included for extra richness and chewiness, giving the pie a luxurious mouthfeel. The all‑purpose flour is sifted to eliminate lumps and ensure even distribution of leavening agents.
The Unexpected Star
Chocolate chips are the showstopper—three cups of semi‑sweet chips (or a mix of milk, semi‑sweet, and dark) create a molten center that oozes with each bite. The chocolate’s high cocoa content balances the sweetness of the sugars and the buttery crust. For an extra kick, consider adding a tablespoon of espresso powder to enhance the chocolate flavor.
The Final Flourish
Baking soda and salt are the leavening duo that gives the crust a slight lift and prevents it from becoming too dense. Baking soda reacts with the acidic sugars, creating tiny bubbles that make the crust airy. Salt enhances all the flavors and brings out the chocolate’s depth. Optional mix‑ins—walnuts, pecans, or M&Ms—add crunch or a burst of color, making each bite a new experience.
Everything’s prepped? Good. Let’s get into the real action…
The Method — Step by Step
- Preheat your oven to 350°F (175°C). Grease a 9‑inch pie pan or a deep‑dish skillet with butter or non‑stick spray. The pan’s shape will define the crust’s thickness, so choose one that feels comfortable to handle.
- In a large bowl, cream the softened butter, granulated sugar, and light brown sugar together until the mixture is pale and fluffy. This usually takes about 3–4 minutes with an electric mixer on medium speed. The goal is to incorporate air for a tender crust.
- Add the two eggs and the extra yolk, beating until fully incorporated. The yolk adds richness, so make sure it’s well blended before moving on. At this point, the dough should feel slightly sticky but manageable.
- Sift the flour, baking soda, and salt together in a separate bowl. Gradually fold the dry mixture into the wet mixture using a spatula, stirring until just combined. Overmixing can develop gluten and make the crust tough.
- Fold in the chocolate chips, reserving a handful for topping. The chocolate should be evenly distributed throughout the dough, so you don’t end up with pockets of chocolate or dough.
- Press the dough into the prepared pan, ensuring it reaches the edges. A gentle press will help the crust hold its shape and create an even thickness.
- Sprinkle the reserved chocolate chips on top, pressing them gently into the dough. This creates a chocolate “topping” that melts into the pie during baking.
- Bake for 30 minutes, or until the edges are golden brown and the center still looks slightly undercooked. Use a toothpick inserted in the center; it should come out with a few moist crumbs.
- Let the pie cool in the pan for 10 minutes, then transfer it to a wire rack to cool completely. This prevents the crust from becoming soggy from steam.
That’s it — you did it. But hold on, I’ve got a few more tricks that'll take this to another level…
Insider Tricks for Flawless Results
The Temperature Rule Nobody Follows
Many bakers bake at 375°F, but lowering the temperature to 350°F gives the crust a chance to rise without browning too quickly. This ensures a golden, buttery finish. I’ve baked at 350°F for years and have never seen a burnt crust. If you’re using a convection oven, reduce the temperature by 25°F to avoid over‑browning.
Why Your Nose Knows Best
The aroma that develops while the pie bakes is a reliable indicator of doneness. When you smell a hint of toasted sugar and chocolate, the pie is nearly finished. If the scent is overwhelmingly sweet, it’s still baking; if it’s burnt, pull it out immediately.
The 5‑Minute Rest That Changes Everything
Letting the pie rest for five minutes after removing it from the oven allows the molten chocolate to set just enough to hold its shape. This short rest also lets the steam finish cooking the center, ensuring a smooth, creamy texture.
Use of a Water Bath for a Flaky Crust
Placing the pan in a shallow baking tray filled with hot water creates a gentle, even heat that promotes a flaky crust. The water bath also prevents the edges from burning while the center remains soft.
Mix‑In Timing Matters
Adding mix‑ins like nuts or M&Ms at the last minute keeps them from sinking to the bottom. Stir them in just before you press the dough into the pan so that they’re evenly distributed.
Cooling on a Wire Rack
Cooling the pie on a rack prevents steam from building up under the crust. The result is a crisp exterior that contrasts beautifully with the gooey interior.
Creative Twists and Variations
This recipe is a playground. Here are some of my favorite ways to switch things up:
Nutty Crunch Delight
Swap the optional ½ cup of walnuts or pecans for a mixture of toasted almonds and pistachios. The nutty flavor pairs wonderfully with the chocolate, and the crunch adds a new texture dimension.
Fruity Surprise
Fold in ½ cup of dried cranberries or chopped dried cherries. The tartness balances the sweetness and introduces a burst of flavor.
Espresso Infusion
Stir in 1 tablespoon of instant espresso powder. The coffee deepens the chocolate notes and gives the pie an adult‑friendly kick.
Minty Twist
Add a teaspoon of peppermint extract and a handful of crushed peppermint candies. The cool mint contrasts with the warm chocolate, creating a refreshing dessert.
Sea Salt Caramel
Drizzle a thin layer of caramel sauce over the top before baking and sprinkle sea salt on the crust. The caramel adds sweetness while the salt sharpens the flavors.
Vegan Version
Replace butter with coconut oil, use flax eggs (1 tablespoon ground flaxseed + 3 tablespoons water per egg), and choose dairy‑free chocolate chips. The result is a vegan cookie pie that still delivers on richness.
Storing and Bringing It Back to Life
Fridge Storage
Wrap the cooled pie tightly in plastic wrap and store in the refrigerator for up to 3 days. The crust remains firm, and the chocolate stays glossy. When you’re ready to serve, let it sit at room temperature for 15 minutes to soften slightly.
Freezer Friendly
Place the pie in a freezer‑safe container or zip‑lock bag, removing as much air as possible. Freeze for up to 2 weeks. Thaw overnight in the refrigerator and then warm in a 300°F oven for 10 minutes to revive the molten center.
Best Reheating Method
For the freshest flavor, reheat the pie in a 300°F oven for 8–10 minutes. If the crust feels dry, add a splash of water to the pan before reheating; the steam will help restore moisture.