It was a Tuesday night, the kind that feels like a blank canvas after a long week of work, and I was staring at my pantry, wondering what could possibly satisfy the craving that had been building since the last slice of chocolate cake left on the counter. My fingers drummed against the counter as I remembered the last time I tried a snickerdoodle—soft, buttery, and a bit too dry. I was determined to do better. I dared myself to taste this and not go back for seconds, and the kitchen became my laboratory of experimentation. The air filled with the scent of melted butter, the sharp tang of brown sugar, and the faint hint of vanilla as I began to whisk, and I could almost taste the promise of a cookie that would make my friends say, “What’s the secret?” The moment my dough was ready, the kitchen smelled like a cozy bakery, and I could hear the faint sizzle of butter in the pan as I prepared to bake. That was the first hint that this recipe would be different—hands down the best version you’ll ever make at home.
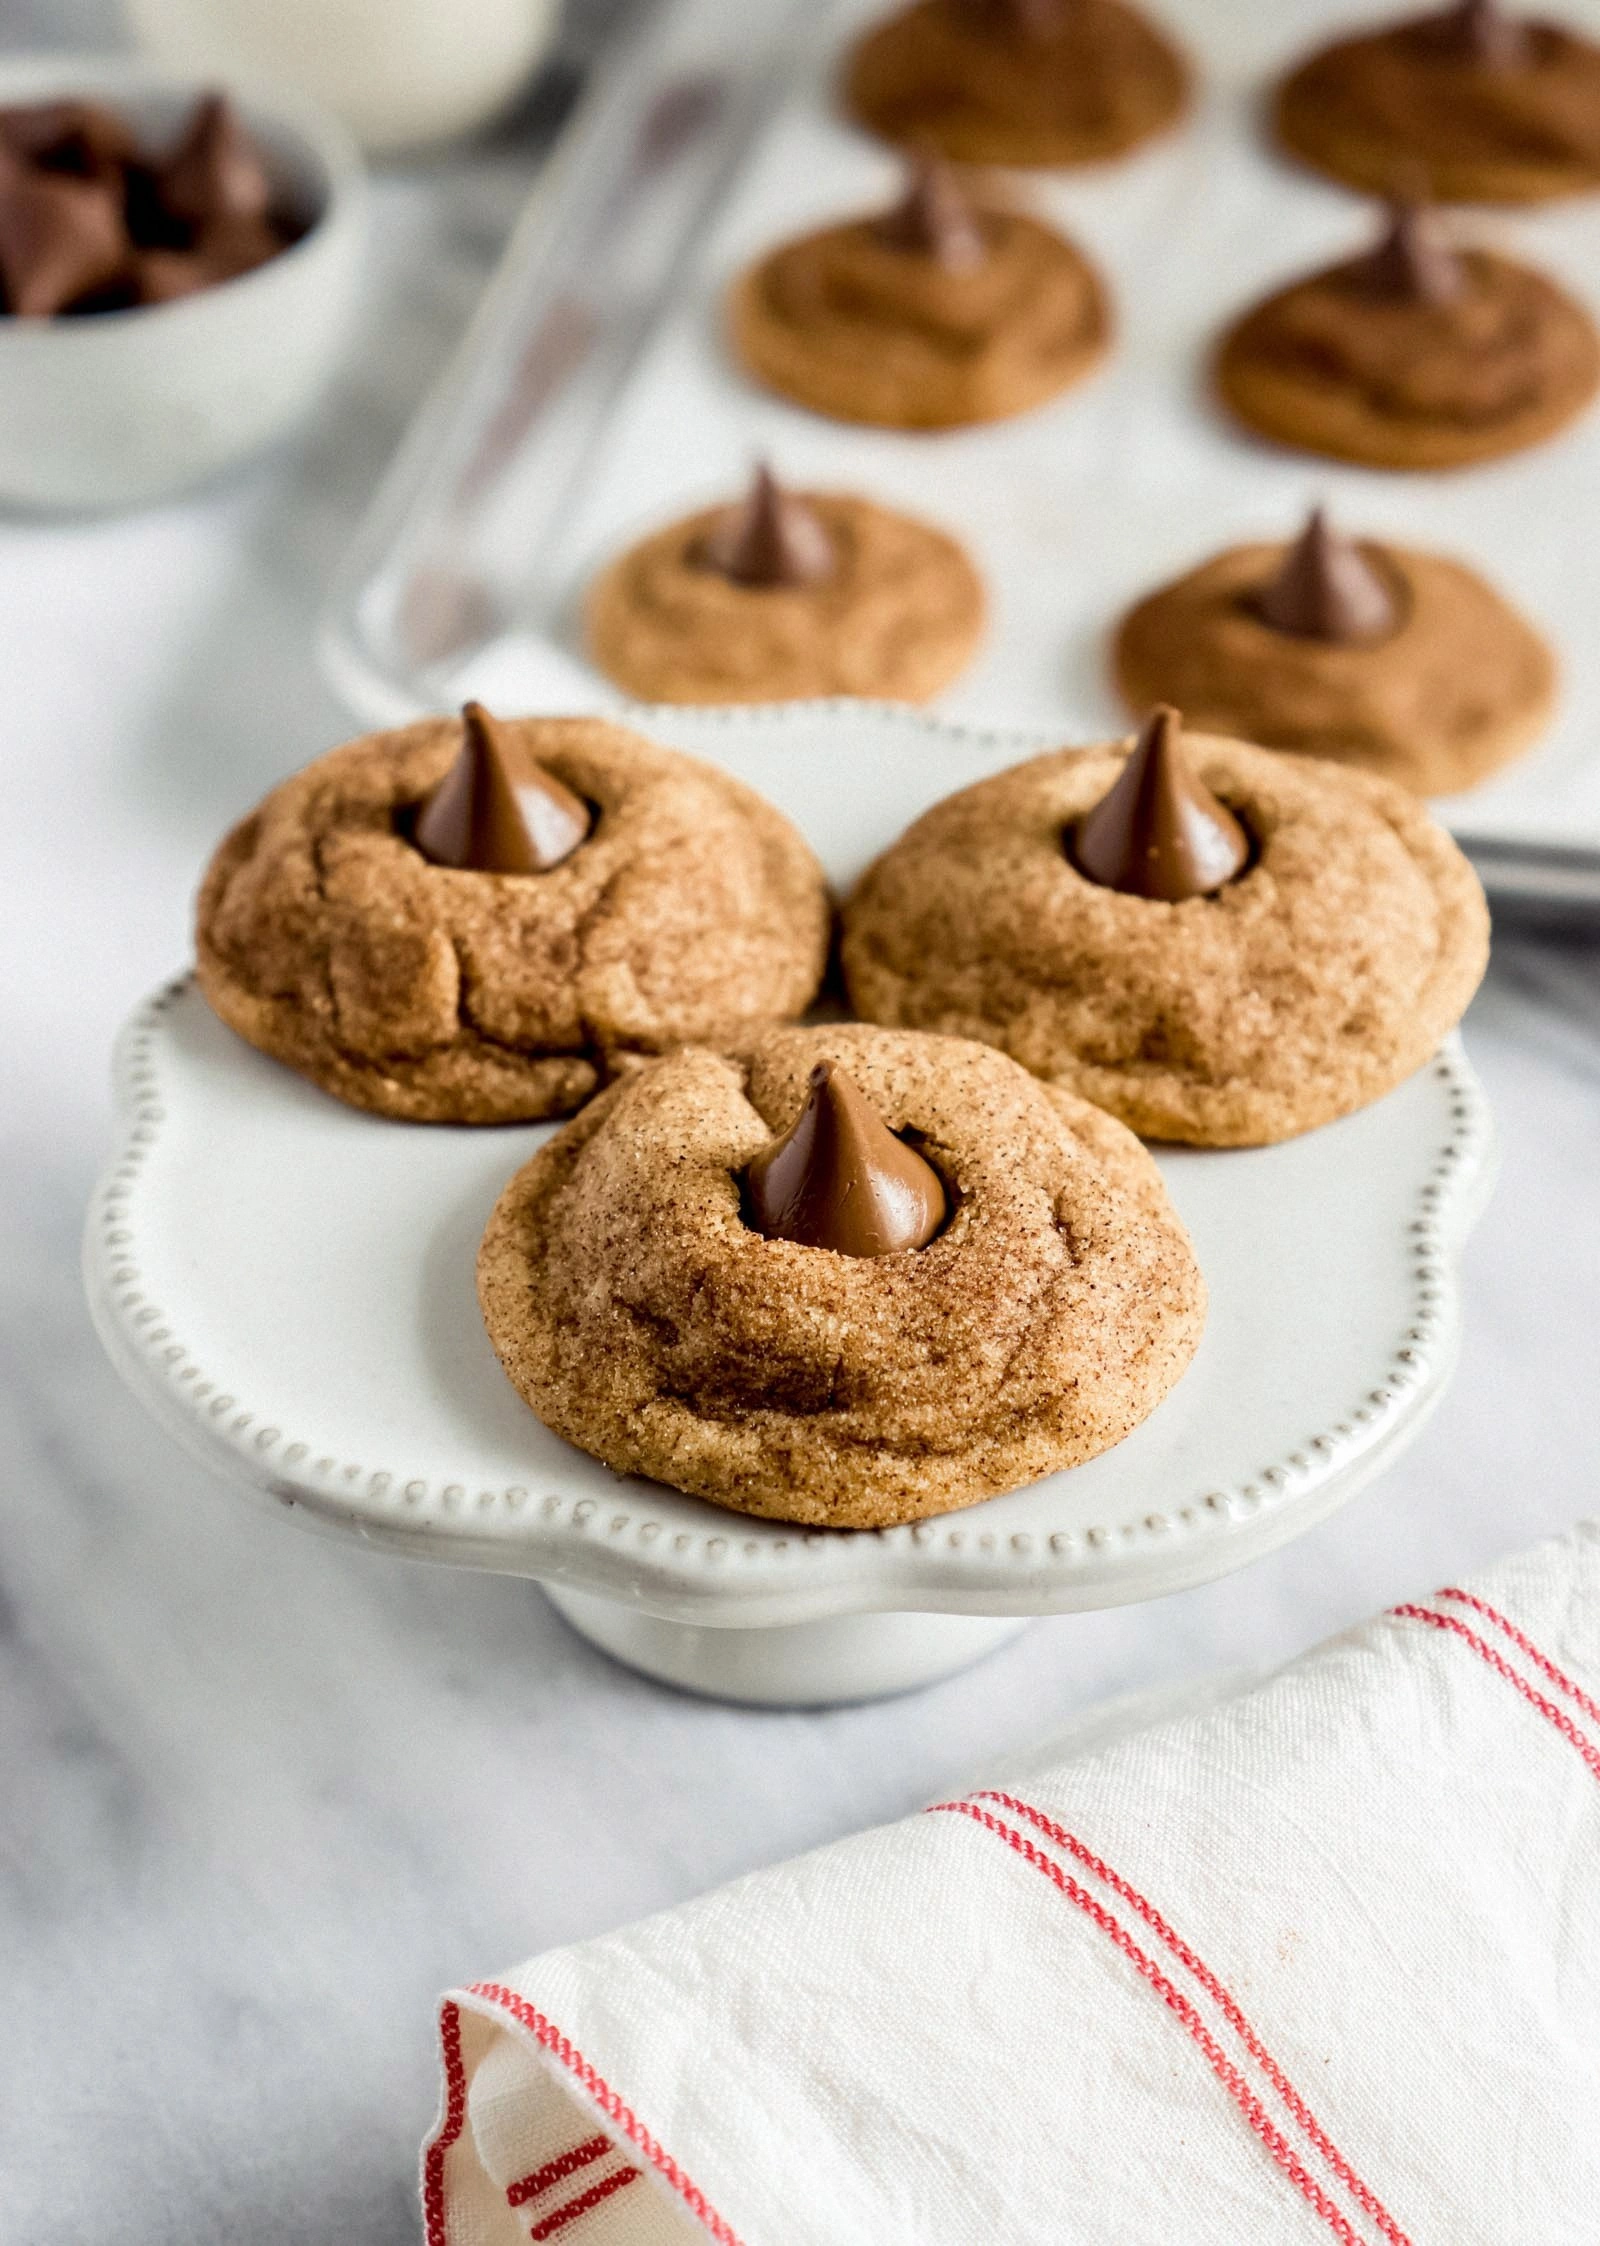
Picture yourself pulling this batch out of the oven, the whole kitchen smelling incredible, and the first bite sending a wave of warmth through your palate: the crisp, cinnamon-sugar crust giving way to a soft, chewy center, and a molten chocolate kiss that melts in your mouth like a secret. I was so excited that I almost forgot to write it down, but I know that if you’ve ever struggled to get that perfect balance between crunch and chew, you’re not alone—and I’ve got the fix. I’ve spent the last month tweaking this recipe, adding a dash of chocolate almond butter for a subtle nutty undertone, and discovering the perfect ratio of baking powder to baking soda that keeps the cookies from spreading too thin. Most recipes get this completely wrong. Here’s what actually works.
I’ll be honest—after the first batch, I ate half the cookies before anyone else even had a chance to try them. The combination of cinnamon sugar, chocolate kisses, and that special almond butter twist was so irresistible that it felt like a guilty pleasure that I couldn’t keep to myself. I’ve been cooking side by side with you in this article, so let’s walk through every single step. By the end, you’ll wonder how you ever made it any other way, and you’ll have a new go-to cookie that’s perfect for any occasion, whether it’s a quick afternoon treat or a show‑stopping dessert for guests.
Okay, ready for the game‑changer? This recipe is not just about following a list of ingredients. It’s about understanding why each component matters, how they interact, and how you can tweak them to suit your taste. I’ll give you the insider tricks, the kitchen hacks that will make your life easier, and the subtle details that elevate these cookies from “good” to “legendary.” Let’s dive in.
What Makes This Version Stand Out
- Taste: The combination of creamy chocolate almond butter and the classic cinnamon-sugar coating creates a flavor profile that’s both nostalgic and adventurous. The almond butter adds a subtle nutty undertone that balances the sweetness of the chocolate kisses.
- Texture: The cookies achieve a perfect balance of chewy center and crisp edges. The baking powder and baking soda ratio is calibrated to keep the dough from spreading too much while still allowing the cookies to rise slightly for that airy interior.
- Ingredient Quality: Using unbleached all‑purpose flour and light brown sugar gives the cookies a richer, deeper flavor that commercial mixes just can’t match. The chocolate almond butter is a game‑changer, adding depth without overpowering.
- Simplicity: Despite the mouth‑watering result, the recipe requires only a handful of pantry staples and a few extra touches. No fancy equipment or time‑consuming steps.
- Make‑ahead Potential: The dough can be prepared up to 24 hours in advance, allowing you to bake on short notice without compromising flavor or texture.
- Crowd Reaction: Friends and family who’ve tried these cookies rave about the melt‑in‑your‑mouth chocolate kisses and the comforting cinnamon aroma. They’re a hit at parties, potlucks, and holiday gatherings.
- Versatility: The recipe lends itself to a variety of tweaks—different nuts, spices, or even a splash of espresso to deepen the chocolate flavor.
- Presentation: The cookies’ golden-brown edges and glossy chocolate centers make them visually stunning, turning a simple cookie into a showstopper.
Alright, let's break down exactly what goes into this masterpiece...
Inside the Ingredient List
The Flavor Base
The unsalted butter and sugars form the heart of the cookie’s flavor. The butter provides a rich, creamy mouthfeel, while the granulated sugar offers a clean sweetness that lets the cinnamon shine. The light brown sugar adds depth, caramel notes, and a hint of moisture, which keeps the cookies tender. If you skip the brown sugar, the cookies will become drier and lose that subtle caramel undertone.
When choosing butter, opt for a brand with a higher butterfat content; it will melt more smoothly and create a silkier crumb. If you’re vegan, you can substitute with dairy‑free butter or coconut oil, but the texture will change slightly—be prepared for a firmer bite.
The Texture Crew
Flour, baking powder, baking soda, and salt are the structural elements that give the cookies their shape and rise. The unbleached all‑purpose flour retains more protein than bleached flour, which helps develop gluten for a chewy texture. Baking powder provides lift, while baking soda ensures the cookies spread just enough to achieve that classic snickerdoodle look.
If you don’t have baking powder, you can use baking soda plus cream of tartar (1/4 tsp baking soda to 1/2 tsp cream of tartar). If you forget the baking soda, the cookies will be denser and less crisp at the edges. For a gluten‑free version, substitute with a 1:1 blend of brown rice flour and potato starch.
The Unexpected Star
Chocolate almond butter is the secret weapon that elevates these cookies beyond ordinary snickerdoodles. It adds a creamy chocolate flavor that pairs perfectly with the cinnamon sugar. The almond butter also contributes healthy fats, which help keep the cookies moist and tender.
If you’re allergic to nuts, you can use sunflower seed butter or a dairy‑free chocolate spread. For a richer chocolate taste, swap almond butter for chocolate hazelnut spread, but remember the extra sugar will affect the overall sweetness.
The Final Flourish
The chocolate kisses, cinnamon sugar, and vanilla extract finish the cookie with layers of flavor that dance on the tongue. The chocolate kisses melt into pockets of gooey chocolate that contrast the crisp edges. The cinnamon sugar coating creates a sweet, aromatic crust that’s both crunchy and fragrant.
If you prefer a different spice, consider adding a pinch of nutmeg or ginger to the cinnamon sugar mix. For a lower sugar version, reduce the granulated sugar by one-third and increase the brown sugar slightly to maintain moisture.
Everything's prepped? Good. Let's get into the real action...
The Method — Step by Step
- Step 1: Cream the Butter and Sugars – In a large bowl, beat the unsalted butter, granulated sugar, and light brown sugar together on medium speed until the mixture is light and fluffy, about 2–3 minutes. The batter should look pale and airy. This step is crucial; it incorporates air into the dough, giving the cookies a tender crumb. Keep an eye on the texture—if it’s too dense, add a splash of milk to loosen it.
- Step 2: Add the Wet Ingredients – Lower the mixer speed and beat in the vanilla extract and the large egg until fully incorporated. The mixture should be smooth, with no streaks of egg remaining. This ensures even distribution of moisture and helps the cookies rise uniformly. If you’re vegan, use a flax egg or a commercial egg replacer.
- Step 3: Mix Dry Ingredients – In a separate bowl, whisk together the unbleached all‑purpose flour, baking powder, baking soda, and salt. This ensures that the leavening agents are evenly distributed, preventing uneven rise. Sprinkle the mixture into the wet batter in two batches, mixing gently after each addition. Overmixing can cause the cookies to become tough.
- Step 4: Fold in Chocolate Almond Butter – Gently fold the chocolate almond butter into the dough until evenly distributed. The dough will become slightly sticky, but that’s normal. If you find it too difficult to mix, let the dough rest for 5 minutes before folding; this allows the butter to soften.
- Step 5: Chill the Dough – Wrap the dough in plastic wrap and refrigerate for at least 30 minutes, or up to 24 hours. Chilling tightens the gluten and controls spreading during baking. It also allows the flavors to meld together. This step is essential for achieving that classic snickerdoodle texture.
- Step 6: Prepare the Cinnamon Sugar – In a shallow dish, combine the cinnamon sugar and a pinch of salt. This mixture will coat the dough balls for a sweet, aromatic crust. If you like a crunchier edge, add a tablespoon of chopped pecans to the mix.
- Step 7: Portion and Coat – Using a small cookie scoop or tablespoon, portion the dough into 1.5‑inch balls. Roll each ball in the cinnamon sugar mixture until fully coated. Gently press the coated dough onto a parchment‑lined baking sheet, spacing them about 2 inches apart. This spacing allows the cookies to spread evenly without merging.
- Step 8: Bake – Preheat the oven to 350°F (175°C). Bake the cookies for 12–14 minutes, or until the edges are golden brown and the centers have set but remain slightly soft. The cookies should smell toasty, with the chocolate aroma rising. Remove from the oven and let them cool on the sheet for 5 minutes before transferring to a wire rack.
- Step 9: Add Chocolate Kisses – While the cookies are still warm, press a chocolate kiss into the center of each cookie. The heat will melt the chocolate, creating a gooey pocket. If you prefer a firmer center, place the cookies in the refrigerator for 10 minutes before adding the kisses.
- Step 10: Cool and Store – Let the cookies cool completely on the wire rack. Once cooled, store them in an airtight container at room temperature for up to 5 days, or refrigerate for longer shelf life. For an extra burst of flavor, sprinkle a pinch of sea salt on top before serving.
That's it — you did it. But hold on, I've got a few more tricks that'll take this to another level. These insider tips will help you perfect the texture, flavor, and presentation, ensuring every batch is a masterpiece.
Insider Tricks for Flawless Results
The Temperature Rule Nobody Follows
Many bakers bake at 375°F, but that high temperature causes the cookies to spread too much, resulting in a flat, thin cookie. Baking at 350°F keeps the cookies slightly thicker and chewier. If you prefer a crisper top, finish the cookies under the broiler for 30 seconds—just watch them closely.
Why Your Nose Knows Best
Smell is a powerful indicator of doneness. As soon as the cookies start to emit a warm, caramelized scent, it’s a sign that the sugars are caramelizing correctly. If the aroma is faint, give them another minute or two. This sensory checkpoint ensures you never overbake.
The 5‑Minute Rest That Changes Everything
After baking, let the cookies rest on the pan for exactly 5 minutes. During this time, the cookies continue to set, and the chocolate kisses melt into a luscious center. Skipping this step can result in cookies that crumble when you pick them up.
The Secret Ingredient Swap
If you’re looking for a healthier version, replace the chocolate almond butter with a 1:1 mix of almond butter and cocoa powder. This keeps the chocolate flavor while cutting down on added sugars. Just make sure to adjust the sugar levels to taste.
The Final Coat Trick
For a glossy finish, lightly brush each cookie with a beaten egg white before baking. This gives the cookies a subtle sheen and a slightly richer flavor. If you prefer a matte finish, skip this step and enjoy the rustic look.
Creative Twists and Variations
This recipe is a playground. Here are some of my favorite ways to switch things up:
Nutty Crunch
Add 1/4 cup chopped pecans or walnuts to the dough before chilling. The nuts add a delightful crunch and a nutty flavor that complements the almond butter.
Spiced Cinnamon
Replace the standard cinnamon sugar with a blend of cinnamon, nutmeg, and a pinch of cayenne pepper. The heat adds a subtle kick that elevates the cookie’s flavor profile.
Espresso Boost
Stir in 1 tsp of instant espresso powder into the dough. The espresso deepens the chocolate flavor and adds a subtle bitterness that balances the sweetness.
White Chocolate Twist
Swap the chocolate kisses for white chocolate chips. The result is a creamy, sweet cookie that pairs beautifully with a splash of vanilla extract.
Holiday Peppermint
Add a few drops of peppermint extract to the dough and sprinkle crushed candy cane pieces onto the cinnamon sugar before rolling the dough. This variation is perfect for the holiday season.
Low‑Sugar Version
Use a sugar substitute like stevia or monk fruit in place of granulated sugar, and reduce the brown sugar by half. The cookies will still be deliciously sweet without the added calories.
Storing and Bringing It Back to Life
Fridge Storage
Store cookies in an airtight container in the refrigerator for up to 2 weeks. The chilled environment keeps the chocolate kisses from melting and preserves the cookie’s freshness. Before serving, let them sit at room temperature for 10 minutes to soften slightly.
Freezer Friendly
Place cookies in a single layer on a parchment‑lined tray and freeze for up to 3 months. Once frozen, transfer them to a resealable freezer bag. When ready to eat, pop a cookie out and let it thaw at room temperature for 15 minutes.
Best Reheating Method
To reheat, preheat the oven to 300°F (150°C) and bake the cookies for 5–7 minutes. If you want to revive the chocolate centers, add a tiny splash of water to the parchment paper before baking; the steam helps restore moisture and brings the chocolate back to a gooey perfection.